meet me in purgatory strawberry buttercreams

It’s finally Spring, can you believe it? Yeah me neither. So long cold, dark and please don’t make me get out from under these nice warm covers days of Winter. Hello sunny, bright and full of possibility days of Spring. 

The past six months have been a whirlwind. I’ve been so busy with work, life and family that I haven’t been able to properly focus on blogging or even cooking for that matter, and that’s been a real disappointment to me. The older I get the more clearly I’ve come to realize that life is far too short to live in a state of disappointment. So… I‘ve decide to embrace the renewal, rebirth and revitalized spirit of Spring and to find time for the little things that bring me the greatest satisfaction. To get up a bit early just to have some quiet time to drink coffee on the deck, to putter around in the garden rather than spend the time straightening up the house and to cook (and blog) far more often. It won’t be easy but in my experience anything worth doing often requires a bit of extra effort. I’m approaching this venture determined to just stop and slow down. As I was making this personal declaration a friend happened to post this tweet: “People who insist on making homemade Easter candy will never be welcome in the kingdom of heaven.” After I finished laughing I decided to take this as a sign that the universe wanted me to make a little Easter candy. And so I did.

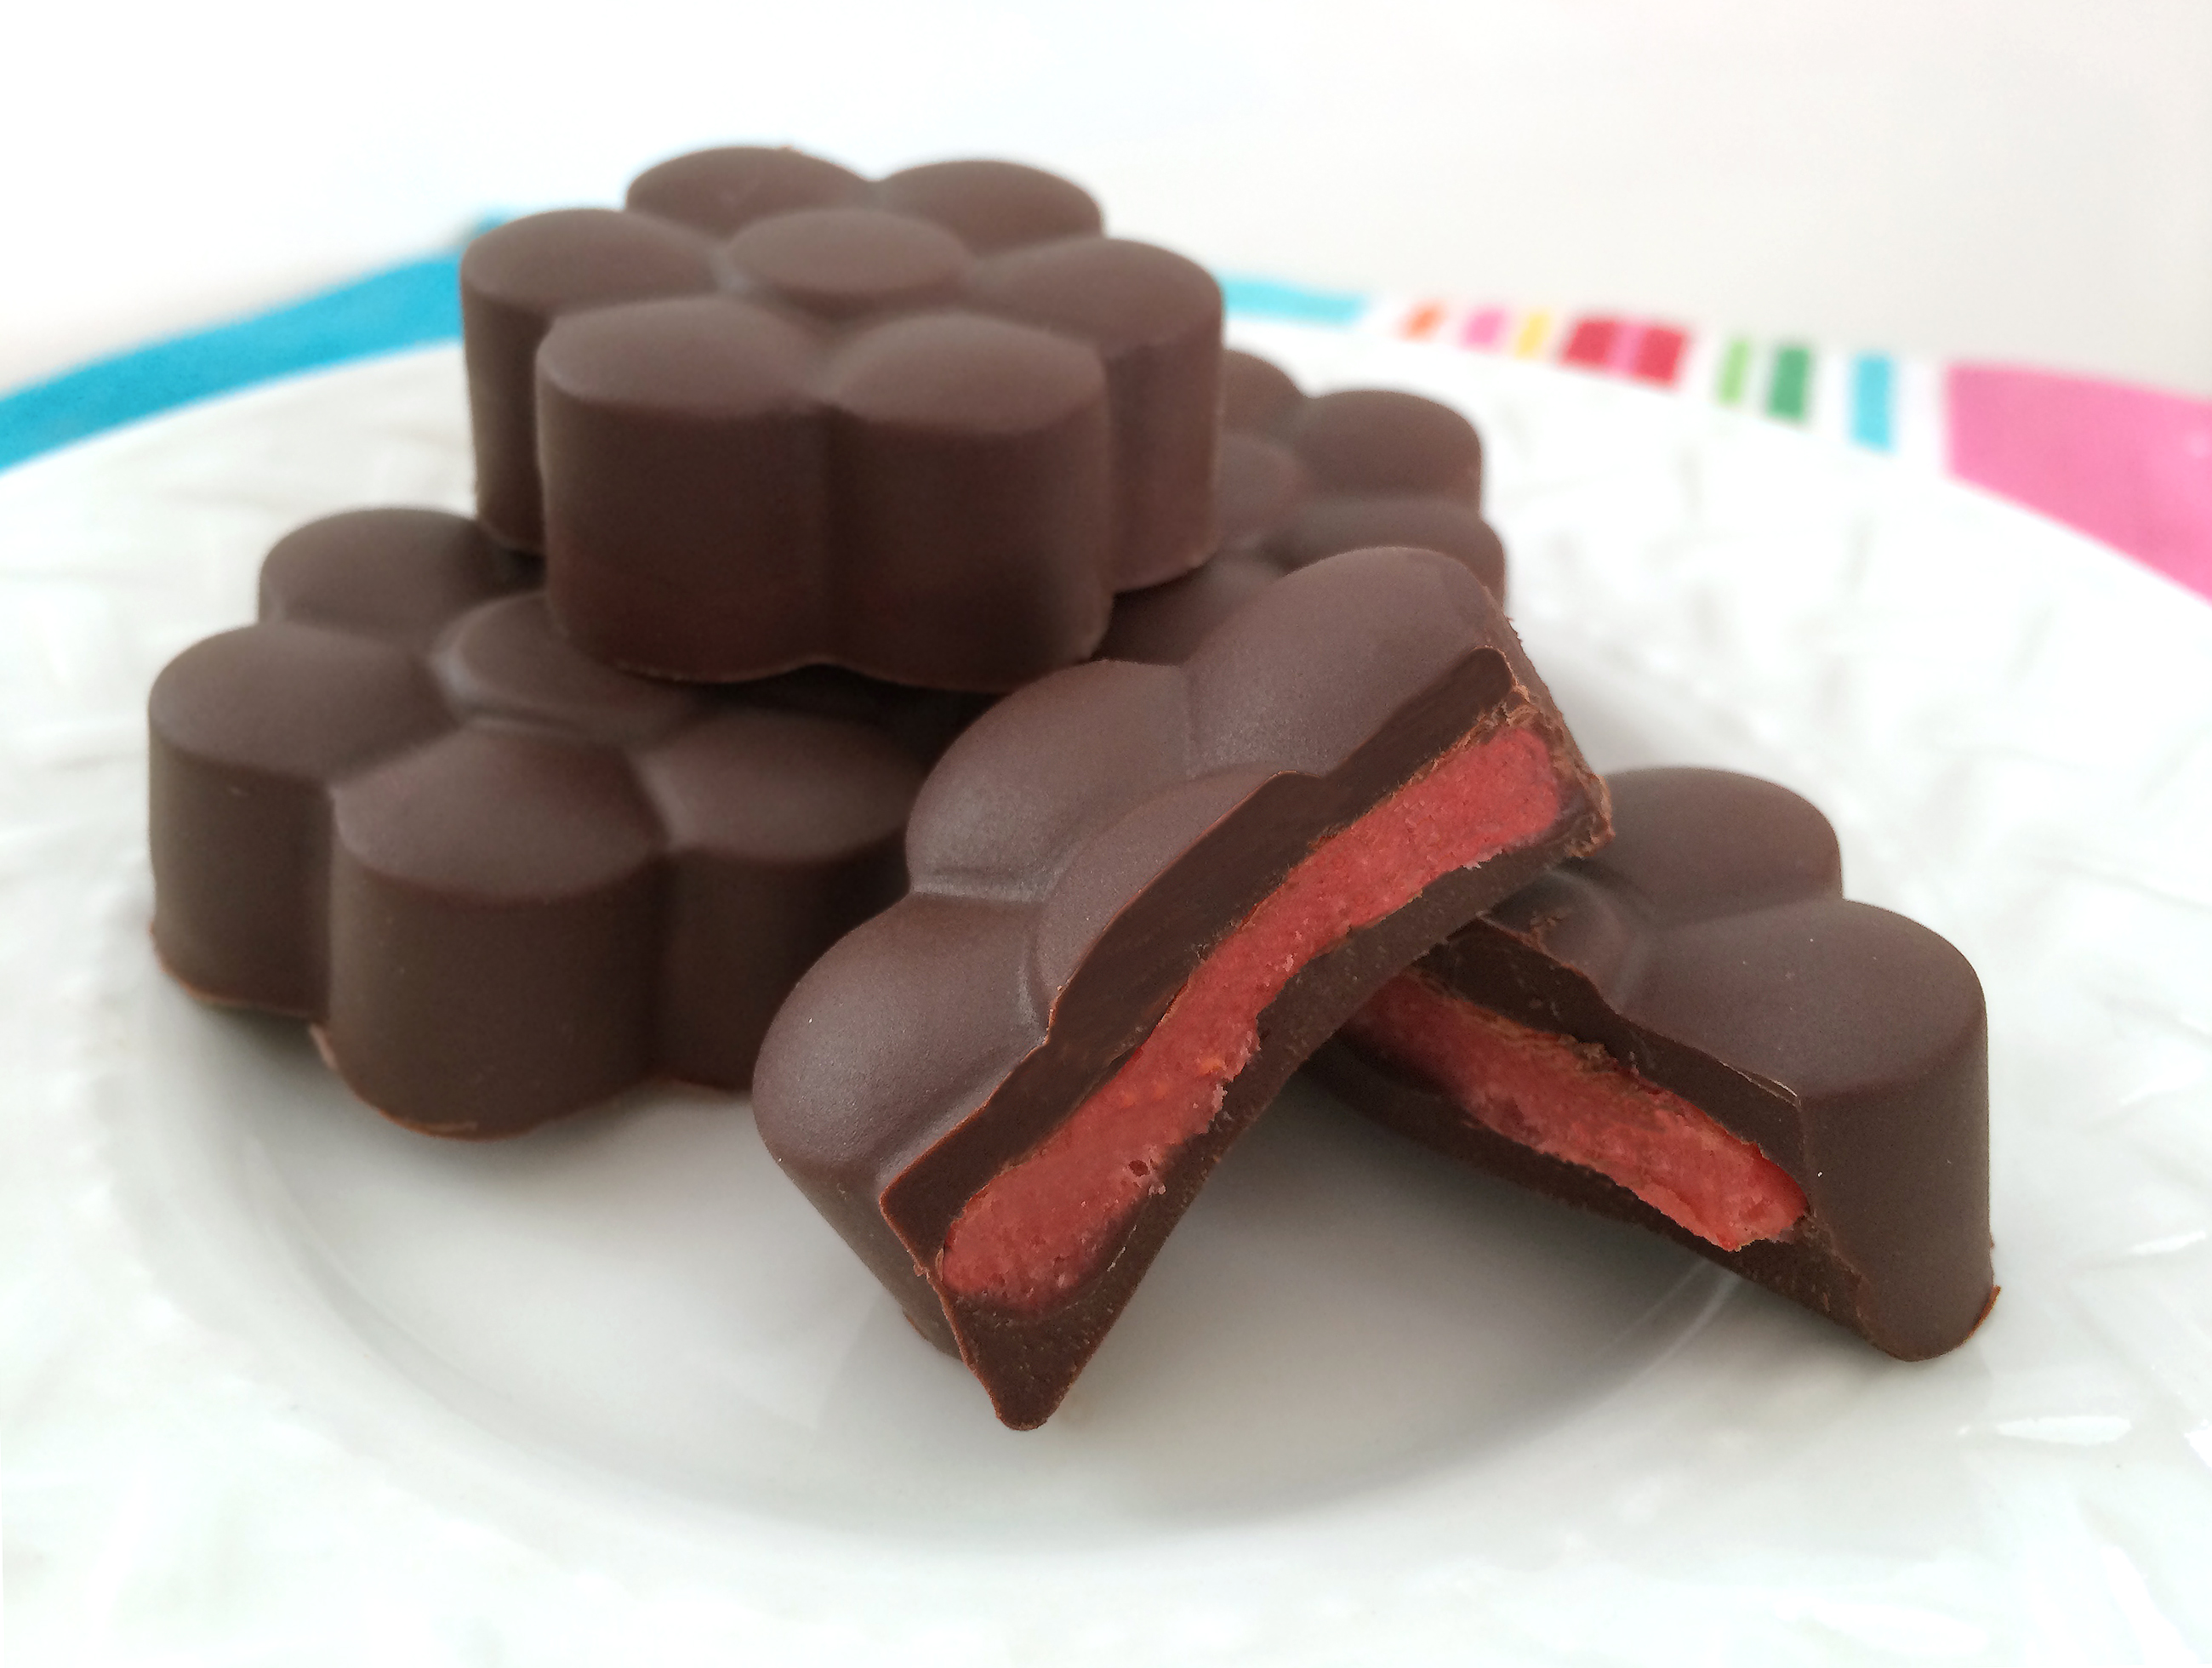
In my mind Easter is synonymous with chocolate. Not jelly beans, marshmallow chicks or cream eggs. Nope, for me its all about chocolate. In the past I’ve made peanut butter cups and chocolate almond bark. I’ve dipped fresh cherries and tangerine segments in dark chocolate and I’ve made simple chocolate lollipops. This time around I wanted to make something a bit more extravagant. This time I wanted to make something that tasted fresh like the season. This time I wanted candy so good it would redeem me from my months of lack luster cooking. So this time I made chocolates filled with homemade strawberry buttercream. And they were delicious— Kingdom of heaven be damned.

Strawberry Buttercream Chocolates
I used Trader Joe’s freeze-dried strawberries for this recipe. They also sell freeze-dried blueberries and raspberries, which would no doubt also make a delicious filling.

strawberry creams

1  1.2 oz package freeze-dried strawberries
1 cup powered sugar
pinch salt
4 tbsp. unsalted butter, softened
2 tbsp. heavy cream
3 4 oz. bars bittersweet or dark chocolate
special equipment: silicone candy mold

  1. Place the candy mold in the refrigerator to chill. Pour the strawberries into the bowl of a food processor (being sure to remove the silica packet) and process to a fine powder. Add the powdered sugar and pulse a few times before adding the salt, butter and cream. Turn the food processor on and allow to process until the mixture gathers into a loose ball, this takes a little time so be patient.
  2. Wrap the ball of filling in plastic wrap and place in the refrigerator to chill while you melt the chocolate.
  3. Break up the chocolate and use a double-boiler (or a glass bowl placed over a pot of simmering water) to melt the chocolate, stirring frequently. When the chocolate is totally melted and smooth remove from heat.
  4. Remove the chilled mold from the refrigerator and fill each opening halfway with chocolate (I used a little paint brush to spread the chocolate up the sides.) Place the filled mold back in the refrigerator for 15 minutes to set.
  5. Remove the chocolate mold and the wrapped filling from the refrigerator. Pinch off a 1/2 teaspoon sized piece of filling, roll it into a ball and carefully press it into each of the set chocolates. Cover the filling with additional chocolate (you may need to warm it again) filling each mold to the top. Place the filled mold back in the fridge to chill until firm, about 1 hour.
  6. Carefully pop finished chocolates out of mold and enjoy!
Advertisement

the hercules of soft pretzels

Beginnings and endings beg for reflection, that’s just how it is. They force you to pause for a moment and contemplate the ups and downs of the past and the changes you hope for in the future. I don’t typically make formal New Year’s resolutions, however there are a few little things I’d like to see happen over the next twelve months. For instance— I would like to be a more patient mother between the hours of 8 and 9:00 a.m. (getting out of the house on a school morning without yelling would feel like a minor miracle!). I would like to laugh at the ridiculous more and worry about the clearly inalterable less. I would like to make plans with my girlfriends at least once a month to go out for drinks, dinner or just adults only ice skating. And I would like to once and for all achieve success and finally fulfill all my bread baking ambitions.

I’ve told you before about my obsession with and repeated failures at bread baking. I truly and with all my heart long to successfully make an eye-rollingly delicious, crusty on the outside light and wonderful on the inside, loaf of bread. A simple seeded boule or a rustic baguette, bread so amazing it could easily serve as the meal, rather than just the accompaniment to it. I’ve even joked that I either need a bread baking class or an intervention. As luck would have it a baking studio offering bread classes recently opened near my house, so perhaps there is already a glimmer of hope on the horizon. In the meantime I plan to keep plugging along on my own, hoping that one of these recipe will be “the one”. With that in mind I recently decided to attempt to make soft pretzels. I’ve been toying with the idea and collecting pretzel recipes for some time, but something always stopped me from giving it a go. Then along came Hercules (the winter storm not the Greek hero) and the timing just seemed right.

My first inkling that I might be onto something was when my dough actually doubled in size in the amount of time the recipe suggested. Next it was when years of making play-dough snakes finally paid off and my little ball of dough quickly turned into something resembling a pretzel. (Actually at this point I was so excited at the prospect of a successful outcome that I called the kids to come checkout my pretzels!) After a quick baking soda bath and a few minutes in the oven, the moment I dread with every bread recipe I attempt was upon us. Would it be another baking debockle or would 2014 be my year?

♫ Oh yeah. Uh huh.  I baked a pretzel. ♪  It’s my birthday. ♫…

Soft Rosemary Pretzels with Cheddar Sauce
Even if you’re not a big fan of rosemary you should still consider using some. The flavor is really subtle and it’s the difference a good pretzel and an extraordinary one.

pretzels2

1 1/2 cups warm water
2 tbsp. light brown sugar
1 package active dry yeast (2 1/4 tsp.)
6 tbsp. unsalted butter, melted
2 1/2 tsp. salt
4 1/2 cups all-purpose flour
1 tbsp. finely chopped fresh rosemary
Canola oil, to grease bowl
3 quarts water
2/3 cups baking soda
1 egg, beaten + 1 tbsp. cold water
coarse salt

2 tbsp. butter
2 tbsp. all-purpose flour
1 1/4 cups milk, warmed
1/2 tsp. salt
1 tsp. garlic powder
4 oz. sharp Cheddar cheese, shredded
4 oz. Monterey Jack cheese, shredded

  1. Combine the water, sugar, yeast, and butter in the bowl of a stand mixer and whisk to combine. Let sit for 10 minutes.
  2. Add the salt, flour, and rosemary to the mixture and mix on low-speed until combined. Increase the speed to medium and continue kneading until the dough is smooth and it has formed a ball. (If the dough appears too wet, add additional flour, 1 tablespoon at a time.)
  3. Coat a large bowl with canola oil, add the dough and turn to coat with the oil. Remove the dough from the stand mixer bowl, knead a few times and place in the oiled bowl. Cover with plastic wrap and place in a warm spot until the dough doubles in size. This will take about an hour and a half. (I usually warm my oven, turn it off and place the covered bowl inside it to allow it to rise.)
  4. When the dough has doubled preheat the oven to 400°F. Line two cookie sheets with parchment and set aside. Bring the water to a boil in a large stockpot.
  5. Divide the dough in half, then dived the halves into eight equal pieces. (Cover the bowl with a towel while working.) Roll each piece into an 12” rope, take the right side and cross over to the left, twist together and bring to the bottom. Pinch onto the curved bottom piece to create a pretzel shape.
  6. Slowly add the baking soda to the boiling water. Boil the pretzels in the water solution, 2 at a time for 30 seconds. Remove with a large flat slotted spatula and place on the prepared cookie sheet. Brush the tops of each pretzel with the egg wash, sprinkle with coarse salt and bake for 18-22 minutes or until pretzels are rich golden brown.
  7. Remove pretzels from oven and let cool on a wire rack.
  8. To make the cheese sauce: Melt the butter in a small saucepan over medium heat. Whisk in the flour and cook until it’s a golden brown. Add the warm milk, salt and garlic powder and whisk until the mixture thickens. Add the shredded cheese and stir until the cheese is melted and smooth. Serve alongside the warm pretzels.

*adapted from two peas and their pod

color me naturally

Tomorrow is my littlest loves birthday. We started celebrating a week ago with a party just for her school friends, followed by cupcakes and yours truly reading stories to her class on Thursday and culminating with a family party tomorrow. Yeah I agree, that’s an awful lot of partying for any little girl, but you do only turn 4 once!

I’m sure it won’t surprise you to hear that I didn’t go to the bakery for any of her birthday goodies, by now you know that’s just not how I roll. Actually littlest love requested cupcakes for the friend party (chocolate with yellow frosting) as well as the school party (chocolate with pink frosting), which made me happy since they would be way easier to make and transport than a cake. The family party on the other hand is going to have a full-blown labor-intensive-just-might-send-me-over-the-edge Imagination Movers guitar cake. (Yeah, wish me luck!)

First things first, I believe in boxed cake mix—there I said it. Sure you can make your cake from scratch and it will no doubt be fantastic, but the people at Betty Crocker make a pretty fine chocolate cake mix so why not save yourself a few steps. However (and if you know me you already saw this tweak coming), when I make chocolate cake I always add a cup of mini chocolate chips to the batter. It takes perfectly acceptable boxed mix and bumps it up to something just a bit richer, tastier and more like homemade. Okay, so that takes care of the cake, now for the frosting.

I like buttercream frosting, but while buttercream seems like a no-brainer it’s actually a bit tricky. It can easily go from fluffy and light to too sweet, too greasy or too gritty. After much trial and error I finally found a vanilla buttercream recipe that seems near perfect; sweet but not overly so and light, creamy and easy to spread. Now to just make it a lovely color… As a rule I do not use food coloring. It’s pure chemicals, it increases hyperactivity in children and it’s considered carcinogenic. “In the early 1990s, FDA and Canadian scientists found that Red 40, Yellow 5 and Yellow 6, the three most widely used dyes, were contaminated with likely human carcinogens. And while many foods, such as M&M’s and Kellogg’s Hot Fudge Sundae Pop Tarts, include as many as five different dyes, even today the carcinogenic potential of such combinations has not been tested.” Pretty frightening right? And M&M’s are one of my “have to eat ’em till I’m sick” vices (same goes for potato chips, but that’s a story for another day!) The fact is artificial dyes are truly unhealthy, so much so that in Europe food with artificial colors must carry warning labels! So thanks for the easy solution, but no thanks. Instead I always try to use natural dyes for my frosting. I’ve had success in the past with puréed strawberries and raspberries to create pink frosting, dark chocolate cocoa powder for black frosting (think Darth Vader cake) and I just used turmeric powder to make littlest loves requested yellow frosting. I was a little worried about the turmeric flavor coming through but everyone (kids included) seemed to love it and couldn’t believe when I came clean about the secret ingredient.

So there you have it, the world is a colorful place and now you don’t need to rely on Red 40 and Blue 1 to make it even more so! And in case you’re really interested; I’ve read you can use puréed spinach for green frosting, carrot juice for orange and cooked red cabbage for purple. I haven’t given any of those combos a try yet but I just may, so be prepared the next time I offer you green cupcakes…

Pale Pink Buttercream Frosting
Using berries to color frosting gives it a lovely flavor as well as pale pink color. If you want a deeper shade of pink double the strawberries, but add the additional berries slowly. Too much moisture and your buttercream will be a watery mush.

natural color cupcakes

1 cup diced strawberries
2 sticks of unsalted butter, room temperature
3 cups powdered sugar
2 tsp. vanilla
2 tbsp. heavy cream

  1. Finely dice the strawberries. Place them in a small saucepan and cook over a low flame for 25 minutes until all the berries have broken down and released juices. (Stir and smoosh berries with spoon every few minutes to speed up the process.)
  2. Pour the berry slurry into a mesh strainer, press out as much of the juice and pulp as possible and let cool. (Be sure to save what’s leftover in the strainer for spreading on toast or adding to your yogurt the next morning.)
  3. In a stand mixer fitted with a whisk, cream the butter 3 minutes on high until fluffy. Add the sugar one cup at a time and mix on low-speed until well blended. When all the sugar has been added increase the speed to medium-high and beat for another 4-5 minutes.
  4. Scrape down the bowl and add the vanilla and cream, continue to beat on medium speed for 1 minute more. Slowly add the puréed strawberries until frosting is ideal spreading consistency and shade of pink, continue beating on high until frosting is light and fluffy, 2-3 minutes more.

*All of these recipes make enough frosting for roughly 30 cupcakes or one medium cake.

Dark Chocolate Buttercream Frosting
This is the richest most decadent chocolate buttercream you’ll ever taste. It’s serious stuff, not for the faint of heart.

2 sticks of unsalted butter, room temperature
2 1/4 cups powdered sugar
1 cup dark chocolate cocoa powder
2 tsp. vanilla
3 tbsp. heavy cream

  1. In a stand mixer fitted with a whisk, cream the butter 3 minutes on high until fluffy. Add the sugar and the cocoa one cup at a time and mix on low-speed until well blended. When all the sugar/cocoa has been added increase the speed to medium and beat for another 4-5 minutes.
  2. Scrape down the bowl and add the vanilla and cream, continue to beat on high until frosting is light and fluffy, 2-3 minutes more.

Yellow Buttercream Frosting
I could detect the subtle taste of turmeric when I tried the frosting alone, but once it’s on the cake it just tastes like good ‘ol buttercream.

2 sticks of unsalted butter, room temperature
3 1/2 cups powdered sugar
2 tsp. vanilla
3 tbsp. heavy cream
1/2-1 tsp. turmeric powder

  1. In a stand mixer fitted with a whisk, cream the butter 3 minutes on high until fluffy. Add the sugar one cup at a time and mix on low-speed until well blended. When all the sugar has been added increase the speed to medium and beat for another 4-5 minutes.
  2. Scrape down the bowl and add the vanilla and cream, continue to beat on medium speed for 1 minute more. Slowly add the turmeric powder until you achieve the ideal shade of yellow and continue beating on high until frosting is light and fluffy, 2-3 minutes more.

*adapted from food network

chocolate + nutella = love

A few weeks ago my son had a lesson on Cinquain Poems at school. He was so taken with the project that he came home and decided to compile an entire book of poems. Most of the poems revolved around food (he is the son of a food blogger after all) and this one was my favorite:

Pizza.
Very tasty.
Cook it well.
It is very greasy.
Pepperoni.

I was so inspired by his poetry that I decided to write a few Cinquain Poems of my own. I hope you enjoy them and I wish you the sweetest of Valentine’s Day’s!

Chocolate,
My weakness.
Dark or nothing.
Don’t think I’ll share.
Delicious.

Valentine,
My love.
You’re the one
That makes me smile.
Chocolate.

Cookies.
Plum out.
Wanna bake some?
Let them cool down.
Crumbs.

Chocolate + Nutella Shortbread Sandwich Cookies
If you have a special valentine and they happen to love chocolate and hazelnut, then you absolutely must bake them a batch of these. They’ll love you forever!

hearts5

2/3 cup confectioners’ sugar
2 sticks unsalted butter, softened
1/2 cup granulated sugar
1/2 cup dark cocoa powder
1/2 tsp. vanilla extract
1/4 tsp. salt
2 cups all-purpose flour
1 small jar homemade Nutella (or store-bought)

  1. In stand mixer fitted with paddle attachment, mix confectioners’ sugar, butter, granulated sugar, cocoa powder, vanilla, and salt on medium low speed until creamy. Scrape down the sides of the bowl and add the flour one cup at a time. Continue to mix on low until the flour is completely integrated.
  2. Form the dough into a ball (it will be a bit dry) and divide in half. Wrap each half in plastic wrap, flatten into a disc and refrigerate until firm, about 30 minutes.
  3. Preheat oven to 350°F. Line two cookie sheets with parchment paper and set aside.
  4. Take out the dough, sandwich between plastic wrap and use a rolling pin to roll it to 1/4-inch thick. Cut out cookies with a cookie cutter and place on baking sheets. Bake 8 minutes, or until firm.
  5. Repeat with remaining dough but cut the centers out of the second batch, making sure you have equal numbers of tops and bottoms. (If dough becomes too soft pop it back in fridge for a few minutes to firm up.) Let the baked cookies cool for 5 minutes on the cookie sheet before transferring to a cooling rack.
  6. Once cookies have fully cooled spread a thin layer of Nutella onto each of the cookie bottoms. Sandwich together with the top cookies and serve or chill for a later date.


No, I Haven’t Cracked Up!

With Christmas right around the corner I’ve been giving some serious thought to my holiday menu. We usually have some type of beef roast for our Christmas Eve dinner, (yes I know, how very un-Italian of me) and this year it will be a tenderloin with horseradish-blue cheese sauce on the side. I’m thinking of serving it along with creamed spinach, roasted carrots and parsnips, baked artichokes and simple mashed sweet potatoes. (Stop snickering those of you who know I have a history with holiday potatoes— this year they will be fully cooked!)

Whenever we entertain I like to start with an array of yummy appetizers; some made from scratch and some lovingly doctored up store bought. I always serve shrimp cocktail, some veggies with dip (hummus, baked spinach & artichoke, pesto-yogurt) perhaps a soup and some delicious cheese and crackers. But I’m not talking about any old crackers, oh no no! I’m talking about homemade cheddar crackers.

I know what you’re thinking, “What kind of crazy person makes crackers rather than just buying a box?” Even my husband gave me a look of exasperation the first time I announced I was making crackers. Now he says to me in the most nonchalant way, “So when do you think you’re going to make those crackers again?” These lovely and effortless little crackers could seriously be the most tasty thing to have ever come out of my oven. The dough comes together in a matter of minutes and it’s crazy easy to work with. So easy in fact that than even my kids are able to roll out and cut their own crackers. (But only after squabbling over who’s turn it is with the rolling pin and who had the star cookie cutter first. Sigh… kids.)

Easy, delicious and engaging for all— that’s a Jan Greco recipe trifecta!

Cheddar Snaps
Sometimes I make these crackers large enough to support a slice of cheese or dollop of dip, sometimes I make them snack size and sometimes I even make them goldfish size. No matter the shape or size they’re delicious! 

crackers

2 cups finely grated sharp Cheddar cheese
4 tbsp. (1/2 stick) unsalted butter, softened and cut into pieces
3/4 cup flour
1/2 tsp. salt
1/2 tsp. smoked paprika
1 tsp. garlic powder
1 tbsp. milk

  1. Preheat oven to 350˚F. Line two cookie sheets with parchment paper and set aside.
  2. Put all the ingredients except the milk into the bowl of a food processor. Pulse the processor until the dough resembles coarse crumbs.
  3. Add the milk and process until the dough gathers together into a ball.
  4. Lightly flour a cutting board and pat the ball of dough into a circle. Use a rolling pin to flatten it out the rest of the way, roughly an 1/8 of an inch thick.
  5. Cut the dough into shapes using a cookie cutter of your choice. Place the crackers on a baking sheet and use a fork to poke a series of holes in the top of each cracker.
  6. Bake for 12–15 minutes, until the edges are just starting to brown.
  7. Cool the crackers on a rack and devour along some tasty cheese, soup or just by the handful.

* adapted from rural housewife

Trust the Greco Fisherman

I don’t make it a habit to cook “kid food”. Rather I try to expose my children to all sorts of cuisine but in a more kid-friendly kinda way. For example, I purposely make my curried chicken less spicy than I would personally like it so that the heat won’t be a turn off for them. And when I serve a unappealingly green vegetable like oh-so-dreaded spinach, I try to make it extra flavorful so that they can’t help but enjoy it.

However I am very lucky in that both of my kids like fish. My son loves clams steamed on the grill and is crazy for sautéed grouper. My daughter will devour shrimp cocktail (spicy sauce and all) and salmon burgers like the ship’s going down. Because they are so willing to eat whatever I make (well, most nights anyway) every now and then I treat them to an honest to goodness “kid meal”. Mac n’ cheese, chicken pot pie or… fish sticks. Not those minced white fish Gorton’s fisherman frozen numbers, but fresh  fish fillets with a crispy (baked) coating served with a side of homemade tartar sauce.

These are super easy to make, kid-appealingly crunchy and just plain old delicious. I seriously think my husband and I enjoy fish stick night just as much as the kids. Seriously.

Easy, delicious, nutritious… That’s a home run in my book.

Baked Fish Sticks and Tartar Sauce
You can use any type of firm white fish for these fish sticks. Tilapia was on sale so that’s what I used, but Grouper and Cod work just as well.

fish sticks 4

1 lb. tilapia fillets
1 1/2 cups crushed corn flakes
1 tsp. smoked paprika
2 tbsp. butter, melted
1/2 tsp. garlic powder
1/2 tsp. salt
1 egg, beaten
2 tbsp. milk
1/2 cup flour
1/4 cup mayonnaise
1/4 cup plain Greek yogurt
2 tsp. Dijon mustard
2 tsp. onion, minced
1 tbsp. dill pickle, minced
1 tsp. lemon juice
a pinch of chipotle chili pepper

  1. Preheat oven to 375°. Line a cookie sheet with parchment paper and set aside.
  2. In one bowl beat together the egg and milk. In another bowl mix together the crushed corn flakes, smoked paprika, butter, garlic powder and salt. In a third bowl place the flour.
  3. Cut the fish into 1″ wide sticks. Dredge the sticks (one at a time) in the flour, then in the egg mixture and then finally in the corn flakes, turning to coat all sides.
  4. Place the coated fish sticks on the prepared cookie sheet and bake until the fish is opaque and the corn flakes have begun to brown, 10-15 min.
  5. While the fish is in the oven mix up the tartar sauce. Stir together the mayonnaise, yogurt, mustard, onion, pickle, lemon juice and chipotle powder. Chill until ready to use.
  6. When the fish is done serve with a puddle of tartar sauce and a squeeze of lemon.

*adapted from good things

on a roll…

As you may already know I’m a “make it from scratch” kinda girl. I really don’t cut corners or choose the easy road because, if you’re going to bother to do something you might as well do it right. Right? For example, I wanted to make cupcakes with the perfect shade of pink frosting for my daughter’s last birthday, but I didn’t want to use red food coloring to do it. So instead I cooked down fresh raspberries, strained out the seeds and pulp and used the juice to flavor and tint the frosting. And voila, perfect pink!

The one place I must confess I’ve never had much “from scratch” success is baking bread. I find bread baking to be tricky. Either my dough is too wet, too dry or requires more time then I’m willing to invest in a simple loaf of bread. Whatever the case may be, I’m usually disappointed by the results and off to the bakery we go. That is until I found a recipe for pull apart dinner rolls that are baked in a muffin tin.

These rolls are super easy to make, require only an hour or so rise time and look fancy with their clover shape and a touch of coarse salt scattered on top. The only thing that could possibly make these lovelies a bit tastier would be some homemade butter to slather on.

Pull Apart Dinner Rolls
There is nothing like bread fresh out of the oven to make any dinner
seem extra special. These rolls are so easy to make that you could almost
serve them every night. Almost!


1 package active dry yeast
1 1/3 cup milk (105 to 115°F degrees)
3 cups flour
3 tbsp. olive oil
1 tbsp. sugar
1 tsp. salt
1 tablespoon melted butter
coarse salt (or sesame seeds), for garnish

  1. Heat oven 375°F. Dissolve yeast and sugar in the warm milk and set aside.
  2. Stir together 2 1/2 cups flour and salt. Add the yeast/milk mixture and oil and blend until smooth. Stir in remaining 1/2 cup of flour until a soft dough ball forms.
  3. Place dough in a lightly oiled bowl, cover with plastic wrap and drape with a dish towel. Let rise in warm place until doubled, about 45 minutes to 1 hour.
  4. Punch down dough and fold over a few times. Brush a 12 cup muffin pan with melted butter. Pinch off 1 inch balls of dough and quickly roll in palm of hands. Put 3 balls to one muffin cup, brush with more melted butter and sprinkle with coarse salt or sesame seeds.
  5. Bake until crust is light golden brown, about 12-15 minutes. Immediately remove from pan and enjoy. (These babies are really at their best right out of the oven with a little butter. In my house there are rarely leftovers, but if you do have some store them loosely covered or they will become soggy.)

* adapted from amanda’s cookin’