No More Butternut Blues

My pantry is literally overflowing with Winter squash; multiple Butternut, Acorn, Spaghetti and Kobacha to be exact. I’ve used them roasted in enchiladas, mashed them, turned them into fries and offered them to neighbors… yet my stock seems forever bountiful in the worst of ways. Today I roasted a butternut with shallots, garlic and fresh sage and turned it into a sauce that I served over thick Thai noodles. Holy ‘what do you mean there aren’t leftovers’ delish dinner moment. And if you’re not into pasta I can imagine keeping the sauce on the thick side, putting a puddle of it in a shallow bowl and topping it with a nice piece of pan seared fish. Bon appétit.

Butternut Squash Pasta Sauce
1 medium butternut squash (about 1 1/2 pounds) 
1 tablespoon olive oil 
handful fresh sage, chopped
3 lg shallots 
salt 
10 cloves garlic
1 cup fat free half and half*
2 cups chicken stock 
pasta, for serving
Optional toppings: Grated cheese, chopped toasted walnuts, fried fresh sage

1. Preheat oven to 375 degrees. Using a large, sharp knife, trim ends; halve squash crosswise to separate bulb from neck. Peel with a vegetable peeler. Cut both pieces in half lengthwise. With a spoon, scoop out seeds; discard. Cut squash into 2-inch chunks; transfer to a small rimmed baking sheet. 

2. Roughly chop shallots and add to pan along with garlic, toss with oil and sage; season generously with salt. Roast until squash is very tender, about 45 minutes, tossing once halfway through. 

3. Transfer vegetables to a food processor; puree. With motor running, add half and half through the feed tube; process until smooth. Add chicken stock; continue to process until totally smooth. Season again with salt if necessary. (If sauce seems to thick it can be thinned with a little pasta water.)

4. Cook pasta according to package instructions. Pour sauce over pasta; toss to coat. Serve with desired toppings.

*NOTE: Fresh rosemary or sage can be simmered in half and half for additional flavor.

Sup.

Betcha your surprised to hear from me after all this time. Yeah, sorry about that but you know how it goes. This space, and my obvious neglect of it, has been on my mind for sometime. A friend recently said “Hey what’s up with beets and blue cheese?” Turns out that was the push I needed to quit thinking about writing and simply start typing. So here I am.

A ton has happened since my last post, not the least of which is; I moved to a new town (in a completely unfamiliar corner of the state). I bought a new house (which is equal parts diy’er dream and nightmare). And I have new social circles to learn to navigate. (Finding your people in an unfamiliar place feels a little like dating, but without the romantic butterflies.) When things get tricky and I can’t figure out who to ask about rec softball verses the Summer club league (I blew it with girls basketball signups, it wasn’t pretty) or I’m feeling overwhelmed surveying my soggy and overgrown woodsy yard, I try to remind myself that “Great things never came from comfort zones.” And then I make a cocktail and move on.

I still cook as much as ever (we recently put in a sweet new kitchen), but I think this go ’round beets and blue cheese might be more rambling lifestyle blog and less recipe driven. A little diy project post here, a smattering of cooking and some old school gardening there. Whatever I’m currently working on you’ll get to hear about, lucky you! Speaking of gardening… I’m a passionate dig in the dirt/wanna be farmer. In fact when we moved to our woodsy corner of the world my hope was to get a few chickens, my dream was to get a few goats. It turns out that this is one dream that may simply never be fulfilled, however I’m coming to terms with this reality. The fact that the local feed store has sweet little peeps that I can go visit certainly helps. I literally go in, squat down next to the giant trough of peeps with their heat lamps and bed of shaving, and I just gaze. The shop dudes think I’m insane, but theres no shame in getting a chick fix. ALSO (this is even more exciting to me than the chicks) I was just hired by a local farm as a part of their workshare team. I’ll work on a real deal farm a few hours a week, planting, tending and harvesting, and be paid back in glorious organic veggies. This is literally my dream job!

So there you have it, my plan for the rebirth of beets and blue cheese. I make no promises about frequency or engaging content, but I’ll do my best. Pinky swear.

guilt-free eggnog

It’s Christmas Eve, can you believe it? I know me neither. The weeks of planning, quietly executing and subversive measures will all culminate in a few hours and then Christmas 2013 will become just another memory. Sure the gifts (the ones not returned anyway), credit card bills and expanded waistlines will still be there to remind us of the big day, but all the real Santa fun will be over in the blink of an eye. Sigh. But back to Christmas Eve…

Christmas Eve would never be considered complete at our house without several things happening first: Marshmallows must be roasted in the fireplace. Swedish meatballs with lingonberry sauce must be one of the appetizers. Crack and carrots must be left for Santa and the reindeer. And finally egg nog must be the final cocktail of the evening.

In the past I’ve served store-bought egg nog that I boozed and spiced up to my liking, but this year I thought I’d try to make it from scratch instead. When I started researching recipes I couldn’t get over the calorie stats I was reading. I’m all for enjoying the holiday but come on… 375+ calories in one cup seems like a bit much even to me! So I decided to look for a lower fat (yet still delicious) recipe and Cooking Light magazine was my first stop. Their recipe looked like just the jumping off point I needed to create a classic Jan Greco tweaked up low-fat eggnog recipe. And so I did just that, I tweaked and taste tested and I came up with an eggnog recipe I can really feel good about (or that really makes me feel good, or perhaps a little of both) and now I’m ready to pass it along to my lovely and loyal readers. Think of it as my gift to you.

From my kitchen to yours, happy holidays!

Guilt-free Eggnog
This is a rich, creamy
egg nog that doesn’t taste remotely like something “light”. If you would like yours a little less boozy feel free to cut back or even omit the brandy and bourbon.

eggnog3

3 1/2 cups 1% milk
1/2 cup sweetened condensed milk
1 tbsp. all-purpose flour
1/4 tsp. ground nutmeg
1/4 tsp. ground cloves
1/8 tsp. salt
2 large egg yolks, beaten
3 tbsp.- 1/4 cup bourbon
3 tbsp – 1/4 cup brandy
2 tsp. vanilla extract
additional ground nutmeg, for garnish

  1. Whisk together the first 6 ingredients in a medium saucepan. Bring to a simmer over medium heat, stirring frequently.
  2. Place the beaten egg yolks in a medium bowl. Slowly whisk half of the hot milk mixture into the egg yolks and continue whisking until fully combined. Add the milk/yolk mixture back to the pan with the remaining hot milk and cook over medium heat 2 minutes or until slightly thickened, whisking continuously.
  3. Pour the bourbon, brandy, and vanilla into a large pitcher and set aside. Allow the egg nog to cool for 5 minutes in the pan then add to the pitcher, whisking to blend.
  4. Refrigerate the egg nog at least 4 hours, until fully chilled. Before serving give a final stir then pour into glasses and garnish with additional nutmeg. Bottoms up!

*adapted from cooking light

homemade “nutella”

The baking countdown is on! Each Christmas I make scores of homemade goodies, some to share with family and friends and some just to enjoy here at home. In the past I’ve made pounds of Fudge, gallons of Chocolate Sauce, mountains of Crack and oodles of Chocolate + Nutella Shortbread cookies. And when time has allowed I’ve also been known to whip up a batch of biscotti or simple sugar cookies that the kids help decorate. Now that I’m a working girl it’s going to be a bit tricky to pull-off this amount of goodies, but I still plan to try. I intend to make a few batches of crack (it wouldn’t be Christmas in our house without it), I’ve decided to give a Swedish spice cookie a whirl and just to take this years chocolate shortbread sandwich cookies a smidge over the top—I’ve decided to make them with homemade Nutella.

Nutella is one of those foods that people either just don’t get or love to the point of obsession. I have a girlfriend who keeps a jar in her office desk drawer, for when the need strikes. I on the other hand am not particularly a fan. Don’t get me wrong, I love the flavors of dark chocolate and hazelnut together but there’s something about the viscosity of the jarred stuff that bothers me, it reminds me of silly putty. Anyway it turns out that homemade Nutella is pretty easy to make and the results are truly outstanding. It’s not as smooth and gloppy as the Nutella you’re familiar with (which is fine by me) and not surprisingly, it’s way tastier than the other stuff. Delish on toast. Fantastic sandwiched between cookies. Outrageous right off the spoon.

So far and with complete confidence we can say that homemade Nutella is absolutely here to stay.

Homemade “Nutella”
Enjoy this spread just as you would the jarred stuff, which would include right off the spoon.

nutella cookies

1 1/2 cups skinned hazelnuts
1/4 tsp. granulated sugar
8 oz. quality semi-sweet chocolate
1/2 cup heavy cream
4 tbsp. salted butter, cut into pieces
1/4 tsp. real vanilla extract

  1. Preheat oven to 350°F. Spread the hazelnuts out in a single layer in an ovenproof skillet and toast them until they are a golden brown, stirring frequently. Pour them into the bowl of a food processor and allow to cool. Once cool, add the sugar and process to a smooth, buttery paste.
  2. Melt the chocolate over medium-low heat in a medium bowl set over a pot of simmering water, stirring often. Remove the bowl from the heat and stir in the cream, butter and vanilla then add in the hazelnut paste and stir until fully blended.
  3. Pour your nutella into a glass jar (it will thicken as it cools). Refrigerate and bring to room temperature before using.

*adapted from canal house cooks

Chocolate + Nutella Shortbread Sandwich Cookies
These cookies are amazing on their own, but add some homemade Nutella and you’ve got one decadent cookie!

2/3 cup confectioners’ sugar
2 sticks unsalted butter, softened
1/2 cup granulated sugar
1/2 cup dark cocoa powder
1/2 tsp. vanilla extract
1/4 tsp. salt
2 cups all-purpose flour
1 small jar homemade Nutella (or store-bought)

  1. In stand mixer fitted with paddle attachment, mix confectioners’ sugar, butter, granulated sugar, cocoa powder, vanilla, and salt on medium low speed until creamy. Scrape down the sides of the bowl and add the flour one cup at a time. Continue to mix on low until the flour is completely integrated.
  2. Form the dough into a ball (it will be a bit dry) and divide in half. Wrap each half in plastic wrap, flatten into a disc and refrigerate until firm, about 30 minutes.
  3. Preheat oven to 350°F. Line two cookie sheets with parchment paper and set aside.
  4. Take the dough out and sandwich it between two sheets of plastic wrap. Use a rolling pin to roll it to 1/4-inch thick. Use cookie cutters to cut into desired shapes and place on baking sheets. Bake 8 minutes, or until firm.
  5. Repeat with remaining dough but cut the centers out of the second batch, making sure you have equal numbers of tops and bottoms. (If dough becomes too soft pop it back in fridge for a few minutes to firm up.) Let the baked cookies cool for 5 minutes on the cookie sheet before transferring to a cooling rack.
  6. Once cookies have fully cooled spread a thin layer of Nutella onto each of the cookie bottoms. Sandwich together with the top cookies and serve or chill for a later date.

*adapted from serious eats

Simple Sugar Cookies
This is standard sugar cookie recipe, perfect for decorating with icing or using as a vehicle for your homemade nutella.

1 cup (2 sticks) butter, softened
1/2 cup packed brown sugar
3/4 cup granulated sugar
2 eggs, room temperature
2 tbsp. milk
2 tsp. vanilla
4 cups all-purpose flour
2 1/2 tsp. baking powder
1 tsp. salt

  1. Cream together the butter and sugars in the bowl of a stand mixer until light and fluffy. Add eggs, milk and vanilla; beat well. Stir together flour, baking powder and salt in small bowl; gradually add to sugar mixture. Knead the dough into a ball and flatten into a disc. Wrap with saran wrap and chill for an hour.
  2. Preheat oven to 375°F and line two cookie sheets with parchment. Cut the dough in half and on well floured surface, roll the dough into a circle roughly 1/4-inch thick. Use cookie cutters to cut into desired shapes. Bake for 8-10 minutes or until lightly browned at edges. Allow to fully cool before decorating.

*adapted from domino sugar

color me naturally

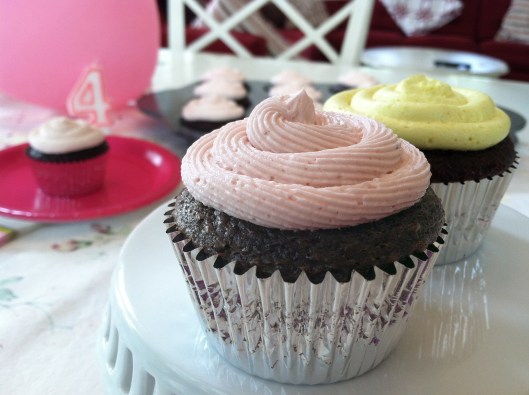
Tomorrow is my littlest loves birthday. We started celebrating a week ago with a party just for her school friends, followed by cupcakes and yours truly reading stories to her class on Thursday and culminating with a family party tomorrow. Yeah I agree, that’s an awful lot of partying for any little girl, but you do only turn 4 once!

I’m sure it won’t surprise you to hear that I didn’t go to the bakery for any of her birthday goodies, by now you know that’s just not how I roll. Actually littlest love requested cupcakes for the friend party (chocolate with yellow frosting) as well as the school party (chocolate with pink frosting), which made me happy since they would be way easier to make and transport than a cake. The family party on the other hand is going to have a full-blown labor-intensive-just-might-send-me-over-the-edge Imagination Movers guitar cake. (Yeah, wish me luck!)

First things first, I believe in boxed cake mix—there I said it. Sure you can make your cake from scratch and it will no doubt be fantastic, but the people at Betty Crocker make a pretty fine chocolate cake mix so why not save yourself a few steps. However (and if you know me you already saw this tweak coming), when I make chocolate cake I always add a cup of mini chocolate chips to the batter. It takes perfectly acceptable boxed mix and bumps it up to something just a bit richer, tastier and more like homemade. Okay, so that takes care of the cake, now for the frosting.

I like buttercream frosting, but while buttercream seems like a no-brainer it’s actually a bit tricky. It can easily go from fluffy and light to too sweet, too greasy or too gritty. After much trial and error I finally found a vanilla buttercream recipe that seems near perfect; sweet but not overly so and light, creamy and easy to spread. Now to just make it a lovely color… As a rule I do not use food coloring. It’s pure chemicals, it increases hyperactivity in children and it’s considered carcinogenic. “In the early 1990s, FDA and Canadian scientists found that Red 40, Yellow 5 and Yellow 6, the three most widely used dyes, were contaminated with likely human carcinogens. And while many foods, such as M&M’s and Kellogg’s Hot Fudge Sundae Pop Tarts, include as many as five different dyes, even today the carcinogenic potential of such combinations has not been tested.” Pretty frightening right? And M&M’s are one of my “have to eat ’em till I’m sick” vices (same goes for potato chips, but that’s a story for another day!) The fact is artificial dyes are truly unhealthy, so much so that in Europe food with artificial colors must carry warning labels! So thanks for the easy solution, but no thanks. Instead I always try to use natural dyes for my frosting. I’ve had success in the past with puréed strawberries and raspberries to create pink frosting, dark chocolate cocoa powder for black frosting (think Darth Vader cake) and I just used turmeric powder to make littlest loves requested yellow frosting. I was a little worried about the turmeric flavor coming through but everyone (kids included) seemed to love it and couldn’t believe when I came clean about the secret ingredient.

So there you have it, the world is a colorful place and now you don’t need to rely on Red 40 and Blue 1 to make it even more so! And in case you’re really interested; I’ve read you can use puréed spinach for green frosting, carrot juice for orange and cooked red cabbage for purple. I haven’t given any of those combos a try yet but I just may, so be prepared the next time I offer you green cupcakes…

Pale Pink Buttercream Frosting
Using berries to color frosting gives it a lovely flavor as well as pale pink color. If you want a deeper shade of pink double the strawberries, but add the additional berries slowly. Too much moisture and your buttercream will be a watery mush.

natural color cupcakes

1 cup diced strawberries
2 sticks of unsalted butter, room temperature
3 cups powdered sugar
2 tsp. vanilla
2 tbsp. heavy cream

  1. Finely dice the strawberries. Place them in a small saucepan and cook over a low flame for 25 minutes until all the berries have broken down and released juices. (Stir and smoosh berries with spoon every few minutes to speed up the process.)
  2. Pour the berry slurry into a mesh strainer, press out as much of the juice and pulp as possible and let cool. (Be sure to save what’s leftover in the strainer for spreading on toast or adding to your yogurt the next morning.)
  3. In a stand mixer fitted with a whisk, cream the butter 3 minutes on high until fluffy. Add the sugar one cup at a time and mix on low-speed until well blended. When all the sugar has been added increase the speed to medium-high and beat for another 4-5 minutes.
  4. Scrape down the bowl and add the vanilla and cream, continue to beat on medium speed for 1 minute more. Slowly add the puréed strawberries until frosting is ideal spreading consistency and shade of pink, continue beating on high until frosting is light and fluffy, 2-3 minutes more.

*All of these recipes make enough frosting for roughly 30 cupcakes or one medium cake.

Dark Chocolate Buttercream Frosting
This is the richest most decadent chocolate buttercream you’ll ever taste. It’s serious stuff, not for the faint of heart.

2 sticks of unsalted butter, room temperature
2 1/4 cups powdered sugar
1 cup dark chocolate cocoa powder
2 tsp. vanilla
3 tbsp. heavy cream

  1. In a stand mixer fitted with a whisk, cream the butter 3 minutes on high until fluffy. Add the sugar and the cocoa one cup at a time and mix on low-speed until well blended. When all the sugar/cocoa has been added increase the speed to medium and beat for another 4-5 minutes.
  2. Scrape down the bowl and add the vanilla and cream, continue to beat on high until frosting is light and fluffy, 2-3 minutes more.

Yellow Buttercream Frosting
I could detect the subtle taste of turmeric when I tried the frosting alone, but once it’s on the cake it just tastes like good ‘ol buttercream.

2 sticks of unsalted butter, room temperature
3 1/2 cups powdered sugar
2 tsp. vanilla
3 tbsp. heavy cream
1/2-1 tsp. turmeric powder

  1. In a stand mixer fitted with a whisk, cream the butter 3 minutes on high until fluffy. Add the sugar one cup at a time and mix on low-speed until well blended. When all the sugar has been added increase the speed to medium and beat for another 4-5 minutes.
  2. Scrape down the bowl and add the vanilla and cream, continue to beat on medium speed for 1 minute more. Slowly add the turmeric powder until you achieve the ideal shade of yellow and continue beating on high until frosting is light and fluffy, 2-3 minutes more.

*adapted from food network

the house that mouse built

I know all you tried and true beets and blue cheese readers are patiently awaiting yet another pithy post from yours truly, and I thank you for it. But here’s the thing… this week you’re not getting one. You see my family and I are currently visiting the world of all things mouse, you know “the happiest (most expensive, crowded and over-whelming) place on Earth”. Yes, Disney. And while this multi-tasking gal is good, she’s not that good. So no amusing anecdotes or recipe this week, sorry!

Until next week (unless there’s a stampede at tonight’s character dinner that kills me) M.I.C.K.E.Y. M.O.U.S.E…image

Hooray for a Giveaway!~ Has Ended

I’m one of those people who delight in the process of planning a meal almost as much as I do cooking and eating it. I truly enjoy researching recipes, making endless lists and shopping for ingredients. But, I realize that not everyone feels the way I do.

I recently posted a bit of a love letter to the Shim’on Ariche Harissa Forte that I can only find at my local Fairway. I also contacted them to request that they sell it in larger sized jars. Well that request turned into a couple of back and forth e-mails that turned into beets and blue cheese’s first sponsored giveaway!

It turns out that besides being a fantastic resource for your everyday grocery and wine needs, Fairway also offers an extensive catering menu for any size gathering or holiday meal (kosher and non-kosher). Who knew?!? The folks at Fairway Market have given me a $100 gift card to give away to one of you— wasn’t that nice of them? With Passover and Easter right around the corner a Fairway gift card would certainly buy some lovely ingredients. Or, you could cater in and pretend you cooked (I won’t tell). And not to fear if you don’t happen to have a Fairway near you, they also offer online ordering. So here’s what you have to do…

giveaway image

To enter, please leave a comment with what you love most about grocery shopping. Are you like me and you love the process of planning meals; making lists and finally selecting the perfect brussels sprout or artichoke. Is it the only time during the week that you’re actually kid-free? Or do you dread those brightly lit and jam-packed aisles and avoid it whenever possible? Whatever you have to say about grocery shopping, and even more specifically shopping at Fairway, I’d love to hear it.

Please leave your comment between Wednesday, March 6, 2013 and Wednesday, March 20, 2013. One comment per person please, US residents only. Entries must be left via the comment form at the bottom of this post. A winner will be selected using Random.org. on Thursday, March 21st and will be promptly contacted.

So please leave a comment and then feel free to…

  • Follow @beetsbluecheese on Twitter.
  • Become a beets and blue cheese follower via e-mail
    (you’ll find the “follow me” button at the top of this page).
  • Like beets and blue cheese’s facebook page.
  • Share this giveaway with your friends on Facebook and Twitter.

Good luck!