gluten-free donuts that won’t make you barf

Well hello. That’s right, I’m baaack— We’ll technically I’ve never been gone, just busy. But I’m here now and ready to dish (pun intended).

A while ago I talked about going gluten-free. I’ve continued to vacillate over gluten, frequently debating with myself whether it makes a difference in how I feel day-to-day, and never really coming to a conclusion. Then my daughter started suffering from frequent stomachaches. However since it was the year of the debilitating stomach-flu and she does have a propensity to worry, I kept thinking perhaps those were the culprits behind the complaints. But then she threw up in school. After eating snack. And a classmate slipped in it. (Yeah, disgusting. He cried, she didn’t.) That’s when the clouds parted and the pieces fell into place, each time she ate food with gluten she got a stomachache. Sometime a little gassy ache and sometime a big barfy ache, but an ache nonetheless. I did a little gluten elimination experiment, and she felt great. I concluded my experiment with a celebratory grilled cheese on regular bread and guess what. Bellyache. She is now officially a gluten-free girl.

It’s pretty easy these days to find tasty and inexpensive gluten-free options at the store and more and more packaging is including “Gluten-Free!” on the label, making it all the easier to shop. But I have to say that when it comes to breads and baked goods the options are a bit bleak. I was recently gifted a andwich bread and bagel recipe from a co-worker whose daughter is celiac (I’ll share them after I make the recipes a few times) but I was on a mission to find a recipe for something that seemed indulgent and treat worthy. Hello donuts!

Since I’d already conquered Chocolate-Beet Donuts and Baked Cinnamon Spice Donuts I thought revisiting those recipes was a good place to start. While chocolate is always a fan favorite the extra moisture from the beets, coupled with the nontraditional flour, made recipe conversion tricky. The spiced donuts however were begging for a re-do, and so I re-did. Behold… The best homemade baked gluten-free donuts guaranteed NOT to make you barf. You’re welcome.

Gluten-free Cinnamon Spice Donuts
These are the best donuts. Seriously. Gluten and guilt free deliciousness in one good to go package.
glutenfree donut2

1 cup flax meal
1 cup rice flour
2 tsp. baking powder
1 tsp. baking soda
1/8 tsp. salt
1/4 tsp ground cloves
1/4 tsp. nutmeg
1 tsp cinnamon
1/2 cup granulated sugar
1/4 cup coconut oil, melted
1/2 cup + 2 tbsp. whole milk buttermilk, room temperature
4 eggs, beaten
1/2 tsp. Angostura bitters

sugar coating:
3 tbsp. coconut oil, melted
2/3 cup granulated sugar
1 1/2 tsp. cinnamon
1/4 tsp. ground cloves
1/4 tsp. nutmeg

  1. Preheat the oven to 375°F. In a medium bowl whisk together all of the dry ingredients. Place the coconut oil in a large bowl and pop in the microwave for a minute to melt. Add to the coconut the buttermilk and eggs and beat, then add the bitters and whisk to combine.
  2. Gradually add the wet ingredients to the dry and stir until just until combined.
    Grease or spray the doughnut pan and fill each doughnut form half way. (I find it’s easiest to pour the batter into a ziplock bag, snip off one corner and pipe it into the pan.)
  3. Bake for 8-10 minutes. (You’ll know they’re done when they spring back when touched and are just beginning to brown on top.)
  4. While the donuts are baking mix together the cinnamon-sugar coating in a medium bowl and melt the coconut oil. Set aside.
  5. When the donuts are finished baking, immediately remove them from the oven and brush them with coconut oil. Give them a quick roll in the cinnamon-sugar coating and enjoy!

eat like an inca

If you know me then you know I’m a restless spirit; I would much rather jump into the unknown then live in the routine. This adventurous streak probably explains my love of travel and my current obsession with the tv show Expedition Unknown. Some episodes make me think things like: “Hmm. Honduras definitely does not look like my cup of tea (or rice and beans as the case may be).” While others actually make me consider enduring the twenty plus hour flight to see the ancient temples of Thailand. I love watching them investigate age old myths and legends in far flung places. A recent episode all about the ancient Inca Trail, with a detour to the ruins of Machu Picchu, really hit home with me. Visiting Machu Picchu has long been on my list of someday adventures. I mean c’mon, have you seen pictures of the amazing stone ruins smack in the middle of the Peruvian mountain forest? How could you NOT want to go and see them for yourself?!? It must be a truly amazing, and perhaps almost life altering experience. (And husband of mine if you’re reading this, don’t be surprised when I say “I’ve been watching flights to Peru and…” Okay so I watched the episode, made notes (not kidding) about airports to fly into and altitudes to adjust to and went to bed. The next morning while standing in the kitchen drinking coffee I spotted a piece of paper sticking out from behind one of my cookbooks. As I went to shuffle it back into the pile the bold letters at the top of the page caught my eye: “Chili-Lime Inca Corn” Seriously? Incas last night. Incas this morning. I think someone is trying to tell me something.

This seemingly mystical connection just happened to take place on the first warm weekend of the year. Since I was looking for any excuse to be outside enjoying the sunshine and hoping “this is finally it for Winter” I decided it was time to break out the cast iron pan, fire up the grill and make a little Inca corn. So how’d it turn out? Well, I have but one thing to say: The demise of the Inca Empire clearly had nothing to do with their choice in food. These little fried corn kernels are pure gold.

Inca gold.

Homemade Chili-Lime Inca Corn
These are totally addictive. Be prepared.

Inca Corn2

15 oz dried giant corn/Maiz Mote
Canola/Olive oil blend
1 tsp chipotle chili powder
zest and juice of 1 lime
1 1/2 tsp fine pink salt
1 tsp smoked paprika
  1. Place the dried corn in a pan with a lid, cover with water and allow to sit for 7-12 hours.
  2. Drain corn, shaking as much water off as possible and spread out on a clean tea towel. Allow to dry for an hour or so minutes. (It doesn’t need to be bone dry, you just don’t want much water on the surface as you’ll be dropping it into hot oil.)
  3. While the corn is drying make your spice mixture. Mix together the chili powder, lime zest, pink salt and smoked paprika. Transfer the spice mixture to a doubled paper lunch bag and set aside.
  4. Line a rimmed sheet pan with paper towels for draining the fried corn.
  5. In a cast iron pan or high sided skillet heat 1/4 inch of oil to 375º F. Working in batches add the corn to the oil and fry until the it’s a toasted golden brown, stirring frequently. Use spider or slotted spoon to remove the corn from the oil and transfer it to the paper towel lined sheet pan. Continue with the remaining corn.
  6. When all the corn is fried squeeze the juice from your tested lime all over it. Carefully transfer the corn to the lunch bag containing the spices and shake well to coat. The corn will become cruncher as it sits and will keep for several days (if it lasts that long).

*adapted from the kitchn

perfect pie crust

“I have a confession to make; I love pie but I never make my own crust. I know I should, I realize that it’s not really all that difficult and that homemade is far superior to store bought, but somehow I’ve just never gotten around to giving it a whirl. However I promise that one day soon I will make the effort. I promise…”

I wrote these words two years ago and I’m embarrassed to say that up until recently, they remained true. As much as I preach about homemade real food I honestly had NEVER made or even attempted to make pie crust from scratch. Why? Good question and one I actually don’t have an answer to. I guess I simply just wasn’t in the mood. However it would appear that the universe was fed up with my wishy-washy attitude towards pie crust and decided to force the issue. How you may wonder. With the perfect storm of gardening scenarios… The threat of an early frost and tomato plants that just wouldn’t quit.

You see my vegetable garden; My suburban oasis, the fulfillment of my wannabe farmer aspirations and my favorite place to putter around and avoid all the things I should be doing instead had one of its most successful seasons ever. Was it thanks to the bees? The fact that last years crop was so pitiful that I was due a bountiful year or was it simply good luck? I’m just not sure. What I do know is that this year was one of the most prolific years my little garden has ever had. So imagine my dismay when the overnight temps were predicted to drop well below freezing and my tomato plants were still loaded with unripe tomatoes. I did the only thing I could think to do, I picked the fruit and decided to figure out the rest later.

According to Martha Stewart green tomato pie is DELICIOUS and the perfect substitute for apple pie. In fact she claims that by using the same spices as you would in a traditional apple pie, you can actually fool your unsuspecting guests.

Martha was wrong. Very wrong.

My tomato pie was a giant soupy, undercooked and fairly disgusting looking mess. But… The crust (which I had spontaneously decided to make from scratch) was AMAZING! So good that I actually couldn’t bear to throw it out. Instead I poured the tomato gunk out, wrapped up what remained and we ate crust with vanilla ice cream for dessert the rest of the week. Funny right, but true nonetheless. I am now a from scratch crust devotee and a total crust snob who’s shameful Pillsbury purchasing days are well behind her.

“Candy might be sweet, but it’s a traveling carnival blowing through town. Pie is home. People always come home…” This has been one of my favorite quotes for some time, but my newfound crust appreciation makes me feel like I finally truly understand it.

Super Simple Food Processor Pie Crust
Sure cooks have been making delicious and flakey pie crust by hand for hundreds of years, but that doesn’t mean you have to. Have a little faith in technology.

1 1/2 sticks (12 tbsp.) cold salted butter
3 cups all-purpose flour
1 tablespoon sugar
1 teaspoon kosher salt
1/3 cup cold vegetable shortening, such as Crisco
1/2 cup ice water
  1. Cut the butter into cubes and return it to the refrigerator while you prepare the flour mixture. Place the flour, sugar and salt in the bowl of a food processor and pulse a few times to mix. In multiple batches add the butter and shortening, pulse in between additions until the butter is the size of peas. Continue to pulse and slowly pour the ice water down the feed tube until the dough begins to form a ball (you may not use all of the water.) Scoop out the dough and place on a sheet of plastic wrap. Gently shape into a ball, wrap and refrigerate for at least 30 minutes.
  2. The dough is now ready to be used. For a double pie crust cut the dough in half, roll out on a well-floured surface to the size of your pie pan and proceed as usual. For hand pies cut the dough in half, the halves into quarters and the quarters in half again. Roll out and using a pocket pie crimper (or a 6″ inverted bowl), cut out as many circles as possible. Re-roll the crust scraps and continue cutting out circles until you run out of dough. Fill with your choice of sweet or savory filling, bake and enjoy.*

*One of my fondest childhood memories actually revolves around pie crust. My mother has always made hers from scratch and as any baker knows, there is always a bit of leftover dough when the pie is finished. She’d gather the scraps up and roll them back out. Dust them with cinnamon and sugar and slice them into triangular strips. Then she’d roll the strips up, pop them into the oven for a few minutes and voilà… tasty little Rugelach type cookies that to my way of thinking were even better than the pie itself.

pie crust cookies

meet me in purgatory strawberry buttercreams

It’s finally Spring, can you believe it? Yeah me neither. So long cold, dark and please don’t make me get out from under these nice warm covers days of Winter. Hello sunny, bright and full of possibility days of Spring. 

The past six months have been a whirlwind. I’ve been so busy with work, life and family that I haven’t been able to properly focus on blogging or even cooking for that matter, and that’s been a real disappointment to me. The older I get the more clearly I’ve come to realize that life is far too short to live in a state of disappointment. So… I‘ve decide to embrace the renewal, rebirth and revitalized spirit of Spring and to find time for the little things that bring me the greatest satisfaction. To get up a bit early just to have some quiet time to drink coffee on the deck, to putter around in the garden rather than spend the time straightening up the house and to cook (and blog) far more often. It won’t be easy but in my experience anything worth doing often requires a bit of extra effort. I’m approaching this venture determined to just stop and slow down. As I was making this personal declaration a friend happened to post this tweet: “People who insist on making homemade Easter candy will never be welcome in the kingdom of heaven.” After I finished laughing I decided to take this as a sign that the universe wanted me to make a little Easter candy. And so I did.

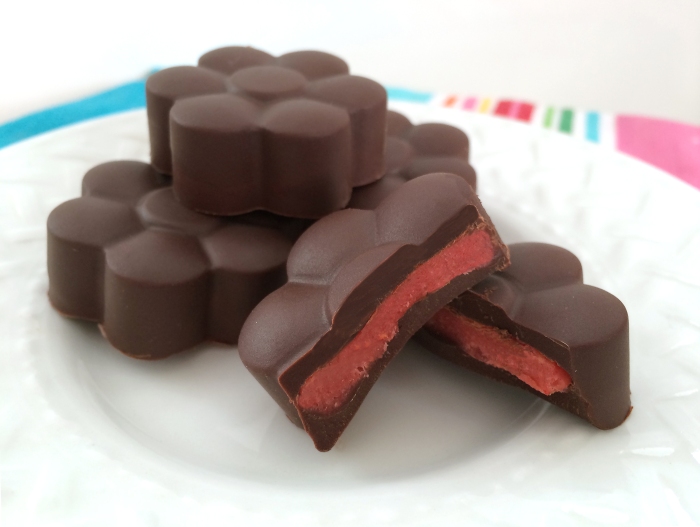
In my mind Easter is synonymous with chocolate. Not jelly beans, marshmallow chicks or cream eggs. Nope, for me its all about chocolate. In the past I’ve made peanut butter cups and chocolate almond bark. I’ve dipped fresh cherries and tangerine segments in dark chocolate and I’ve made simple chocolate lollipops. This time around I wanted to make something a bit more extravagant. This time I wanted to make something that tasted fresh like the season. This time I wanted candy so good it would redeem me from my months of lack luster cooking. So this time I made chocolates filled with homemade strawberry buttercream. And they were delicious— Kingdom of heaven be damned.

Strawberry Buttercream Chocolates
I used Trader Joe’s freeze-dried strawberries for this recipe. They also sell freeze-dried blueberries and raspberries, which would no doubt also make a delicious filling.

strawberry creams

1  1.2 oz package freeze-dried strawberries
1 cup powered sugar
pinch salt
4 tbsp. unsalted butter, softened
2 tbsp. heavy cream
3 4 oz. bars bittersweet or dark chocolate
special equipment: silicone candy mold

  1. Place the candy mold in the refrigerator to chill. Pour the strawberries into the bowl of a food processor (being sure to remove the silica packet) and process to a fine powder. Add the powdered sugar and pulse a few times before adding the salt, butter and cream. Turn the food processor on and allow to process until the mixture gathers into a loose ball, this takes a little time so be patient.
  2. Wrap the ball of filling in plastic wrap and place in the refrigerator to chill while you melt the chocolate.
  3. Break up the chocolate and use a double-boiler (or a glass bowl placed over a pot of simmering water) to melt the chocolate, stirring frequently. When the chocolate is totally melted and smooth remove from heat.
  4. Remove the chilled mold from the refrigerator and fill each opening halfway with chocolate (I used a little paint brush to spread the chocolate up the sides.) Place the filled mold back in the refrigerator for 15 minutes to set.
  5. Remove the chocolate mold and the wrapped filling from the refrigerator. Pinch off a 1/2 teaspoon sized piece of filling, roll it into a ball and carefully press it into each of the set chocolates. Cover the filling with additional chocolate (you may need to warm it again) filling each mold to the top. Place the filled mold back in the fridge to chill until firm, about 1 hour.
  6. Carefully pop finished chocolates out of mold and enjoy!

ya can’t beet a brownie

I don’t know about you but I love brownies. Rich, chocolatey, cakey, satisfying brownies. No nuts. No frosting. No edges. (I’m a center of the pan kinda girl.) I love those classic, foundation of many a bake sale and potluck, way better than a slice of cake treats— But I almost never make them. Why? Because while they exude an air of nostalgia and casual effortlessness, they are in fact persnickety little monsters and total baking with ease impostors. Let me explain..

Over bake them and they’re tough and chewy, sticking to the pan and in your teeth. Under bake them and they’re a mushy, gooey, fall apart mess. And then there’s the cooling factor. Even if you time the baking exactly right you still have to let them cool an inordinate amount of time before even attempting to cut into them. Can’t fight you’re impatient inner child and start slicing while they’re still too warm… Hello stuck to the knife brownie mess! And honestly, whom among us hasn’t been lured into making a batch (whether it be from scratch or boxed) only to end up standing at the counter scraping bits of brownie off the bottom of the pan, smushing them together to create a pitiful brownie lump and shoveling them into your mouth so as to not have your efforts wasted. All the while swearing “NEVER AGAIN”. I know, I’m with you. I’ve totally been there. Which is why it’s all the more surprising that I decided out of the blue to make brownies from scratch. Perhaps I was feeling invincible or perhaps I was simply feeling that keeping up with work, kids and home wasn’t enough of a challenge that week. Whatever the case may have been there I was whipping up a batch of brownies for two sick kids. (Oh yeah, did I forget to mention that my kids were both home sick from school. Yup, they were. Two sick kids. Both home. Two days. Good times.) Anyway… Amid the chaos that was last week I decided to make brownies, no doubt as much for myself as for them.

I’m a bit of a recipe pack-rat; squirreling away magazine pages, newspaper clippings and dozens of forwarded to myself emails containing recipes that I plan to make “someday”. One of the scraps of paper at the top of my pile was a brownie recipe from C for Food & Agriculture. (If you’re not familiar with Stone Barnes then by all means you should be, it’s an incredible place with an equally amazing restaurant Blue Hill at Stone Barns smack at the center.) The recipe was for rich, decadent brownies with a subtle orange flavor and beets as the secret ingredient. This wasn’t the first time I had decided to sneak beets into my baked goods, remember those yummy Chocolate Cake Donuts with Chocolate Ganache, so I jumped right in. I knew the beets would add moisture and texture to the mix and that once cool, their flavor would be virtually undetectable. And I was right, they were delicious! Rich, moist and chocolatey with just the right hit of orange and just the right amount of soul soothing decadence to make this harried mom and her two sick kids feel momentarily better.

The kids are thankfully on the mend and everyone will be heading back to school (and work) tomorrow, perhaps with a tasty little square of Orange-Beet Brownie tucked into their lunch boxes. Unless of course I tell them the brownies are all gone and secretly polish off the rest myself. A little white tie never hurt anyone and frankly, I think I’ve earned it.

Orange-Beet Brownies
Once these babies are cool no one would ever guess they contain beets!

beet brownie3

3 small beets, trimmed
8 oz. good-quality bittersweet chocolate (such as Ghirardelli 60% cacao)
1 stick salted butter, diced
1 cup granulated sugar
3 eggs
zest of 1 orange
3 tbsp. orange juice, divided
1 1/4 cups self-rising flour*
confectioner’s sugar, for dusting

  1. To make the beet purée: Preheat oven to 400°F, wrap the beets in foil and roast for 45 minutes or until the beets are easily pierced with a fork. Let cool until they can be handled easily, then peel and dice. (I usually do this the day before I plan to bake the brownies.)
  2. Add diced beets and 1 tablespoon of orange juice to the bowl of a food processor and blend to a purée, set aside to cool.
  3. Lower oven temp to 350°F and lightly grease an 8×8 pan, set aside.
  4. Break the chocolate into pieces and place in a heatproof bowl over a saucepan of simmering water. Add the diced butter and let melt, stirring often.
  5. In another bowl, beat the sugar with the eggs until smooth and creamy. Stir in the orange zest and remaining orange juice, puréed beets and flour. Then slowly add the melted chocolate and beat until fully combined.
  6. Pour the batter into the prepared pan and bake for 35-40 minutes.
  7. Allow to cool for 15 minutes in the pan before removing to a rack. Then cool for another 15 minutes before attempting to cut. Dust with confectioner’s sugar and enjoy!

*To make gluten-free self-rising flour: Combine 2 cups of gluten-free flour with 3 teaspoons of baking powder and 1/2 teaspoon of salt. Whisk to combine.

*inspired by stone barnes center

survive a snow day popcorn

I am so over this winter. I was home with my kids for nine years and we barely had enough snow to go sledding. I go back to work and New Jersey ends up having a Winter that could make Celine Dion feel at home. (She’s Canadian, get it. Never mind…) The kids have already used all their snow days, so it looks like they’ll be in school until at least mid-July. Our inflatable tube for sledding popped early in the season and since the stores are full of bathing suits and sunscreen, forget about replacing it. Northern NJ is reportedly out of salt, which would explain why the short drive to school has become more like an Olympic slalom course. And don’t get me started on the gluttonous amount of “well it is a snow-day” treats we’ve all been enjoying these past few weeks. I’m not just talking about the soft pretzels and snack bars, no I’m talking about the countless marshmallows we’ve roasted in the fireplace, the batches of cookies and muffins we’ve consumed, the ice cream at lunch because “you played so hard in the snow” and most recently the dark chocolate drizzled popcorn.

We eat a considerable amount of popcorn around here. After school every Friday I make the kids a big bowl of the stuff and pop in a DVD. They chill (usually with minimal bickering or complaining) and I get a little time to get dinner started or putter around without having to tell anyone to stop yelling, stop mauling the dog or stop annoying each other— it’s become a nice relaxing way to start the weekend. Popcorn and dvd’s have also become this mom’s saving grace during this exceptionally cold winter. Our last big snow storm had the kids pounding on the backdoor with red little noses and frozen tears in their eyes about ten minutes after going out. “Hot chocolate!” they cried “And popcorn…” Chocolate and popcorn, that’s a crazy combination… or is it? In the past I’ve made homemade Caramel Corn, which was a totally tasty and “junky” treat, but it was a bit involved. What if I simplified the sugared popcorn idea and instead made something like Dark Chocolate Drizzled Popcorn?!?

It turns out that those half-frozen kids of mine were actually onto something… a seriously delicious, totally addictive and super easy to make treat and the perfect reward for surviving yet another snow day. Enjoy!

Dark Chocolate Drizzled Popcorn
Crazy. Addictive. Delicious.

choc popcorn2

1 tbsp. coconut oil
1/2 cup jumbo popcorn kernels (such as Pop-Secret)
3.5 oz. 60% cacao bittersweet chocolate, chopped
1 tsp. sea salt, divided

  1. Line a rimmed baking sheet with parchment and set aside. Add the coconut oil to a large pot and allow to melt. Add the popcorn kernels, cover, and allow to continue warming. As the popcorn begins to pop, shake pan. Once the popping slows to 2-3 seconds between pops, immediately remove the pan from the heat.
  2. Pour the popcorn onto the prepared baking sheet in as even of a layer as possible, removing any unpopped or partially popped kernels.
  3. Place the chocolate in a double-boiler (or a glass bowl over a pot of boiling water) and heat until the chocolate becomes completely liquid when stirred. Remove from heat and stir in 1/2 teaspoon of salt.
  4. Pour the melted chocolate into a small ziploc bag, snip off a tiny bit of one corner of the bag and drizzle the chocolate evenly all over the popcorn. Immediately sprinkle with the remaining 1/2 teaspoon salt and let sit in a cool spot until the chocolate has hardened, about 1 hour.
  5. I understand that this will keep for a few days in an airtight container— Good luck with that!

*adapted from the washington post

the hercules of soft pretzels

Beginnings and endings beg for reflection, that’s just how it is. They force you to pause for a moment and contemplate the ups and downs of the past and the changes you hope for in the future. I don’t typically make formal New Year’s resolutions, however there are a few little things I’d like to see happen over the next twelve months. For instance— I would like to be a more patient mother between the hours of 8 and 9:00 a.m. (getting out of the house on a school morning without yelling would feel like a minor miracle!). I would like to laugh at the ridiculous more and worry about the clearly inalterable less. I would like to make plans with my girlfriends at least once a month to go out for drinks, dinner or just adults only ice skating. And I would like to once and for all achieve success and finally fulfill all my bread baking ambitions.

I’ve told you before about my obsession with and repeated failures at bread baking. I truly and with all my heart long to successfully make an eye-rollingly delicious, crusty on the outside light and wonderful on the inside, loaf of bread. A simple seeded boule or a rustic baguette, bread so amazing it could easily serve as the meal, rather than just the accompaniment to it. I’ve even joked that I either need a bread baking class or an intervention. As luck would have it a baking studio offering bread classes recently opened near my house, so perhaps there is already a glimmer of hope on the horizon. In the meantime I plan to keep plugging along on my own, hoping that one of these recipe will be “the one”. With that in mind I recently decided to attempt to make soft pretzels. I’ve been toying with the idea and collecting pretzel recipes for some time, but something always stopped me from giving it a go. Then along came Hercules (the winter storm not the Greek hero) and the timing just seemed right.

My first inkling that I might be onto something was when my dough actually doubled in size in the amount of time the recipe suggested. Next it was when years of making play-dough snakes finally paid off and my little ball of dough quickly turned into something resembling a pretzel. (Actually at this point I was so excited at the prospect of a successful outcome that I called the kids to come checkout my pretzels!) After a quick baking soda bath and a few minutes in the oven, the moment I dread with every bread recipe I attempt was upon us. Would it be another baking debockle or would 2014 be my year?

♫ Oh yeah. Uh huh.  I baked a pretzel. ♪  It’s my birthday. ♫…

Soft Rosemary Pretzels with Cheddar Sauce
Even if you’re not a big fan of rosemary you should still consider using some. The flavor is really subtle and it’s the difference a good pretzel and an extraordinary one.

pretzels2

1 1/2 cups warm water
2 tbsp. light brown sugar
1 package active dry yeast (2 1/4 tsp.)
6 tbsp. unsalted butter, melted
2 1/2 tsp. salt
4 1/2 cups all-purpose flour
1 tbsp. finely chopped fresh rosemary
Canola oil, to grease bowl
3 quarts water
2/3 cups baking soda
1 egg, beaten + 1 tbsp. cold water
coarse salt

2 tbsp. butter
2 tbsp. all-purpose flour
1 1/4 cups milk, warmed
1/2 tsp. salt
1 tsp. garlic powder
4 oz. sharp Cheddar cheese, shredded
4 oz. Monterey Jack cheese, shredded

  1. Combine the water, sugar, yeast, and butter in the bowl of a stand mixer and whisk to combine. Let sit for 10 minutes.
  2. Add the salt, flour, and rosemary to the mixture and mix on low-speed until combined. Increase the speed to medium and continue kneading until the dough is smooth and it has formed a ball. (If the dough appears too wet, add additional flour, 1 tablespoon at a time.)
  3. Coat a large bowl with canola oil, add the dough and turn to coat with the oil. Remove the dough from the stand mixer bowl, knead a few times and place in the oiled bowl. Cover with plastic wrap and place in a warm spot until the dough doubles in size. This will take about an hour and a half. (I usually warm my oven, turn it off and place the covered bowl inside it to allow it to rise.)
  4. When the dough has doubled preheat the oven to 400°F. Line two cookie sheets with parchment and set aside. Bring the water to a boil in a large stockpot.
  5. Divide the dough in half, then dived the halves into eight equal pieces. (Cover the bowl with a towel while working.) Roll each piece into an 12” rope, take the right side and cross over to the left, twist together and bring to the bottom. Pinch onto the curved bottom piece to create a pretzel shape.
  6. Slowly add the baking soda to the boiling water. Boil the pretzels in the water solution, 2 at a time for 30 seconds. Remove with a large flat slotted spatula and place on the prepared cookie sheet. Brush the tops of each pretzel with the egg wash, sprinkle with coarse salt and bake for 18-22 minutes or until pretzels are rich golden brown.
  7. Remove pretzels from oven and let cool on a wire rack.
  8. To make the cheese sauce: Melt the butter in a small saucepan over medium heat. Whisk in the flour and cook until it’s a golden brown. Add the warm milk, salt and garlic powder and whisk until the mixture thickens. Add the shredded cheese and stir until the cheese is melted and smooth. Serve alongside the warm pretzels.

*adapted from two peas and their pod

indian summer lavender-lemon muffins

We may have just celebrated Halloween but I still have overflowing pots of herbs happily growing on my back steps. I’m thinking about turning some into herbed salt, freezing a bit and making a little chimichuri with a bunch, but really I’d prefer to use as much as I can right now while they’re still fresh. Sage, basil, tarragon, thyme and rosemary are a real no-brainer, you can throw those herbs into just about any savory dish and come out with a winning meal, but what about the lavender? Lavender flowers have a gazillion uses, but recipes using the fresh leaves are much more limited. Lavender, lavender, lavender… what should I do with you?

While I was recipe hunting I found a few recipes for rosemary and lemon shortbread. While I did briefly consider making cookies I thought muffins would be more fun and instead of rosemary I decided to use that elusive fresh lavender. The resulting Lavender-Lemon Muffins were a huge hit, fresh with a subtle lavender flavor and a lovely pop of sweet from the lemon glaze on top. They have quickly become another Greco family favorite and perhaps they’ll become one of your families favorites as well.

Lavender-Lemon Muffins
The lavender in these babies is subtle not overwhelmingly perfumey. They’re really pretty delicious.

lavender-lemon muffins

2 cups all-purpose flour
3 tbsp. finely chopped fresh lavender
zest of one lemon
2 tsp. baking powder
1/2 tsp. baking soda
1/2 tsp. salt
1 1/2 cups granulated sugar
1/2 cup canola oil
1/2 cup low-fat milk
1/3 cup lemon juice
1/2 tsp. vanilla extract
2 whole eggs + 1 egg white

1 cup powdered sugar
1 tbsp. lemon juice

  1. Preheat oven to 375°F. Line a muffin tin with cupcake liners and lightly coat with cooking spray. In a large bowl combine together the flour, lavender, lemon zest, baking powder, baking soda and salt.
  2. Place the sugar and remaining ingredients (through eggs) in a medium bowl; beat with a mixer at low speed until smooth. Add the wet mixture to the dry and beat again until blended.
  3. Spoon batter into prepared muffin tins. Bake for 18-20 minutes or until a toothpick inserted in center comes out clean.
  4. Combine the powdered sugar and lemon juice. Stir until smooth and set aside.
  5. When the muffins are finished baking allow them to cool completely on a wire rack before drizzling with lemon glaze. Let glaze set and enjoy!

pumpkinpalooza

As far as seasonal food trends go the pumpkin-spice craze has got to be the biggest one around. Each Fall the world seems to be overrun with all things pumpkin: pumpkin spice pasta, pumpkin spice lattes, pumpkin spice marshmallows, pumpkin spice beer and vodka, pumpkin spice potato chips, pumpkin spice body lotion, pumpkin spice bagels to go with pumpkin spice cream cheese and of course pumpkin spice room freshener (a must for every seasonally appropriate home). Whew— thats quite a list, but it doesn’t stop there. We’re so off our rockers over this spicy combination that even the beloved M&M isn’t safe from it. Thats right folks, Pumpkin Spice M&M’s available exclusively at Target and completely sold out when I recently looked for them. It would appear that we’re treading dangerously close to a world-wide state of pumpkin spice hysteria.

Not wanting to be left out, I too decided to make friends with pumpkin. It is after all high in fiber, a cup of puree contains a day’s worth of vitamin A and more potassium than a banana, it’s rich in beta-carotene which is good for your eyesight and lowers the risk of developing cancer or heart disease and the seeds contain chemicals called “phytosterols” which help reduce LDL. So really whats not to love about it, right? If you recall I already use it for my devil dogs Pumpkin-oatmeal dog biscuits and in the past I’ve substituted it for butternut squash in soup, but the weather was cool and I felt like baking…

Last Fall I gave you my coveted Cranberry-Orange Muffin recipe and while I still maintain it’s muffin perfection, I decided to play around with the recipe just the same. A few spices, some pumpkin puree, a little yogurt and one crumble topping later a new Greco family seasonal favorite was born.

Pumpkin-Cranberry Crumble Muffins
These muffins are the perfect way to enjoy the flavors of the season.

pumpkin-cranberry muffin4

Crumble:
3/4 cup rolled oats
1/2 cup flour
1/3 cup brown sugar
3/4 tsp. ground ginger
1/8 tsp. salt
3 tbsp. butter, melted

Batter:
2 cups flour
1 tsp. baking powder
1/2 tsp. baking soda
1/4 tsp. salt
1 cup sugar
1 tsp. cinnamon
1/2 tsp. ground ginger
a pinch of nutmeg
12 oz. bag fresh cranberries
1 egg, beaten
1/4 cup canola oil
1/2 tsp. vanilla extract
1/4 tsp. Angostura bitters
3/4 cup canned unsweetened pumpkin
1/4 cup plain Russian kefir yogurt (or Greek)

  1. Preheat oven to 350°F. Line a muffin pan with cupcake liners and spray with cooking spray. Set aside.
  2. In a small bowl combine the oats, flour, brown sugar, ginger, salt and melted butter. Use a fork (or your fingers) to blend the mixture until it’s crumbly, breaking up any large clumps. Set aside.
  3. Combine all the dry ingredients in a large bowl, gently stir in the cranberries.
  4. In a medium bowl combine all the wet ingredients. Add the wet ingredients to the dry and stir until well blended (the batter will be thick). Spoon evenly into the lined muffin cups, top with a generous amount of crumble and bake for 30 minutes or until a tooth pick inserted in the center comes out clean.
  5. Remove from the oven and allow muffins to cool for 5 minutes in the pan, then place on a wire rack for remainder of cooling

*recipe makes 12-16 muffins

a pie in the hand…

“Candy might be sweet, but it’s a traveling carnival blowing through town. Pie is home. People always come home.”
~ Pushing Daisies

I have a confession to make; I love pie but I never make my own pie crust. I know I should, I realize that it’s not really all that difficult and that homemade is far superior to store bought, but somehow I’ve just never gotten around to giving it a whirl. However I promise that one day soon I will make the effort. I promise that one day soon I will make my crust from scratch, however today is not that day.

A few weeks ago the kids and I went apple picking. The very first thing they requested we make with our bounty was apple pie. No problem! It’s not hard to make a classic apple pie, in fact regardless of your culinary skills I guarantee you could make a successful one. Really! All it really requires is peeling and dicing a couple of apples, throwing them together with sugar and a few spices, dumping the whole shebang into a pie crust and voilà— something bubbly and delicious an hour later. But that wasn’t the kind of apple pie I had in mind. No, I wanted a pie that set itself apart from past pies, an apple pie that would keep them talking. I considered all the possibilities and decided that we’d start by making individual hand pies rather than one big one. (I had recently bought this nifty little pocket pie crimper that I thought would perfect for the job.) But I knew their cute size wouldn’t be enough to make them stand out so, I added some diced caramels and a touch of sea salt to the filling— yup, I’m crazy like that.

They were heavenly. The kids gobbled them up and begged to have them as dessert for the days that followed. But the highlight of this apple hand pie experience came yesterday morning. It was the quintessential Bill Cosby moment and it went something like this…

The boy: “Mom can I have a pie for breakfast?”
Me: “What are you crazy? No.”
The boy: “But Mom, it’s just like having toast with apple jelly.”
Me: (Now mulling over what he just said in my head) “Well, in New England they typically eat apple pie with a slice of cheddar cheese on top. (because in that moment a slice of cheese equals protein which therefore qualifies pie as breakfast appropriate.) How’s that sound?
The boy: “Seriously? I’m in!”

Yeah, it’s not my proudest mothering moment. However, the fact that my creation was such a winner and the idea that he may actually remember this moment for years to come makes me smile. And that makes my day.

Salted Caramel & Apple Hand Pies
These pies are delicious eaten out of hand, but they’re equally fantastic warm with a scoop of ice cream (or with a slice of cheddar cheese).

apple hand pie

3 ready to bake 9″ pie crusts (or homemade two-crust dough)
2 lbs. apples, peeled and diced small
2 tbsp. flour
1/2 cup sugar
2 tsp. cinnamon
1/4 tsp. nutmeg
2 tbsp. lemon juice
2 to 3 dashes Angostura bitters
15 store-bought soft caramels, halved and sliced like matchsticks
coarse sea salt
1 egg, whisked
1 tbsp. water
Demerara sugar, for finishing

  1. Preheat the oven to 375ºF. Line two cookie sheets with parchment paper and set aside.
  2. In a small bowl, combine the apples, flour, sugar, cinnamon, nutmeg, lemon juice and bitters. Stir until thoroughly mixed and set aside.
  3. Roll out the pre-made crust. Using a pocket pie crimper (or a 6″ inverted bowl), cut out as many circles as possible. Re-roll the crust scraps and continue cutting out circles until you run out of dough.
  4. In a small bowl, whisk together the egg with a tablespoon of water and set aside.
  5. Spoon a small amount of the apple filling onto the left side of each circle, leaving a border around the filling. Top the apple filling with a few grains of sea salt and 8-10 of the caramel matchsticks. Lightly brush the edge of the crust with water, cover with another half of the circle and crimp the edges together, sealing each pie.
  6. Brush each pie with the egg wash, sprinkle with Demerara sugar and cut two vents in the top of each pie.
  7. Bake for about 15-20 minutes, or until the pies are golden brown.
  8. Remove the pies from the oven and allow to rest for 10 minutes before serving.

(This recipe makes about 10 pies.)

ya can’t beet a donut

Four weeks ago I set out to convert each and every one of you into whole-hearted beet and blue cheese lovers. I’m not sure how successful I’ve been, but I have learned a few things along the way. 1. Beets can inadvertently dye a white t-shirt the most lovely shade of purple. 2. Don’t buy cheap pre-crumbled blue cheese, it tastes nothing like a good quality wedge. Spend the extra few dollars, it will make a huge difference. 3. A sizable consumption of beets will turn your urine red. Don’t panic! Think back on what you’ve eaten recently, then laugh at yourself for being such a nervous nelly. 4. Stop throwing out those beet greens. Eat them raw, sauté them with some garlic, throw them in some soup. They’re full of nutrients and deserve a little more love and a little less composting!

As the culminating recipe for my of my month of b & b I wanted to give you something truly unexpected, a recipe that you never saw coming and which perhaps makes you question my sanity. Are you ready? Is the anticipation killing you? Okay here goes. Here is my families all time favorite way to eat beets… as the secret ingredient in chocolate donuts! Sounds crazy right? It’s not. Well okay it’s kinda, but no matter, it’s a fantastic way to get a boost of natural sweetness, give your chocolate goodie a deeper more intense color and enjoy all the health benefits of beets without actually having to commit to eating a beet. I know some of you reading this are positive that you would be able to taste the mere cup and a half of puréed beet in this recipe, and for that very reason you would never consider doing something so unthinkable to a perfectly lovely chocolate donut. Here’s what I have to say to all you sceptical naysayers… change is good, embrace it. I promise that no matter how hard you try to detect the taste of beet in these babies, you won’t be able to. Seriously, once they’ve cooled and been glazed it’s impossible to taste anything but deliciousness.

And it is with that dear reader that I wrap up my month of beets and blues. But never fear, this won’t be the last time I feature a recipe with these ingredients. (I still have a few little gems up my sleeve just waiting for the right reveal.) I hope you enjoyed my little food exploration and discovered a few things about these two foods so near and dear to my heart that a month ago you never knew— including perhaps that you actually love them as much as I do.

Chocolate Cake Donuts (with beets) & Chocolate Ganache
If you don’t tell people about the secret ingredient they’ll never guess it’s anything but good ol’ chocolate glazed donut.

beet donut lilly*2

1 1/2 cups puréed beets (about 3 medium)
1 cup (2 sticks) unsalted butter, softened and divided
1 1/2 cups packed dark brown sugar
3 eggs, room temperature
4 oz. semi-sweet chocolate
1 tsp. pure vanilla extract
2 cups cake flour
2 tsp. baking soda
1/4 tsp. salt
1/4 tsp. cinnamon
1 tsp. espresso powder
3 tsp. dark cocoa powder
chocolate ganache glaze (recipe below)

  1. To make beet puree: Preheat oven to 400°F. Trim the stems off the beets and place them on a sheet of aluminum foil. Wrap them tightly, place the bundle in a pie tin and roast for an hour or until the tines of a fork easily pierce the beet. Allow them to cool so that you can handle them, peel off the skins, dice them and place the beets in a food processor. Process until a smooth puree forms and set aside. (I often roast and puree my beets a day or two in advance.)
  2. Grease or spray two donut pans and set aside.* In a mixing bowl, cream together 3/4 cup (1 stick plus 4 tbsp.) butter and brown sugar. Add the eggs one at a time, mixing well and scraping down the sides after each addition.
  3. In a small saucepan or the microwave, melt together the chocolate and remaining 1/4 cup (4 tbsp.) butter, stirring until smooth. Allow to cool slightly before adding the melted chocolate, beets and vanilla to the creamed butter mixture. Mix well, the batter will appear a bit separated but not to worry.
  4. In a medium bowl combine the flour, baking soda, salt, cinnamon, espresso powder and cocoa. In two separate batches, add the dry ingredients to the wet ingredients and mix well.
  5. Fill each doughnut form half way with batter. (I find it’s easiest to pour the batter into a ziplock bag, snip off one corner and pipe it into the pan.) Bake in a 375°F oven for 10-12 minutes, or until they spring back when touched.
  6. When the donuts are finished baking carefully transfer them to racks and allow them to fully cool, they are VERY crumbly while they are still warm.
  7. Glaze the tops of each donut with the ganache either by dunking or spreading it on. The ganache will firm up as it sets, but don’t let that stop you from enjoying one right away!

*I have also used this recipe to make a bundt cake which I then drizzled with the ganache. Bake in a well-greased and floured bundt pan for 55-60 minutes, or until a toothpick inserted near the center comes out clean.

*adapted from straight from the farm

Chocolate Ganache
It doesn’t get much easier or tastier than this three ingredient ganache.

4 oz. bar semi-sweet chocolate
1/2 cup heavy cream
1/2 tsp vanilla
  1. In a saucepan, bring the heavy cream to a boil. Break the chocolate into small pieces and place in a medium bowl. Pour the boiling cream over chocolate and stir until smooth. Add in the vanilla, stir and let cool slightly then glaze away!

make you a convert cookies

It’s that time of year again. The time of year that parents of school aged children dream about for nine months. The time of year when memories of endless school projects, fundraisers and homework are slowly being shed like winter coats. Yes that’s right, it’s finally, thankfully and just-in-the-nick-of-time-or-I-really-might-have-lost-it… the end of the school year!

But just as I’m getting ready to heave a giant sigh of relief along come the notices about end of the year parties, plays, picnics etc. All of which would be very happy to accept my donation of a baked good (“peanut-free and at least a dozen please.”) Of course I’ll send something along, how could I not, but I feel as though I’ve managed to paint myself into a bit of a corner. I’ve shown up to enough events and class birthday’s with something yummy in hand that now at the end of year when I’m just plumb tired, I have to “bring it” one final time. Sigh. Me and my big mouth and weekly blog.

I considered making cupcakes but I figured the dessert table would be awash in them. Then I thought about some lemons bars; but the recipe literally only makes a dozen. What if they turned out so delicious that there was a stampede trying to get to the dessert table. And what if several little people were injured in the may lay and never able to look at a lemon bar again without having flashbacks— I’d feel terrible! So I settled on cookies, ya can’t go wrong with a cookie (that’s my motto anyway) and I knew just which recipe to make.

As you may recall I collect cookie jars and while most of them hold bric-a-brac and dust bunnies, one is usually filled with something freshly baked. A wide variety of cookies come and go through that jar, but some that never hang around long enough to get stale are my Cherry & Chocolate Oatmeal Cookies. I know what some of you are thinking, “I don’t like oatmeal cookies.” I’m with you, I usually don’t either. I don’t like their grainy texture or how overly spiced and sweet they usually are. And I can’t stand raisins in my cookies (don’t even get me started on walnuts in my brownies!) Anyway, the oatmeal cookies you’re thinking of and writing off as not for you, are not these cookies. These are without a doubt the oatmeal cookies that will covert you.

Cherry & Chocolate Oatmeal Cookies
These are my go to cookies when I have to show up somewhere with treats. The recipe makes about 2 1/2 dozen large cookies, plenty to take to school and enjoy a few at home as well!

oat-choc cookies3

1 1/4 cups white whole-wheat flour
1 cup quick cook oats
1/2 tsp. baking powder
1/2 tsp. baking soda
1/4 tsp. ground cinnamon
1/4 tsp. salt
1 stick unsalted butter, melted
3/4 cup packed brown sugar
1/4 cup granulated sugar
1 1/2 tsp. pure vanilla extract
1 large egg
2 tbsp. 2% milk
1/2 cup dried cherries (or cranberries)
1 12 oz. bag dark chocolate morsels

  1. Preheat oven to 350° F. Line two baking sheets with parchment paper and set aside.
  2. Mix together the flour, oatmeal, baking powder, baking soda, cinnamon and salt in small bowl.
  3. In large bowl beat together the butter, brown sugar, granulated sugar and vanilla until creamy. Scrape down the bowl and add the egg and milk. Beat until well combined and a batter has formed.
  4. Add the flour/oat mixture to the batter mixture and gently stir to combine (it will seem dry but not to worry). Add the cherries and chocolate morsels and stir until blended. Drop by rounded tablespoon (or cookie scoop) onto the baking sheets. (The cookies will spread a bit so be sure to leave enough room between each one.)
  5. Bake for 17-20 minutes or until the tops are lightly browned but centers are still soft. Cool on wire racks, then try and eat just one.