eat like an inca

If you know me then you know I’m a restless spirit; I would much rather jump into the unknown then live in the routine. This adventurous streak probably explains my love of travel and my current obsession with the tv show Expedition Unknown. Some episodes make me think things like: “Hmm. Honduras definitely does not look like my cup of tea (or rice and beans as the case may be).” While others actually make me consider enduring the twenty plus hour flight to see the ancient temples of Thailand. I love watching them investigate age old myths and legends in far flung places. A recent episode all about the ancient Inca Trail, with a detour to the ruins of Machu Picchu, really hit home with me. Visiting Machu Picchu has long been on my list of someday adventures. I mean c’mon, have you seen pictures of the amazing stone ruins smack in the middle of the Peruvian mountain forest? How could you NOT want to go and see them for yourself?!? It must be a truly amazing, and perhaps almost life altering experience. (And husband of mine if you’re reading this, don’t be surprised when I say “I’ve been watching flights to Peru and…” Okay so I watched the episode, made notes (not kidding) about airports to fly into and altitudes to adjust to and went to bed. The next morning while standing in the kitchen drinking coffee I spotted a piece of paper sticking out from behind one of my cookbooks. As I went to shuffle it back into the pile the bold letters at the top of the page caught my eye: “Chili-Lime Inca Corn” Seriously? Incas last night. Incas this morning. I think someone is trying to tell me something.

This seemingly mystical connection just happened to take place on the first warm weekend of the year. Since I was looking for any excuse to be outside enjoying the sunshine and hoping “this is finally it for Winter” I decided it was time to break out the cast iron pan, fire up the grill and make a little Inca corn. So how’d it turn out? Well, I have but one thing to say: The demise of the Inca Empire clearly had nothing to do with their choice in food. These little fried corn kernels are pure gold.

Inca gold.

Homemade Chili-Lime Inca Corn
These are totally addictive. Be prepared.

Inca Corn2

15 oz dried giant corn/Maiz Mote
Canola/Olive oil blend
1 tsp chipotle chili powder
zest and juice of 1 lime
1 1/2 tsp fine pink salt
1 tsp smoked paprika
  1. Place the dried corn in a pan with a lid, cover with water and allow to sit for 7-12 hours.
  2. Drain corn, shaking as much water off as possible and spread out on a clean tea towel. Allow to dry for an hour or so minutes. (It doesn’t need to be bone dry, you just don’t want much water on the surface as you’ll be dropping it into hot oil.)
  3. While the corn is drying make your spice mixture. Mix together the chili powder, lime zest, pink salt and smoked paprika. Transfer the spice mixture to a doubled paper lunch bag and set aside.
  4. Line a rimmed sheet pan with paper towels for draining the fried corn.
  5. In a cast iron pan or high sided skillet heat 1/4 inch of oil to 375º F. Working in batches add the corn to the oil and fry until the it’s a toasted golden brown, stirring frequently. Use spider or slotted spoon to remove the corn from the oil and transfer it to the paper towel lined sheet pan. Continue with the remaining corn.
  6. When all the corn is fried squeeze the juice from your tested lime all over it. Carefully transfer the corn to the lunch bag containing the spices and shake well to coat. The corn will become cruncher as it sits and will keep for several days (if it lasts that long).

*adapted from the kitchn

smoked beer can chicken soup

Autumn is my favorite season. I love the chill in the air; I love the contrast between the bright blue sky and Mother Nature’s muted colors; I even love the cool, earthy and slightly damp way the world smells. Around this time each year I’m typically elbow deep in end of the season garden veggies; namely peppers, tomatoes, onions and eggplant. But not this year. This summers garden was a serious bust. I gave it just as much love as I ever do and the meager amount of veggies it produced was beyond disappointing. Sure my cucumber plants grew so voraciously we were eating cucumber with nearly every meal, but I got exactly two habanero and six bell peppers, the yellow and acorn squash flowered but then nada, the radishes and beets were nothing but greens and the tomato plants grew taller than me but only offered up a few handfuls of fruit. It broke my heart. What did truly flourish and produce in abundance were the tomatillos. The plants were so tall and willowy they resembled trees and each was covered stem to stern in little paper-thin green lanterns that would later be filled with the tomatillo fruit. It was the bountiful harvest I had been longing for. So you may be wondering, what did I do with all those lovely tomatillos? Well… I ate them sliced in salads and as a garnish for tacos. I made an insanely spicy Salsa Verde and I threw a handful in with some heirloom purple tomatoes for a kooky homemade pasta sauce. And I made soup.

Ours is a house of soup eaters, in fact my daughter is so crazy for soup that she’ll frequently request the leftovers for breakfast. No problem… In my mind there’s nothing like a warm comforting bowl of some homemade goodness to make a chilly Fall day (or morning) seem downright toasty. Believe it or not I’ve actually been planning for my first pot of Fall soup for a few months now. I know, seems a little crazy right? But it’s not really. You see my husband really honed his smoked beer can chicken technique this past summer. What started out as a good recipe in June turned into a killer recipe by August. It was so good that beer can chicken was the meal requested by my son’s friend the night he slept over. (And you know when a super picky 10 yr old requests one of your recipes it must be good!) Anyway, to ultimately get to this poultry of perfection recipe he made beer can chicken fairly frequently— sometimes as often as two weekends in a row. Mind you I’m not complaining, just explaining that we had a considerable amount of leftover chicken in the house and one can only eat so many chicken salad sandwiches! So, I decided to quietly squirrel away some of the leftover bits in the freezer in anticipation of that first pot of soup.

Fast forward to a chilly day in September, a day that begged for soup. Into the pot went some onion, a green pepper and a bunch of those lovely tomatillos. Out of the freezer came my carefully rationed chicken and an hour later… into our belly’s went some of the tastiest soup ever to come out of my kitchen.

And yes, my littlest love did in fact have a bowl of it for breakfast the next day.

beer can soup

Smoked Beer Can Chicken Soup
Any sort of leftover chicken will do but the smoked beer can really brings a nice flavor to the party.

3 tbsp. olive oil
2 cups diced onion
3 cloves garlic, minced
1 lb. tomatillos, husked, washed and diced
1 green bell pepper, diced
2 tsp. salt
1 tbsp. smoked paprika
1 tsp. ground cumin
1/4 tsp. chipotle chili powder
3 cups frozen corn, defrosted
2 15 oz. cans black beans, rinsed
8 cups chicken stock
4 cups leftover beer can chicken, cut into bite size pieces
Sliced jalapeño, fresh cilantro, avocado (optional garnish)

  1. In a large stockpot over medium heat warm the oil until it just begins to shimmer. Add the onions and cook until they become transparent. Then add the garlic, tomatillos and peppers. Season with salt and let cook until the tomatillos break down and become soupy.
  2. Add to the pot the spices, corn, black beans, stock and leftover chicken. Bring to a boil, reduce to a simmer and let cook for 10 minutes. Ladle into bowls and enjoy garnished with sliced jalapeño, fresh cilantro and avocado if you like.

bacon!

Ba·con. (bey-kuhn) noun. Cured and smoked meat from the sides and belly of a pig. Bacon. A smell immediately identifiable by hard core vegans and dyed in the wool carnivores alike. Bacon. A food that has reached a cult like obsession within the food community. Bacon. An item that until I made it myself, I really never gave a flying fig about. Bacon. The topic of this post…

Sure I’m the girl who gave you candied bacon, followed naturally by Candied Bacon Fudge; but I never really considered bacon as anything more than just another ingredient. However strangely enough, when we became the proud owners of a smoker my first thought was BACON! Crazy, right? Or perhaps not… Anytime I can figure out how to make something from scratch that I’ve ALWAYS had to buy, I do. Bacon seemed to fit that criteria perfectly! The more I considered bacon (be it homemade or store-bought) the more I began to see it’s inherent value. What would Quiche Lorraine be without bacon? And how sad would that BLT sandwich be without good ol’ bacon? Not to mention my roasted brussels sprouts or mashed turnips. I quickly came to the conclusion that bacon is in fact much more of a superstar than I’ve been giving it credit for.

Last summer was the first time we attempted curing and smoking a pork belly. I couldn’t find one recipe that seemed exactly right, so I cobbled two of them together and dove headlong into the process. The resulting bacon was not exactly a success. It was bacon all right but it was extraordinarily salty bacon, way too salty to be eaten on it’s own. I ended up using it in a variety of yummy recipes, but my desire to create the perfect slab of homemade bacon still loomed large in my little foodie heart. I spent the winter on a mission to find what I deemed the ideal bacon recipe, I was a girl obsessed. And then I found it. A recipe from Whole Foods for Brown Sugar-Black Pepper cured bacon. Naturally I tweaked the recipe a smidge (come on now, you know I can’t help myself!) but followed the curing directions to a tee. And guess what happened? Deliciousness baby. Total and absolute deliciousness!

We ate the bacon just as is. We ate bacon and egg sandwiches (on homemade english muffins). We ate black-eyed peas with bacon, brussels sprouts with bacon and maple syrup and one of my all time favorite side dishes— braised collard greens with bacon. We were in a bacon stupor and damn we were happy.

Bacon. Possibly the world’s most perfect food.

Homemade Brown Sugar-Black Pepper Bacon
Delish. Delish. Delish.

bacon group4

5 lbs. fresh deboned pork belly
4 cups coarse kosher salt
2 cup brown sugar
1 1/2 cups granulated sugar
2 tbsp. ground black pepper

  1. Rinse pork belly and then pat dry with paper towels to remove excess moisture.
  2. Combine salt, brown sugar, granulated sugar and back pepper in a mixing bowl. Place half of the mixture in a large lidded container. Add the pork and cover with the remaining salt mixture, being sure that it is fully submerged in the salt.
  3. Cover and refrigerate the pork belly for 1 week, checking on it once or twice to be sure it’s still fully covered with the salt mixture. This will “cure” the belly, creating salt pork (a.k.a. unsmoked bacon).
  4. Remove the pork from the cure and rinse well under cold water. Fill a bowl large enough to hold the pork belly with water and submerge the pork. Allow to soak for 30 minutes then pat dry with paper towels and place on a rack fitted in a large rimmed baking pan (a lasagna pan works well). Refrigerate, uncovered, overnight to air-dry.
  5. Prepare the grill (or smoker) for indirect cooking over very low heat. Add 1 wood chunk (such as hickory or pecan) to the charcoal, or add 1 handful of the wood chips to the smoker box of a gas grill, following manufacturer’s instructions. Close the lid. When the wood begins to smoke, place the pork belly over indirect heat.
  6. Cook until pork is firm and slightly darker, about 1 1/2 hours, until the internal temperature reaches 145-150°F. Remember, you’re infusing the pork belly with a smoky flavor, not fully cooking it at this point. (If using a charcoal grill, replenish the charcoal as needed to maintain a steady temperature. Add 1 wood chunk to the charcoal every 30 minutes, or drain and add 1 handful of the remaining wood chips to the smoker box every 20 minutes before the old chips burn out.)
  7. Allow bacon to cool, then cover and store in the fridge for up to 2 weeks or thoroughly wrap and freeze for up to 2 months. (The colder the bacon is the easier it will be to slice.)
  8. Thinly slice, cook and enjoy!

*adapted from whole foods

Braised Collard Greens with Bacon
Even if you’re unfamiliar with collards and don’t really think you’d like them, this recipe will change your mind. It’s honestly one of my most favorite things to eat.

3/4 cups homemade bacon cut into lardons (or slab bacon, diced)
1 1/2 lb. bunch collard greens
4 cups onion, diced
4 cloves garlic, grated
1 12 oz. bottle of beer
2 cups chicken stock
1 tsp. salt
1 tsp. black pepper
1 tsp. smoked paprika
1/4 tsp. ground cayenne pepper

  1. Dice the bacon, add to an already hot stockpot and allow it to crisp and the fat to render, about 5-8 min. Rinse the collard greens and remove the tough center stem of each leaf. Stack a few leaves together and slice them into thin strips. Repeat with the remaining leaves.
  2. Add the diced onion and garlic to the bacon fat and saute until the onion is translucent. Add the beer to deglaze the pan, being sure to scrape up any brown bits that have formed on the bottom.
  3. Add the sliced greens and stir until they are all moistened. Cover and cook for 5 minutes or until they begin to wilt. Add the spices and stock, reduce to low and cover. Allow to simmer, stirring occasionally, for 20 minutes. Uncover and cook for 15- 25 more minutes. (I like my greens to still have a bit of texture to them so I cook them for 35 minutes, if you like yours mushy go for the 45.)

rub me the right way

Last weekend may have been the unofficial start of Summer, but in my mind it actually began a few weeks ago. You see for me the early days of Summer have less to do with the calendar and more to do with rediscovering life outdoors. It’s little things like; starting each day off with coffee on the deck, my vegetable garden being fully planted and prospering, the remaining school year being counted in weeks rather than months and the grill and smoker working overtime churning out something delicious nearly everyday of the week. Yeah, it’s definitely the little things that best tell the story of the season for me.

My husband received an offset smoker as a birthday gift about a year ago and has been on a mission to become the ultimate backyard smokin’ guru ever since. He spent last summer perfecting smoked chicken and ribs— he modified the firebox, researched optimal fuel types and temps, watched countless hours of BBQ Pit Masters and collaborated with yours truly on marinades, rubs and sauces. We spent a considerable amount of time developing a wet rub that was initially our go to recipe for ribs, but after giving it a try on chicken it ended up our go to recipe for just about everything. Shrimp, ribs, chicken, pork roast… it’s a winner every time.

Basically all a rub consists of is ground spices, sugar and salt, pretty simple. Rubs are typically massaged into the meat and then allowed to sit for a few hours so that the flavors can permeate. Our recipe starts out pretty much the same as all the others but then we add a twist— apple cider vinegar. You see we wanted to develop a rub recipe that would ensure the meat would stay moist during its long cook on the smoker, would provide plenty of flavor and would work to tenderize and “flavorize” the meat rather quickly. (While we always plan our smoking adventures well in advance we’re not always so quick on the fire building prep and execution!) In the past I’ve used balsamic vinegar as a quick marinade for grilled pork chops— the acids in the vinegar help to tenderize the meat in a very short amount of time and keep it moist while it cooks. Balsamic is a pretty strong flavor, but I thought apple cider vinegar would achieve the same results with a much more appealing profile. We mixed together our spices, added brown sugar and kosher salt, poured in the vinegar, blended until it was a watery paste and schmeared it all over the meat. Holy moly it was amazing!

And as they say… the rest is history.

Best Ever BBQ Wet Rub
This rub works well on everything. Seriously, everything.

rib rub2

1 tsp. smoked paprika
1-2 tsp. chipotle chili powder
1 tsp. chili powder
1 tsp. Chinese Five Spice
2 tsp. ground cumin
3 tsp. kosher salt
3 tsp. garlic powder
5 tsp. brown sugar
5 tbsp. raw apple cider vinegar

  1. Mix all the ingredients together in a medium bowl. Schmear all over the meat and allow to sit for a few hours before smoking or grilling*.

*Because of the brown sugar in the rub be sure to grill the meat slowly over a medium-low flame to avoid charing.

game day chili

Let me begin by introducing myself; my name is Jim Greco and I’m the husband of the tour de force behind Beets and Blue Cheese. I’ve been asked to be this weeks “Blogger Emeritus” because it’s Super Bowl Weekend and (since the Giants didn’t make it this year) that really only means one thing in our house…CHILI!

Chili typically means the following: “Chili- noun \ˈchi-lē\: A small hot-tasting pod of a variety of capsicum, used chopped (and often dried) in sauces, relishes, and spice powders or a spicy stew of beef and red chilies or chili powder, often with beans and tomatoes.”

However in my house it has many connotations; football, cold weather, skiing and fermented hops consumption to name a few. Now chili may not be a strictly cold-weather food, but the only time it seems to appear in our house is when the cold northwest winds are blowing. Once the weather gets warm it’s “Jim can you light the grill— I give got some chicken/skirt steak/pork chops marinating…” (I know, your heart breaks for me, right?) Anyway, back to the chili. Jan didn’t just happen upon her chili recipe, she’s actually been working on it for years but only recently did she actually write it down. It was always good, but some batches would definitely be better than others depending on how much of this and that she put in it. After much begging and pleading on my part she finally has a real recipe to refer to, and I have perfect chili every time!

Jan’s chili is a pot of pure tasting delight with a definite dash of heat. She makes it with ground turkey rather than beef (I suppose because of my cholesterol levels), but believe me you won’t care a bit. In fact it takes quite a bit of control to eat just one bowl! (Actually I usually add an extra scoop to my dish without anyone looking, but lets just keep that between us.) Since our kids can’t really appreciate the intense heat her chili of old used to crank out it’s been “toned down” lately, but based on her ingredient list I’m sure you can modify the recipe and get the Scoville level up to where it’s perfect for you. I usually add a little of Franks’ Hot Sauce or sliced jalapeno to kick it up to a sweat-enducing level.

I’m lucky to be the husband of a food blogger and quite frankly, any way she chooses to make chili suits me just fine. Especially when it is accompanied by some nice hoppy brew and her delicious homemade cornbread! So my friends and fellow followers of Beets and Blue Cheese enjoy this fantastic chili recipe and remember, there’s no shame in seconds!

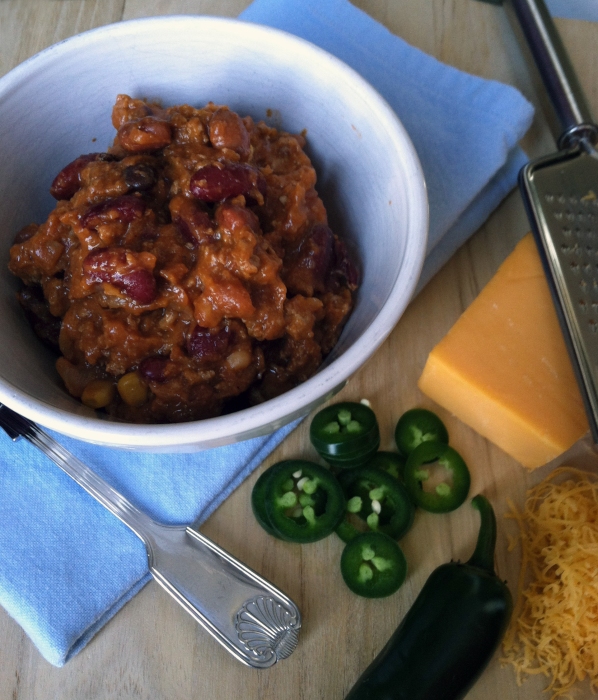
Turkey & Bean Chili
This recipe makes enough chili for a Super Bowl party sized crowd, but never fear it freezes beautifully as well.

chili

3 tbsp. olive oil
4 cups onions, diced
6 cloves garlic, minced
3 lbs. ground turkey
3 tbsp. flour
2 1/2 cups tomato sauce (homemade or jarred)
1 cup water
4 cups chunky chipotle salsa
1 tbsp. ground cumin
1 tbsp. smoked paprika
2-3 tsp. chipotle chili powder
1 tsp. garlic powder
1 tsp. salt
1 tsp. black pepper
7 cups canned kidney or pinto beans (or a mix of both), rinsed

  1. Heat the olive oil in a large dutch oven, add the onion and sautee over medium-high for 5 minutes. Add the garlic and turkey and cook about 10 minutes. Sprinkle with flour, stir well and allow to cook an additional 2 minutes, until the juices are absorbed.
  2. Add the tomato sauce, salsa, water and all the spices. Give a good stir, add the rinsed beans and stir again. Reduce the heat to low, cover the pot and simmer for an hour fifteen to an hour and a half, or until the beans are tender and the turkey is cooked through.
  3. Serve garnished with sliced jalapeno, cheddar cheese or sour cream and with a side of homemade cornbread or tortilla chips.