gluten-free donuts that won’t make you barf

Well hello. That’s right, I’m baaack— We’ll technically I’ve never been gone, just busy. But I’m here now and ready to dish (pun intended).

A while ago I talked about going gluten-free. I’ve continued to vacillate over gluten, frequently debating with myself whether it makes a difference in how I feel day-to-day, and never really coming to a conclusion. Then my daughter started suffering from frequent stomachaches. However since it was the year of the debilitating stomach-flu and she does have a propensity to worry, I kept thinking perhaps those were the culprits behind the complaints. But then she threw up in school. After eating snack. And a classmate slipped in it. (Yeah, disgusting. He cried, she didn’t.) That’s when the clouds parted and the pieces fell into place, each time she ate food with gluten she got a stomachache. Sometime a little gassy ache and sometime a big barfy ache, but an ache nonetheless. I did a little gluten elimination experiment, and she felt great. I concluded my experiment with a celebratory grilled cheese on regular bread and guess what. Bellyache. She is now officially a gluten-free girl.

It’s pretty easy these days to find tasty and inexpensive gluten-free options at the store and more and more packaging is including “Gluten-Free!” on the label, making it all the easier to shop. But I have to say that when it comes to breads and baked goods the options are a bit bleak. I was recently gifted a andwich bread and bagel recipe from a co-worker whose daughter is celiac (I’ll share them after I make the recipes a few times) but I was on a mission to find a recipe for something that seemed indulgent and treat worthy. Hello donuts!

Since I’d already conquered Chocolate-Beet Donuts and Baked Cinnamon Spice Donuts I thought revisiting those recipes was a good place to start. While chocolate is always a fan favorite the extra moisture from the beets, coupled with the nontraditional flour, made recipe conversion tricky. The spiced donuts however were begging for a re-do, and so I re-did. Behold… The best homemade baked gluten-free donuts guaranteed NOT to make you barf. You’re welcome.

Gluten-free Cinnamon Spice Donuts
These are the best donuts. Seriously. Gluten and guilt free deliciousness in one good to go package.
glutenfree donut2

1 cup flax meal
1 cup rice flour
2 tsp. baking powder
1 tsp. baking soda
1/8 tsp. salt
1/4 tsp ground cloves
1/4 tsp. nutmeg
1 tsp cinnamon
1/2 cup granulated sugar
1/4 cup coconut oil, melted
1/2 cup + 2 tbsp. whole milk buttermilk, room temperature
4 eggs, beaten
1/2 tsp. Angostura bitters

sugar coating:
3 tbsp. coconut oil, melted
2/3 cup granulated sugar
1 1/2 tsp. cinnamon
1/4 tsp. ground cloves
1/4 tsp. nutmeg

  1. Preheat the oven to 375°F. In a medium bowl whisk together all of the dry ingredients. Place the coconut oil in a large bowl and pop in the microwave for a minute to melt. Add to the coconut the buttermilk and eggs and beat, then add the bitters and whisk to combine.
  2. Gradually add the wet ingredients to the dry and stir until just until combined.
    Grease or spray the doughnut pan and fill each doughnut form half way. (I find it’s easiest to pour the batter into a ziplock bag, snip off one corner and pipe it into the pan.)
  3. Bake for 8-10 minutes. (You’ll know they’re done when they spring back when touched and are just beginning to brown on top.)
  4. While the donuts are baking mix together the cinnamon-sugar coating in a medium bowl and melt the coconut oil. Set aside.
  5. When the donuts are finished baking, immediately remove them from the oven and brush them with coconut oil. Give them a quick roll in the cinnamon-sugar coating and enjoy!

eat like an inca

If you know me then you know I’m a restless spirit; I would much rather jump into the unknown then live in the routine. This adventurous streak probably explains my love of travel and my current obsession with the tv show Expedition Unknown. Some episodes make me think things like: “Hmm. Honduras definitely does not look like my cup of tea (or rice and beans as the case may be).” While others actually make me consider enduring the twenty plus hour flight to see the ancient temples of Thailand. I love watching them investigate age old myths and legends in far flung places. A recent episode all about the ancient Inca Trail, with a detour to the ruins of Machu Picchu, really hit home with me. Visiting Machu Picchu has long been on my list of someday adventures. I mean c’mon, have you seen pictures of the amazing stone ruins smack in the middle of the Peruvian mountain forest? How could you NOT want to go and see them for yourself?!? It must be a truly amazing, and perhaps almost life altering experience. (And husband of mine if you’re reading this, don’t be surprised when I say “I’ve been watching flights to Peru and…” Okay so I watched the episode, made notes (not kidding) about airports to fly into and altitudes to adjust to and went to bed. The next morning while standing in the kitchen drinking coffee I spotted a piece of paper sticking out from behind one of my cookbooks. As I went to shuffle it back into the pile the bold letters at the top of the page caught my eye: “Chili-Lime Inca Corn” Seriously? Incas last night. Incas this morning. I think someone is trying to tell me something.

This seemingly mystical connection just happened to take place on the first warm weekend of the year. Since I was looking for any excuse to be outside enjoying the sunshine and hoping “this is finally it for Winter” I decided it was time to break out the cast iron pan, fire up the grill and make a little Inca corn. So how’d it turn out? Well, I have but one thing to say: The demise of the Inca Empire clearly had nothing to do with their choice in food. These little fried corn kernels are pure gold.

Inca gold.

Homemade Chili-Lime Inca Corn
These are totally addictive. Be prepared.

Inca Corn2

15 oz dried giant corn/Maiz Mote
Canola/Olive oil blend
1 tsp chipotle chili powder
zest and juice of 1 lime
1 1/2 tsp fine pink salt
1 tsp smoked paprika
  1. Place the dried corn in a pan with a lid, cover with water and allow to sit for 7-12 hours.
  2. Drain corn, shaking as much water off as possible and spread out on a clean tea towel. Allow to dry for an hour or so minutes. (It doesn’t need to be bone dry, you just don’t want much water on the surface as you’ll be dropping it into hot oil.)
  3. While the corn is drying make your spice mixture. Mix together the chili powder, lime zest, pink salt and smoked paprika. Transfer the spice mixture to a doubled paper lunch bag and set aside.
  4. Line a rimmed sheet pan with paper towels for draining the fried corn.
  5. In a cast iron pan or high sided skillet heat 1/4 inch of oil to 375º F. Working in batches add the corn to the oil and fry until the it’s a toasted golden brown, stirring frequently. Use spider or slotted spoon to remove the corn from the oil and transfer it to the paper towel lined sheet pan. Continue with the remaining corn.
  6. When all the corn is fried squeeze the juice from your tested lime all over it. Carefully transfer the corn to the lunch bag containing the spices and shake well to coat. The corn will become cruncher as it sits and will keep for several days (if it lasts that long).

*adapted from the kitchn

mayonnaise musings

I think I need a muse. It appears that I’ve become so distracted by “my life” that when I’m actually able to carve out a little time for “my self” I’m at a loss. I need inspiration, a creative catalyst, a bit of meaningful illumination. Seriously, I think a muse is the answer. (And just for future reference, if you should one day decide to search ‘creative muse’ on Craigslist be prepared to be surprised.) Okay, so back to my slump… I’ve been trying to come up with an idea for a new post ever since my last one two months ago. It’s not that I haven’t been cooking, frankly the cooking is the easy part, it’s that I haven’t had the time to test, photograph and come up with a few snappy lines about the amazing thing I just made. So instead I’ve been pondering and considering, waiting for the ‘spirit of the whisk’ (not a real thing but it should be) to transcend upon me and simply biding my time until it does. After all you can’t rush transcendence.

I was standing in my kitchen the other morning drinking coffee and checking email when the strangest idea popped into my head: “I should really make mayonnaise.” That was it, nothing more. “Huh… Should I?” I thought to myself. I’ve made plenty of perfectly-good-as-store-bought-but-took-the-time-to-make-anyway condiments in the past (including Hollandaise the fancy cousin of mayo), so why not mayonnaise. Why not?

As it happens at the same time I was have my little egg and oil emulsification epiphany the NY Times was running a recipe for Classic Deviled Eggs written by the same co-author of the cookbook I based my mayonnaise recipe on; Sheila Lukins. Was my food processor a portal to the after life? Was Shelia trying to tell me to keep on truckin’? The answer remains unclear, but then you already know my stance on rushing the mystical, her mayonnaise however was a thing of ethereal beauty.

Simple Homemade Mayonnaise
You can totally adjust the tang of this mayo by playing with the amount of lemon juice you use.

mayonnaise

2 egg yolks
1 whole egg
1 tbsp. Dijon mustard
1/8 tsp. salt
pinch of black pepper
3 tbsp. lemon juice
1 1/4 cups vegetable oil

  1. Combine all the ingredients except for the oil in the bowl of a food processor and allow to run for 1 minute.
  2. With the motor still running slowly drizzle the oil through the feed tube, allowing the eggs and oil to emulsify. Scrape down the sides, pulse a few more times then transfer into a airtight container. Store in the refrigerator, it will keep for 5 days.

*adapted from the new basics cookbook


ya can’t beet a brownie

I don’t know about you but I love brownies. Rich, chocolatey, cakey, satisfying brownies. No nuts. No frosting. No edges. (I’m a center of the pan kinda girl.) I love those classic, foundation of many a bake sale and potluck, way better than a slice of cake treats— But I almost never make them. Why? Because while they exude an air of nostalgia and casual effortlessness, they are in fact persnickety little monsters and total baking with ease impostors. Let me explain..

Over bake them and they’re tough and chewy, sticking to the pan and in your teeth. Under bake them and they’re a mushy, gooey, fall apart mess. And then there’s the cooling factor. Even if you time the baking exactly right you still have to let them cool an inordinate amount of time before even attempting to cut into them. Can’t fight you’re impatient inner child and start slicing while they’re still too warm… Hello stuck to the knife brownie mess! And honestly, whom among us hasn’t been lured into making a batch (whether it be from scratch or boxed) only to end up standing at the counter scraping bits of brownie off the bottom of the pan, smushing them together to create a pitiful brownie lump and shoveling them into your mouth so as to not have your efforts wasted. All the while swearing “NEVER AGAIN”. I know, I’m with you. I’ve totally been there. Which is why it’s all the more surprising that I decided out of the blue to make brownies from scratch. Perhaps I was feeling invincible or perhaps I was simply feeling that keeping up with work, kids and home wasn’t enough of a challenge that week. Whatever the case may have been there I was whipping up a batch of brownies for two sick kids. (Oh yeah, did I forget to mention that my kids were both home sick from school. Yup, they were. Two sick kids. Both home. Two days. Good times.) Anyway… Amid the chaos that was last week I decided to make brownies, no doubt as much for myself as for them.

I’m a bit of a recipe pack-rat; squirreling away magazine pages, newspaper clippings and dozens of forwarded to myself emails containing recipes that I plan to make “someday”. One of the scraps of paper at the top of my pile was a brownie recipe from C for Food & Agriculture. (If you’re not familiar with Stone Barnes then by all means you should be, it’s an incredible place with an equally amazing restaurant Blue Hill at Stone Barns smack at the center.) The recipe was for rich, decadent brownies with a subtle orange flavor and beets as the secret ingredient. This wasn’t the first time I had decided to sneak beets into my baked goods, remember those yummy Chocolate Cake Donuts with Chocolate Ganache, so I jumped right in. I knew the beets would add moisture and texture to the mix and that once cool, their flavor would be virtually undetectable. And I was right, they were delicious! Rich, moist and chocolatey with just the right hit of orange and just the right amount of soul soothing decadence to make this harried mom and her two sick kids feel momentarily better.

The kids are thankfully on the mend and everyone will be heading back to school (and work) tomorrow, perhaps with a tasty little square of Orange-Beet Brownie tucked into their lunch boxes. Unless of course I tell them the brownies are all gone and secretly polish off the rest myself. A little white tie never hurt anyone and frankly, I think I’ve earned it.

Orange-Beet Brownies
Once these babies are cool no one would ever guess they contain beets!

beet brownie3

3 small beets, trimmed
8 oz. good-quality bittersweet chocolate (such as Ghirardelli 60% cacao)
1 stick salted butter, diced
1 cup granulated sugar
3 eggs
zest of 1 orange
3 tbsp. orange juice, divided
1 1/4 cups self-rising flour*
confectioner’s sugar, for dusting

  1. To make the beet purée: Preheat oven to 400°F, wrap the beets in foil and roast for 45 minutes or until the beets are easily pierced with a fork. Let cool until they can be handled easily, then peel and dice. (I usually do this the day before I plan to bake the brownies.)
  2. Add diced beets and 1 tablespoon of orange juice to the bowl of a food processor and blend to a purée, set aside to cool.
  3. Lower oven temp to 350°F and lightly grease an 8×8 pan, set aside.
  4. Break the chocolate into pieces and place in a heatproof bowl over a saucepan of simmering water. Add the diced butter and let melt, stirring often.
  5. In another bowl, beat the sugar with the eggs until smooth and creamy. Stir in the orange zest and remaining orange juice, puréed beets and flour. Then slowly add the melted chocolate and beat until fully combined.
  6. Pour the batter into the prepared pan and bake for 35-40 minutes.
  7. Allow to cool for 15 minutes in the pan before removing to a rack. Then cool for another 15 minutes before attempting to cut. Dust with confectioner’s sugar and enjoy!

*To make gluten-free self-rising flour: Combine 2 cups of gluten-free flour with 3 teaspoons of baking powder and 1/2 teaspoon of salt. Whisk to combine.

*inspired by stone barnes center

the grateful guest

I love party planning; the recipe research, list making, ingredient shopping and tabletop setting. Sure it’s a lot of time, work and money but what can I say— I truly enjoy that meal savored, compliments accepted, pots n’ pans washed feeling of a dinner well done. But ya know what I like even more? Occasionally being the guest rather than the host. Yup you read right, sometimes I prefer to be responsible for nothing more than a hostess gift and a side, rather than the whole shebang. Seriously. Instead of missing out on conversations because I’m stuck in the kitchen, watching the clock like a hawk to ensure that everything comes out hot, washing and packing back away countless pots, pans, dishes, glasses, platters, bowls, napkins and tablecloths… I get to drink wine, nibble on appetizers, chit-chat and relax.

So you may be wondering, what do I bring when the opportunity to be a grateful guest should arise. Well I’ll tell you. I like to bring a bottle of wine, something I know the host will enjoy whether they decide to open it at the gathering or not, and a dish that requires minimal serving effort. There’s nothing worse than having someone show up at your house with a contribution, that in theory is intended to make the dinner easier on you, but in reality requires elaborate assembly and/or preparation. For me the answer is always something that can be made at home, transported easily and (ideally) served at room temperature. Something like a cheese platter, a salad of some sort, dessert (a total no brainer) or an array of crudités and dips.

People love dip, it’s an undeniable fact. Give them something to dunk, dip or slather and they’re happy as clams. And why not— its easy, unpretentious and personally… makes me think of childhood. As a product of the 70’s I have fond memories of old school Lipton Onion Soup Dip served alongside a big ol’ bag of greasy crinkle potato chips. Man, it really didn’t get much better. I would never consider going the Lipton route now but I’m fairly confident that if I did, it would get devoured in no time flat. (Because let’s be honest— corn syrup, hydrolyzed soy protein, caramel color, partially hydrogenated soybean oil, monosodium glutamate and yeast extract may be unhealthy, but they’re just as yummy as they were in 1978!)

When I bring a crudité platter I like serve it with a couple of homemade “healthy” dips. Hummus is always an option and sometimes guacamole, but when I want to switch things up a bit I make Rosemary White Bean Dip or a super simple Feta & Lemon Dip. They’re delicious, can easily be doubled and the leftovers makes great sandwich spreads. I haven’t discounted the idea of attempting to create a healthy/from scratch version of everyone’s beloved Lipton Onion Soup dip, so keep your eyes out for that sometime in the near future. However something tells me that no matter how tasty it turns out, it just won’t compare to my MSG tinted memories.

Rosemary White Bean Dip
The rosemary flavor is very subtle, so even if you’re not a huge fan don’t omit it.

2dips3

5 lg. garlic cloves, smashed
4 tbsp. olive oil, divided
1 fat sprig of fresh rosemary
3 tsp. fresh lemon juice
1 can Great Northern Bean, drained and rinsed
1 tbsp. plain Greek yogurt
1/2 tsp. fine sea salt
1/2 tsp. black pepper
crudités, chips or crackers, for serving

  1. In a small skillet warm 2 tbsp. of oil until it shimmers. Add the smashed garlic and rosemary and sauté until the garlic is golden brown. Remove the rosemary spring and discard, add the garlic and oil to the bowl of a food processor.
  2. Add to the food processor the remaining oil, lemon juice, rinsed beans, yogurt, salt and pepper.
  3. Allow to process until the mixture is completely smooth. Transfer to a serving dish and allow to chill before serving.
  4. Serve with crudités, chips or crackers.

*adapted from serious eats

Feta + Lemon Dip
Seriously simple.

8 oz. block feta cheese
3 tbsp. fresh lemon juice
2 garlic cloves, smashed
3 tbsp. extra-virgin olive oil
lemon zest, for garnish
drizzle of olive oil, for garnish
crudités, chips or crackers, for serving

  1. Break the feta into chunks and place in the bowl of a food processor along with the lemon juice, garlic, and olive oil. Process until smooth and fully combined.
  2. Spoon into a serving bowl, drizzle with a little olive oil, and sprinkle with a bit of fresh lemon zest.
  3. Serve with crudités, chips or crackers.

*adapted from sweet paul magazine

gluten-free… is it for me?

A few weeks ago I decided to try going gluten-free. I’ve had quirky issues with my stomach most of my life (ironic since I’m such a food lover right?) and I wanted to see if making the switch would make a difference. It’s too soon to make any concrete declarations but all signs are pointing to… maybe.

Deciding to change your diet can feel like a daunting task. I’ll be honest, my motto is more “Life is too short not enjoy dinner!” than “Moderation is the key too happiness.” With that in mind I’ve tried my best not to let gluten-free mean flavor-free, but it hasn’t been easy. I’ve discovered that potato chips and wine are both gluten-free (which frankly made me one happy girl) and I’ve come to the conclusion that if you fall into three simple categories you’re certain to find eating well gluten-free to be a snap. And here they are:

1.) You like vegetables and are happy to eat lots of them.
2.) You’re not a big fan of carbs and can give them up without a backward glance.
3.) You’re more of a baked goods buyer than a from scratch baker.

Honestly I’ve got no problem with 1. And I’m actually surprised at how easily I’ve given up 2., but the baking part has been tricky. You see while it’s quite possible to find recipes for ooey-gooey gluten-free cinnamon buns and chewy chocolate chip cookies; these recipes are often labor intensive and usually require a boat load of special ingredients. Ingredients such as tapioca and rice flour, xanthan gum, potato starch and agar flakes, things you probably don’t exactly have lying around the pantry. Yeah, I know— annoying. I’ve decide that if I stick with this little wheat-free detour then perhaps I will make the ingredient investment, but until then I’ve been trying to manage with my own little tweaks and substitutions. So what have I come up with? Well I’m glad you asked…

My daughter and I made our own oat flour and used it to bake up some lovely applesauce muffins. I’ve made dozens of loaves of cornbread with a blend of fine and coarse cornmeal, a couple of eggs and some cream style corn— the results were delicious. But my biggest gluten-free success so far has to be macaroni n’ cheese. I swapped regular pasta for rice (I like Trader Joe’s brand the best), used arrowroot powder instead of flour in the roux for the cheese sauce, and punched up the flavor big time by using a combination of goat brie and cheddar. Afraid of that goaty flavor? Don’t be, it’s really subtle but makes a huge flavor impact and this combo seems to be loved by all. Seriously! My family thinks it’s one of the best versions of mac n’ cheese I’ve ever made, which is fantastic, but I really knew I was onto something when I served it at our July 4th barbecue. Not a single one of the dozen kids who were here had anything but “Is there more?” to say about it. I’ll take that as one big fat recipe success.

I guess you can say that I’m slowly learning to navigate the world of gluten-free living. I can almost imagine myself continuing to live this way if I can just conquer one all mighty obstacle… The ultimate crusty loaf of gluten-free bread. So stay tuned!

Gluten-Free Goat Brie + Cheddar Mac n’ Cheese
I make this with goat brie and my family loves it, but you can use all cheddar if you don’t think yours will.

glutenfree mac2

2 tbsp. butter
2 tbsp. arrowroot powder
1 1/2 cups skim milk, warmed
1/2 tsp. salt
1/2 tsp. garlic powder
1 tsp. Dijon mustard
4 oz. sharp cheddar cheese, diced
4 oz. wheel goat brie, peeled and diced
16 oz. gluten-free rice macaroni

  1. Begin cooking the macaroni according to package directions. While it cooks melt the butter in a medium saucepan.
  2. Add the arrowroot powder and whisk until it turns golden. (The key to using arrowroot is not to overheat it, otherwise it loses it’s thickening magic.)
  3. Slowly add the warm milk and whisk until the sauce has thickened. Add the garlic powder, salt and Dijon mustard and stir until well combined.
  4. Drain the macaroni and return to the pot. Add the diced cheese to the white sauce and stir until the sauce is smooth.
  5. Pour half the cheese sauce over the cooked macaroni and give it a gentle stir. Add additional sauce until the macaroni is coated to your liking. (I often have extra sauce that I use when I reheat the leftovers.)
  6. Serve, enjoy and be amazed at how tasty gluten-free can be!

not mom’s chocolate pudding

Tomorrow is my 20th college reunion. Twenty years, that’s crazy. It feels more like eight, maybe ten, but no way twenty years! When I think back to meals in college a few in particular stand out; chicken ‘n cheese from Paulie’s, pizza from G & G’s, beers on North Ave. (yes once upon a time that could have constituted a meal) and of course fries and gravy at the Thru-Way Diner. Oh yeah, those were our “glory days” of unhealthy, unbridled and unapologetic pleasures.

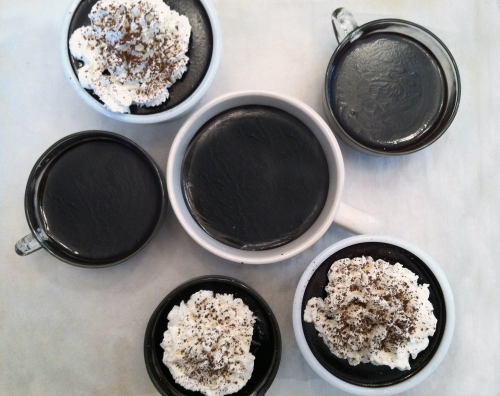
Flash forward twenty years and I couldn’t, wouldn’t even imagine subsisting on such a diet. The very thought of it gives me heartburn! But I suppose there’s a time and a place for everything. Now I’m more about trying to eat and feed my family as much healthy and unprocessed food as possible, which leads me to this weeks post… I recently started testing some recipes for Clean Eating Magazine and I currently happen to have some ingredients in my kitchen that I wouldn’t ordinarily have. Two of which are arrowroot powder and a carton of unsweetened coconut milk. Not wanting perfectly fine ingredients to go to waste I did a bit of research and decided to try making dairy-free, gluten-free (and if I’m correct, Paleo) chocolate pudding. Arrowroot powder is a naturally gluten-free thickener (similar to cornstarch) and coconut milk can stand in for dairy in many recipes. I figured it was worth a shot, any dessert with honey and dark cocoa powder in the ingredient list couldn’t possibly taste all that terrible. Right?!? As it would turn out, at the same time I was contemplating making this out of the ordinary creation both of my children came down with strep throat. In my mind sick kids always need something chocolatey to make them feel better, so off I went to make a batch of “chocolate pudding”.

So how’d it come out… The kids liked it and I ate two bowls myself, but it wasn’t the rich and indulgent dessert you equate with homemade chocolate pudding. It was creamy and it was chocolatey, but it wasn’t soul-satisfying. If you’re not eating gluten-free, dairy-free or a Paleo diet, then feel free to skip this recipe and go make yourself (and your kids) some good ‘ol fashioned chocolate pudding. However if your diet is more limited (or cleaner) than ours, then by all means give this one a try. This pudding won’t be like Mom’s, but it won’t be all that terrible either.

Dairy-free Gluten-free Dark Chocolate Pudding
Adding whipped cream (dairy-free or regular) is entirely optional, but I thought it helped make the dessert seem a bit more traditional and decadent.

arrowroot choc pudding

1/2 cup arrowroot powder
1/4 cup dark cocoa powder
4 cups unsweetened coconut milk (or almond milk)
2/3 cup honey (raw if possible)
2 tsp. pure vanilla extract
whipped cream (non-dairy or regular), optional

  1. In a medium saucepan whisk together the arrowroot powder and cocoa powder. Add the coconut milk and stir until all the lumps are gone.
  2. Place the pan over medium heat, add the honey and cook, stirring frequently, for 10 minutes or until thickened. (The pudding will stay pretty liquid for the first 9 minutes then suddenly it will thicken up.)
  3. Once thickened, remove from heat and add the vanilla. Stir to incorporate and pour into individual serving dishes.
  4. Allow to cool on the counter for 20 minutes before placing in the refrigerator to set and cool the remainder of the way. Serve with a little whipped cream and enjoy!

*adapted from food renegade

“we’re starving!” snack bars

I don’t know about your kids but when mine come home from school they usually ask for a snack. Snacks before dinner are tricky; too much and they don’t eat dinner, too little and they complain that they’re STARVING until dinners ready. I always try to offer them something healthy (which they usually accept without complaint) but sometimes even I know that baby carrots just won’t cut it. Sometimes a snack needs to be healthy, but seem like a treat. Hello homemade snack bars.

I’ve been on a mission to make a granola/snack bar for sometime, but something always went wrong. Too crumbly. Too sticky. Too blech… But being the tenacious type and all, I kept on trying. The recipe I finally achieved success with is super easy; it really only requires melting and mixing; is pretty healthy; almond butter, puffed brown rice, dried cranberries (yeah there’s mini chocolate chips, but just a few) and most importantly my kids love them.

Here’s hoping that yours do as well and that these tasty snack bars buy you a few pre-dinner hours free from starving people underfoot.

Crispy Almond Snack Bars
These bars can easily be adapted to fit your kids’ likes; soy nut butter instead of almond, raisins instead of cranberries and mini m&m’s instead of chips. Go crazy, you have my permission!

new bars2

2 tbsp. butter
1/3 cup chunky almond butter
1/3 cup honey
2 cups puffed brown rice cereal
1/3 cup dried cranberries
1/2 cup slivered almonds, toasted and chopped
1/4 cup mini chocolate chips

  1. Line an 8×8 pan with parchment or wax paper and set aside. In a small sauté pan toast the almonds. Allow to cool slightly and roughly chop.
  2. Place the cereal, almonds and dried cranberries in a large bowl, being sure that cranberries are not all clumped together. Set aside.
  3. In the pan you used to toast the almonds melt together the butter and almond butter, stirring frequently. Remove from heat, add the honey and stir until fully incorporated. Pour the mixture over the cereal and stir to evenly coat.
  4. Press the cereal mixture into the parchment lined pan. Scatter the top with chocolate chips and lightly press them into the sticky cereal mixture. Place the pan in the freezer for 20 minutes to set.
  5. Remove from the freezer, use the parchment paper to lift the contents out and slice into individual bars. Store in the refrigerator in an air tight container between sheets of waxed paper.

devil dog treats: take two

Life as a dog owner is much more involved then I expected. There’s puppy shots and house breaking; leashes, collars, toys, beds and crates; social time at the dog park and training classes to correct some not so hot behavior and don’t even get me started on dog food and it’s many many options. I almost think it would have been easier having another child, at least I know what to expect when you bring the little bugger home! Anyway back to the dog…

Trixie is a medium-sized (high energy) terrier-mix rescue dog who was beginning to develop some skin and ear issues. The vet didn’t want to jump to any conclusions or get crazy with tests but she suspected it could be (dum dum dummm) an allergy; perhaps seasonal or food. I don’t know about you but as soon as our pediatrician or vet says the word allergy alarm bells start going off in my head. That allergy road is no fun, I’ve been down it with both my kids and I didn’t want to go down it again with the dog. Being a bull by the horns type rather than a wait and see kinda girl, I decided to take it upon myself to switch her to a wheat free diet and see if it made any difference. Of course that would also mean rethinking those homemade devil dog treats I had so lovingly been baking her.

It turns out that making wheat free dog biscuits isn’t all that hard to do. They take a bit more time in the oven than your average chocolate chip cookie, but they’re considerably healthier and cheaper than buying them at the pet store. I discovered that oatmeal is a good alternate grain for dogs that are having issues with wheat and that pumpkin is great for canine digestion. Who knew! It’s been about two months since I changed Trixie’s diet and so far so good. I’m thinking wheat free just may be her ticket to ride. Oh the things you learn when you become a dog owner. I’m a little frightened to think what’s next…

Gluten-Free Pumpkin-Oatmeal Dog Biscuits
You can make these in any shape you want. I happen to like the dog biscuit shape because it fits well in Trixie’s treat ball.

new biscuits

4 1/4 cups rolled oats, ground
2 eggs
2/3 cup canned pumpkin
1/8 tsp. salt
2 tbsp. canola oil
3 tbsp. chicken broth, plus additional for brushing
3 tsp. dried parsley

  1. Preheat oven to 350°F. Line two cookie sheets with parchment paper and set aside.
  2. Place rolled oats in a food processor and pulse until it becomes a coarse flour. In a large bowl, whisk together the remaining ingredients until smooth. Add the oat flour to the pumpkin mixture and combine with spatula to form a dry, stiff dough.
  3. Turn the dough out onto a cutting board and pat into a circle. Place a sheet or wax paper over the dough and use a rolling pin to flatten it out the remainder of the way, to roughly an 1/4-1/2 of an inch thick.
  4. Cut the dough into shapes using a cookie cutter of your choice and using a spatula to pry them up, place the biscuits on a baking sheet.
  5. Brush each biscuit with chicken broth and bake for 20 minutes*. Carefully turn biscuits over, brush with more broth and bake an additional 20 minutes or until slightly browned around the edges.
  6. After both sheets of biscuits are baked turn the oven off and place the cookie sheets back inside. Allow the biscuits to dry out in the oven for another hour. After an hour allow the biscuits to cool the remainder of the way on a rack before serving to your canine friends.

*The bake time will vary depending on the size of your treats. I bake biscuit sized treats 20 minutes per side, but tiny training treats only 10 minutes per side.