mayonnaise musings

I think I need a muse. It appears that I’ve become so distracted by “my life” that when I’m actually able to carve out a little time for “my self” I’m at a loss. I need inspiration, a creative catalyst, a bit of meaningful illumination. Seriously, I think a muse is the answer. (And just for future reference, if you should one day decide to search ‘creative muse’ on Craigslist be prepared to be surprised.) Okay, so back to my slump… I’ve been trying to come up with an idea for a new post ever since my last one two months ago. It’s not that I haven’t been cooking, frankly the cooking is the easy part, it’s that I haven’t had the time to test, photograph and come up with a few snappy lines about the amazing thing I just made. So instead I’ve been pondering and considering, waiting for the ‘spirit of the whisk’ (not a real thing but it should be) to transcend upon me and simply biding my time until it does. After all you can’t rush transcendence.

I was standing in my kitchen the other morning drinking coffee and checking email when the strangest idea popped into my head: “I should really make mayonnaise.” That was it, nothing more. “Huh… Should I?” I thought to myself. I’ve made plenty of perfectly-good-as-store-bought-but-took-the-time-to-make-anyway condiments in the past (including Hollandaise the fancy cousin of mayo), so why not mayonnaise. Why not?

As it happens at the same time I was have my little egg and oil emulsification epiphany the NY Times was running a recipe for Classic Deviled Eggs written by the same co-author of the cookbook I based my mayonnaise recipe on; Sheila Lukins. Was my food processor a portal to the after life? Was Shelia trying to tell me to keep on truckin’? The answer remains unclear, but then you already know my stance on rushing the mystical, her mayonnaise however was a thing of ethereal beauty.

Simple Homemade Mayonnaise
You can totally adjust the tang of this mayo by playing with the amount of lemon juice you use.

mayonnaise

2 egg yolks
1 whole egg
1 tbsp. Dijon mustard
1/8 tsp. salt
pinch of black pepper
3 tbsp. lemon juice
1 1/4 cups vegetable oil

  1. Combine all the ingredients except for the oil in the bowl of a food processor and allow to run for 1 minute.
  2. With the motor still running slowly drizzle the oil through the feed tube, allowing the eggs and oil to emulsify. Scrape down the sides, pulse a few more times then transfer into a airtight container. Store in the refrigerator, it will keep for 5 days.

*adapted from the new basics cookbook


the grateful guest

I love party planning; the recipe research, list making, ingredient shopping and tabletop setting. Sure it’s a lot of time, work and money but what can I say— I truly enjoy that meal savored, compliments accepted, pots n’ pans washed feeling of a dinner well done. But ya know what I like even more? Occasionally being the guest rather than the host. Yup you read right, sometimes I prefer to be responsible for nothing more than a hostess gift and a side, rather than the whole shebang. Seriously. Instead of missing out on conversations because I’m stuck in the kitchen, watching the clock like a hawk to ensure that everything comes out hot, washing and packing back away countless pots, pans, dishes, glasses, platters, bowls, napkins and tablecloths… I get to drink wine, nibble on appetizers, chit-chat and relax.

So you may be wondering, what do I bring when the opportunity to be a grateful guest should arise. Well I’ll tell you. I like to bring a bottle of wine, something I know the host will enjoy whether they decide to open it at the gathering or not, and a dish that requires minimal serving effort. There’s nothing worse than having someone show up at your house with a contribution, that in theory is intended to make the dinner easier on you, but in reality requires elaborate assembly and/or preparation. For me the answer is always something that can be made at home, transported easily and (ideally) served at room temperature. Something like a cheese platter, a salad of some sort, dessert (a total no brainer) or an array of crudités and dips.

People love dip, it’s an undeniable fact. Give them something to dunk, dip or slather and they’re happy as clams. And why not— its easy, unpretentious and personally… makes me think of childhood. As a product of the 70’s I have fond memories of old school Lipton Onion Soup Dip served alongside a big ol’ bag of greasy crinkle potato chips. Man, it really didn’t get much better. I would never consider going the Lipton route now but I’m fairly confident that if I did, it would get devoured in no time flat. (Because let’s be honest— corn syrup, hydrolyzed soy protein, caramel color, partially hydrogenated soybean oil, monosodium glutamate and yeast extract may be unhealthy, but they’re just as yummy as they were in 1978!)

When I bring a crudité platter I like serve it with a couple of homemade “healthy” dips. Hummus is always an option and sometimes guacamole, but when I want to switch things up a bit I make Rosemary White Bean Dip or a super simple Feta & Lemon Dip. They’re delicious, can easily be doubled and the leftovers makes great sandwich spreads. I haven’t discounted the idea of attempting to create a healthy/from scratch version of everyone’s beloved Lipton Onion Soup dip, so keep your eyes out for that sometime in the near future. However something tells me that no matter how tasty it turns out, it just won’t compare to my MSG tinted memories.

Rosemary White Bean Dip
The rosemary flavor is very subtle, so even if you’re not a huge fan don’t omit it.

2dips3

5 lg. garlic cloves, smashed
4 tbsp. olive oil, divided
1 fat sprig of fresh rosemary
3 tsp. fresh lemon juice
1 can Great Northern Bean, drained and rinsed
1 tbsp. plain Greek yogurt
1/2 tsp. fine sea salt
1/2 tsp. black pepper
crudités, chips or crackers, for serving

  1. In a small skillet warm 2 tbsp. of oil until it shimmers. Add the smashed garlic and rosemary and sauté until the garlic is golden brown. Remove the rosemary spring and discard, add the garlic and oil to the bowl of a food processor.
  2. Add to the food processor the remaining oil, lemon juice, rinsed beans, yogurt, salt and pepper.
  3. Allow to process until the mixture is completely smooth. Transfer to a serving dish and allow to chill before serving.
  4. Serve with crudités, chips or crackers.

*adapted from serious eats

Feta + Lemon Dip
Seriously simple.

8 oz. block feta cheese
3 tbsp. fresh lemon juice
2 garlic cloves, smashed
3 tbsp. extra-virgin olive oil
lemon zest, for garnish
drizzle of olive oil, for garnish
crudités, chips or crackers, for serving

  1. Break the feta into chunks and place in the bowl of a food processor along with the lemon juice, garlic, and olive oil. Process until smooth and fully combined.
  2. Spoon into a serving bowl, drizzle with a little olive oil, and sprinkle with a bit of fresh lemon zest.
  3. Serve with crudités, chips or crackers.

*adapted from sweet paul magazine

spicy beet greens with chickpeas

My children have been away with their grandparents for the better part of the past two weeks. The first week with one set, the second with the other. That’s right, we’ve been childless for nearly 14 days. Just typing that makes me feel slightly woozy. FOURTEEN DAYS KID-FREE. (I know, the gods are clearly smiling on me.) So what you may wonder have I been up to? Well… I’ve been putting in some serious hours at work. I’ve done a significant amount of chillin’ on the deck. I’ve read a book. We met friends for drinks. I went shopping without anyone asking me “Are we almost done? How many more things do we need to buy?” We went to the movies (an advance screening of The Hundred Foot Journey to be precise). We went out to dinner. I did not watch a single TV show that revolved around Bart, Marge, Maggie and Homer, a family of British pigs who love muddy puddles or that famous duo Elsa and Ana. I got a pedicure. We actually talked to each other (imagine!) and we made things for dinner that the kids would never want to eat; Garlicky pesto over linguine, salmon with a balsamic glaze, lamb burgers with tzatziki, giant bowls of steamed mussels and one night we went totally vegan— beet greens, chickpeas, Habanero chilies and tofu with coconut milk over brown rice. Yup, I’m not kidding.

I eat vegetables everyday. Not because I think I should or because they’re good for me. I eat them daily because I love them. My family doesn’t exactly share my passion for Mother Nature’s candy, but the kids will eat baby carrots and garden fresh cucumbers for a snack, they love mashed turnips and grilled asparagus and only grumble minimally when I make grilled squash or string beans. But they draw the line at greens. Sure they can handle collards with bacon, but an arugula salad or god forbid sautéed spinach or beet greens… totally out of the question. My husband, who can deal with nearly anything but cauliflower, has come to accept that life with me involves much more than meat and potatoes.

Anyway back to the vegan meal… I stopped at the store on my way home one night thinking I’d make a coconut milk and brown rice number with some of the leftover veggies I had at home; A few bunches of fresh beets with greens that needed to be eaten, some Habanero peppers leftover from the mussels night and cherry tomatoes from my garden. I already had brown rice and chickpeas in the pantry so all I needed was coconut milk and shrimp and we’d have dinner in a flash. The shrimp ended up being both expensive and pathetic looking, totally not worth buying. I needed an alternate plan. I still wanted to add a bit more protein to the meal, but it needed to be something that required minimal prep and cooked quickly. That something turned out to be tofu. I think of tofu is a rather innocuous ingredient. It really doesn’t lend much by way of its own flavor but it’s more of a sponge for the other flavors in the dish, and it’s high in protein. So I sliced and diced, sautéed and deglazed, simmered and served and guess what… It was delicious. And vegan. And while my dearest did comment that “It would be better with sausage.” he cleaned his plate nonetheless.

The kids will be back tomorrow and while I have thoroughly enjoyed their absence, I’m ready for them to come home. I know this will mean listening to their bickering, watching their dopey kid shows and answering 50 million times the question “How many more bites do I have to take?” But I’m ready for them to return all the same.

And if you ever remind me that I said that, I’ll completely deny it.

Spicy Beet Greens with Chickpeas and Tofu 

Deilsh and vegan. Who knew… 

vegan2

1 tbsp. coconut oil
1 small yellow onion, diced
4 large cloves garlic, minced
1 tbsp. fresh ginger, grated
a handful of cherry tomatoes, diced
3 Habanero peppers, seeded and julienned
3 tbsp. lemon juice
15 oz. can chickpeas, rinsed and drained
greens from two bunches of beets, stemmed and julienned
14 oz. can coconut milk
2 tsp. salt, divided
1/4 tsp. ground cinnamon
brown rice, for serving
fresh cilantro leaves, for garnish

  1. Heat the oil in a large skillet over medium-low heat. Add the onion and cook until it becomes translucent. Add the garlic, ginger, tomatoes, Habanero peppers and 1 tsp. of salt and cook for 3 minutes, stirring frequently.
  2. Add the lemon juice to deglaze then pan then add the chickpeas and beets greens. Stir to coat well with the onion mixture and allow to cook until the greens have just begun to wilt.
  3. Add in the coconut milk, remaining teaspoon of salt and ground cinnamon. Bring the mixture to a simmer then turn down the heat to low and cook for 5-10 minutes or until the chickpeas just begin to soften.
  4. Serve over brown rice and garnish with fresh cilantro leaves.

spring into chimichurri

After having endured a longest, coldest, harshest winter of memory, Spring couldn’t come soon enough for this girl. Cool mornings, warm afternoons, flowers blooming, birds chirping, the world seeming to suddenly come back to life as if overnight. Just the mention of Spring makes me feel relaxed; like the burden of boots, coats and scarves has been lifted. But wait, what’s that falling from the sky? Snow… in April… Are you kidding me!? And that sound, is that rain? And rain and rain and more rain. WTF Mother Nature— because we haven’t been through enough? Seriously girlfriend, you suck. But I digress…

Regardless of the type of Winter I’ve just lived through, Spring is always a welcome season in my book. It’s fresh, green and full of promise. It makes me want to be outside, to simply slow down and enjoy the sights and sounds of nature rediscovering the world. Spring always makes me think of herbs and herbs make me think of pesto. I love pesto. I love the fresh herbal taste, the pungent garlic and the salty cheese combination. I’ve been known to use it on everything I can think of and sometimes I even eat it right off the spoon. Yeah, I really love it. So it would only seem natural that Chimichurri (the Argentine answer to pesto) would be right up my alley.

I’m lucky to live close enough to Newark N.J. (that’s right, I said lucky enough) that we think nothing of taking a trip to the Ironbound section for dinner. The Ironbound is filled with amazing Portuguese, Brazilian, Spanish and Argentinian restaurants; each paying a subtle homage to its neighboring cuisine. Years spent frequenting this little world unto itself has taught me a lot about food; more specifically how simple can become extraordinary with a few little twists. The perfect example; steak on a stone. Steak brought to the table and quickly seared on a screaming hot stone or terra cotta tile, finished with a squeeze of fresh lemon juice and served with some beautifully green and garlicky Chimichurri. It is the epitome of simple ingredients resulting in extraordinary flavor.

Since our last dinner in the Ironbound I’ve started making Chimichurri at home. It’s as easy to make as pesto, fills my salty/garlicky/spicy/herbal perfectly and has quickly become my condiment of choice for just about everything. No joke, everything.

Chimichurri
I am totally obsessed with this stuff. Drizzled on steak, tossed with potatoes, splashed on greens or even eaten right of the spoon. Hello deliciousness!

chimmichuri2

1 cup fresh flat-leaf parsley
1/4 cup fresh lemon juice
6-8 large garlic cloves, peeled and crushed
1/2 cup fresh oregano leaves
1 tsp. crushed red pepper
1 1/2 tsp. kosher salt
1/2 tsp. black pepper
3/4 cup good quality olive oil

  1. Place all of the ingredients in the bowl of a food processor. Allow to process until smooth.
  2. Transfer the Chimichurri to a serving dish and let stand for at least 1 hour before serving. (The Chimichurri can be made ahead and refrigerated overnight, but allow it to come to room temperature before serving.)

*adapted from food & wine

a saucy cranberry christmas

One individual informed me, that the rosy complexion of the women had been attributed to their consumption of this article [cranberry sauce].”
~Letters on the Eastern States; Memoir on Cranberry Sauce, 1821

I know cranberry sauce is typically thought of as strictly a Thanksgiving side dish here in North America, however it’s in fact traditionally served with Christmas dinner in the UK. Personally I think it’s perfect for either meal, particularly if it’s homemade. We’ve all suffered through that can shaped log of purple jelly that goes directly from can to plate—belch—and based on that experience most of us claim to not like cranberry sauce. Well I’m here to hopefully change that opinion and to set things a few things straight. 1. Real cranberry sauce is nothing more than fresh cranberries, sugar and a bit of spice— so simple to make that even the least experienced of cooks can successfully pull it off. 2. Because of this perviously stated fact cranberry sauce should never come from a can. NEVER. 3. Very few people make their own cranberry sauce, regardless of how easy it is. Therefore if you do your guests will think you are a total culinary rock star; which is always a good reason to get in the kitchen!

My cranberry sauce recipe is the perfect combination of tart and sweet, so perfect in fact that my children actually fight over who gets to lick the spoon every time I make it. (I guess that tells you something!) Since cranberry season is such a short one (mid-September to mid-November) I make a point of always buying a bag or two around the holidays to keep in the freezer. Then when the mood strikes, simply defrost and rock n’ roll. I often serve it along with roasted turkey or beef, use it as a condiment on Blue Cheese + Chive Biscuit mini sandwiches or spoon it over a slice of pound cake or a scoop of vanilla ice cream— delicious! So go ahead and give homemade cranberry sauce a shot for your holiday dinner (or dessert) and tell me you don’t end up loving it too.

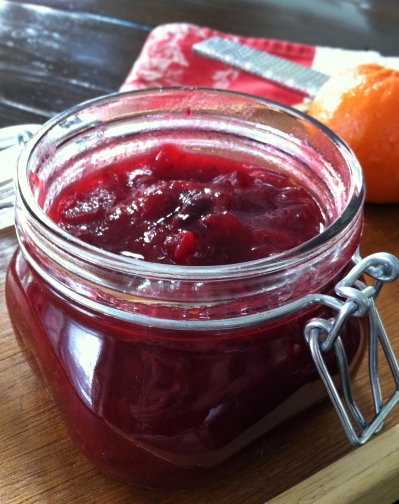
Triple Citrus Cranberry Sauce
This recipe is so easy and so delicious you won’t believe you ever considered dinner complete without it.

cran.sauce3

1 12 oz. bag fresh cranberries
1/2 cup granulated sugar
1/2 cup orange juice
2 tbsp. lemon juice
1/8 tsp. ground cloves
zest of 1 tangerine

  1. Add the first 5 ingredients to a small saucepan. Cover and cook over medium heat, stirring frequently, until the berries begin to soften.
  2. Increase the heat, bring to a simmer and cook uncovered 2-3 minutes longer until the sauce begins to thicken and nearly all of the berries have popped.
  3. Allow to cool slightly in the pan before adding the tangerine zest to the sauce. Transfer to a glass jar and store in the refrigerator until ready to use.

indian summer lavender-lemon muffins

We may have just celebrated Halloween but I still have overflowing pots of herbs happily growing on my back steps. I’m thinking about turning some into herbed salt, freezing a bit and making a little chimichuri with a bunch, but really I’d prefer to use as much as I can right now while they’re still fresh. Sage, basil, tarragon, thyme and rosemary are a real no-brainer, you can throw those herbs into just about any savory dish and come out with a winning meal, but what about the lavender? Lavender flowers have a gazillion uses, but recipes using the fresh leaves are much more limited. Lavender, lavender, lavender… what should I do with you?

While I was recipe hunting I found a few recipes for rosemary and lemon shortbread. While I did briefly consider making cookies I thought muffins would be more fun and instead of rosemary I decided to use that elusive fresh lavender. The resulting Lavender-Lemon Muffins were a huge hit, fresh with a subtle lavender flavor and a lovely pop of sweet from the lemon glaze on top. They have quickly become another Greco family favorite and perhaps they’ll become one of your families favorites as well.

Lavender-Lemon Muffins
The lavender in these babies is subtle not overwhelmingly perfumey. They’re really pretty delicious.

lavender-lemon muffins

2 cups all-purpose flour
3 tbsp. finely chopped fresh lavender
zest of one lemon
2 tsp. baking powder
1/2 tsp. baking soda
1/2 tsp. salt
1 1/2 cups granulated sugar
1/2 cup canola oil
1/2 cup low-fat milk
1/3 cup lemon juice
1/2 tsp. vanilla extract
2 whole eggs + 1 egg white

1 cup powdered sugar
1 tbsp. lemon juice

  1. Preheat oven to 375°F. Line a muffin tin with cupcake liners and lightly coat with cooking spray. In a large bowl combine together the flour, lavender, lemon zest, baking powder, baking soda and salt.
  2. Place the sugar and remaining ingredients (through eggs) in a medium bowl; beat with a mixer at low speed until smooth. Add the wet mixture to the dry and beat again until blended.
  3. Spoon batter into prepared muffin tins. Bake for 18-20 minutes or until a toothpick inserted in center comes out clean.
  4. Combine the powdered sugar and lemon juice. Stir until smooth and set aside.
  5. When the muffins are finished baking allow them to cool completely on a wire rack before drizzling with lemon glaze. Let glaze set and enjoy!

it’s my party + i’ll grill (flank steak) if i want to…

Happy unofficial start of grilling season! The weather here in the Northeast keeps fluctuating between Africa hot and turn the heat back on cold, but the calendar reads June so it must be time to break out the grill tongs and light up the Weber.

We use our grill to make dinner nearly every night when the weather is warm. From burgers and grilled veggies to beer can chicken and steamed shellfish with grilled bread. If we can grill it we usually do. The thing about making dinner on the grill is that it turns an otherwise rather solitary and sometimes mundane task into lovely “this is what I love about warm weather” time. The dog and kids running around the yard, my husband and I relaxing with a glass of wine, the last rays of sunshine filtering through the trees… Ahh it’s all good.

Grilling for your family is pretty easy and low pressure, but grilling for a crowd is a different can ‘o beans all together. Suddenly you have to worry about everyone liking what you serve, the amount of time away from your guests cooking is going to require and will there be enough for everyone. After years of trial and error my husband and I have settled on two never fail recipes for our summertime parties; the first one is Barbecued Ribs. My rib recipe is easy to make, seriously delicious and can feed a crowd in a flash. Throw in a pot of my Smokey Baked Beans and some Homemade Cornbread and your guests will never want to leave! Our second no fail party pleaser (and truthfully the one we rely on most often) is marinated flank steak. I like to serve flank steak because its perfect for sandwiches, salads or just on its own and it takes almost zero time on the grill (which means less chance of an overzealous cook incinerating it).

I’ve been playing with my marinade recipe for years and I finally got it to where I think it’s perfect enough to share with you. (See how much I care about you!) The marinade is fairly simple; soy sauce, garlic, lemon juice, brown sugar— but the impact is major.  And if the scant leftovers are any indication of how much the crowd likes it… well then we’re clearly onto something good.

Grilled Marinated Flank Steak
Be sure to throw the onions and garlic from the marinade in a pan on the grill and serve them along with the sliced meat. They’re delicious!

flank steak

3 tbsp. brown sugar
1 tsp. chipotle chili powder
2 tsp. smoked paprika
1 tsp. ground cumin
1 tsp. red pepper flakes
2/3 cup olive oil
1 1/3 cup lemon juice
1 1/3 cup soy sauce
8 cloves garlic, sliced
1 large onion, sliced
6 lbs. flank steak

  1. In a large bowl with a lid, add all the ingredients and stir with a fork being sure to break up any brown sugar lumps. Taste the marinade and make any seasoning adjustments needed then add the flank steak.
  2. Press the layers of steak down so that they are fully submerged in the marinade, cover and refrigerate overnight. (Rotate the meat, top to bottom, at least once.) In the morning drain off the marinade but be sure to keep all the onions and garlic, you’ll want to heat them up to serve along with the meat.
  3. One hr. prior to grilling remove the container of flank steak from the fridge and allow to come to room temperature on the counter.
  4. Heat the grill. Place the steaks on the hot grill and allow to cook 4 to 6 minutes per side, until nicely browned. Check for doneness with an instant read thermometer (medium-rare is between 125-130°F.) Transfer steak to a cutting board and let rest for at least 5 minutes.
  5. Slice thinly across the grain at a slight diagonal and serve along with the cooked onions from the marinade.

little loves lemonade

My husband and I hold a garage sale every year and last weekend lemonade standwas it. At past sales we’ve sold everything from bikes and bassinets to the kids barely broken in winter boots and a first generation iMac. We’ve become something like pros at hawking our junk and keen negotiators with the hard-core pickers always looking for the best price. But this last sale was unlike any other we’ve ever held in that the kids decided to participate. How… with a good ol’ fashioned lemonade stand of course!

My little loves (that’s them at their stand) sold cups of homemade lemonade and mini chocolate-chocolate chip muffins to nearly everyone who visited our sale, not to mention a few unsuspecting individuals just out for a walk. They worked hard promoting their product and played the cute kid card big time— it totally payed off for them. Their little enterprise was such a huge success that not only did they sell out of 4 gallons of homemade lemonade and 48 mini muffins, but they did so way before the garage sale was over! Not everyone bought from us, but almost everyone bought from them.

So if you’re contemplating a garage sale over the next few months I highly recommend encouraging the kids to run a lemonade stand as well. And if you’ve got some Amway products, Girl Scout cookies or a little Avon you’re looking to move fast, I just may have the salespeople for you!

Classic Homemade Lemonade
This is lemonade is super easy to make and tastes nothing like the powdered stuff in a can. Give it a try once and I promise you’ll never go back!

lemonade2

Lemonade
2 cups simple syrup (see recipe below)
2 cups fresh lemon juice* (about 12 lemons)
4 cups water

  1. In a large pitcher stir together the fresh juice and simple syrup. Add the water, tasting as you go, until the lemonade is as sweet/tart as you like it.
  2. Serve in tall glasses garnished with a sprig of mint or a slice of fresh lemon and enjoy.

Simple Syrup
2 cups water
2 cups sugar

  1. Add the water and sugar to a pan and heat. Stir frequently, until sugar fully dissolves and the syrup becomes clear, about 4-5 minutes.
  2. Let cool and store in the refrigerator until ready to use.

*When lemons are on sale I buy and squeeze enough for 2 cups of juice, but when they’re not I use half fresh juice and half bottled. It’s slightly less amazing than entirely fresh squeezed, but still miles better than the “just add water” canned stuff.

*adapted from whats cooking america

Chocolate-Chocolate Chip Mini Muffins
These mini muffins are truly the perfect one bite chocolate fix. However the same recipe can be used for full sized muffins, simply adjust the baking time.

1 3/4 cups all-purpose flour
1/2 cup packed brown sugar
1/4 cup unsweetened dark cocoa powder
1 tsp. baking powder
1 tsp. baking soda
1/4 tsp. salt
1/2 cup mini chocolate chips
1 large egg, beaten
1 cup water
1/4 cup canola oil
1 tbsp. red wine
1 tsp. vanilla extract

  1. Preheat oven to 350°F. Combine flour, brown sugar, cocoa, baking powder, baking soda, salt and mini chips in a large bowl.
  2. In a small bowl whisk together the egg, water, oil, wine and vanilla. Add oil mixture to flour mixture and stir until all the ingredients are fully incorporated.
  3. Place the liners in the muffin pan and lightly coat with cooking spray. Add a dollop of batter to each prepared muffin cup and sprinkle a few mini chips on the top of each.
  4. Bake mini muffins for 12-14 minutes (full size for 18-22 minutes) or until a toothpick inserted in center comes out clean. Cool for 5 minutes in the pan before transferring to a wire rack.

*adapted from cooking light

life altering hummus

When my son was little he was a real picky eater. The first solid food he ever ate was avocado and he loved it; but then along came toddler free will and out the window went adventurous eating. Most of his likes and dislikes were based solely on the appearance rather than taste, it used to drive me crazy! Night’s when he actually ate what the rest of the family did felt like a huge victory to me. Uggh, mealtimes those first few years were not fun!

Refusing to be undone by this kids’ unfounded rejection of perfectly delicious food, I started experimenting with a little mom sleight of hand. I looked for any way to make the “kid food” he was willing to eat healthier. Carrots and celery puréed into the red sauce I used on pizza, homemade fish sticks and chicken tenders, black beans added to brownies (not a big hit) and hummus as a dipper for crackers and pretzels. Yup you read right, good ol’ garlicky hummus. My picky guy wouldn’t touch a perfectly non-threatening string bean, an innocuous burger or a simple bowl of soup; but he would eat hummus like it was going out of style. Hummus sandwiches, hummus on pretzels, hummus with his chicken tenders… and I can’t even tell you how often he sat down with a big bowl of hummus and a spoon. People thought I was crazy, but he loved it! And I loved that he was eating something full of protein, loaded with heart-healthy garlic (during his hummus years he never had a mosquito bite!) and more exotic than mac n’ cheese or pb&j. Needless to say I quickly developed a hummus recipe of my own and could whip up a batch in flash.

Thankfully he’s no longer a picky eater, but it didn’t happen overnight. He’ll now eat almost anything I put in front of him as long as it’s not spicy and is loaded with garlic. Yet hummus still plays a big role in our house. My daughter, who thankfully is far less suspicious of unfamiliar foods then he ever was, happens to be a hummus junkie as well. In fact just yesterday her lunch request was a bowl of hummus and some baby carrots. Ya gotta love it!

Who knew that a simple bowl of garlicky hummus in your formative years could turn into an enduring love of strong flavors and a willingness to try unfamiliar food. Seriously, who knew?!?

Homemade Hummus
You can adjust the amount of garlic in the recipe to your taste or slow roast it before hand to mellow out the flavor.

hummus4

1 can chickpeas, drained and rinsed
3-4 cloves garlic
1/2 tsp. salt
3 tbsp. tahini
3 tbsp. olive oil
4 tbsp. plain yogurt
1 tbsp. water
3 tbsp. lemon juice
1/4 tsp. cumin
1/4 tsp. smoked paprika

  1. Put everything in the bowl of a food processor and pulse until smooth.
  2. Spoon into a serving dish, drizzle the top with olive oil and sprinkle with a bit of smoked paprika. Serve with toasted pita chips and fresh vegetables, or a spoon.

fro-ly sh*t delicious!

Have you noticed that the country has become frozen yogurt obsessed? There are no less than six frozen yogurt shops within a 4 mile radius of my house, and that doesn’t even take into account the local ice cream shops that also sell it. It would appear that fro-yo has become hot, hot, hot!

Last year the Easter Bunny brought my kids a set of personal sized ice cream makers. They were thrilled and couldn’t wait to get started, but the recipes that came along with the units all called for heavy cream and whole milk. In other words real ice cream ingredients! I’m all for less than healthy treats now and again (which of course includes full fat ice cream), but I certainly couldn’t picture us whipping up a weekly batch of the stuff. I didn’t want their interest in cooking to be diminished just because the folks a Hamilton Beach couldn’t come up with a healthier frozen dessert recipe, so… I did a little research and a bit of recipe tweaking and came up with a solution. A fresh strawberry frozen yogurt recipe that tasted great and I could feel good about encouraging my kids to make and eat. This recipe is loaded with fresh strawberries (which just happen to be hitting the supermarkets again) and high protein greek yogurt and light sour cream in place of the full fat dairy. We added a few chocolate chips just to up the ante and the results were delicious!

But then I got crazy. Then I decided that if the frozen yogurt was healthy perhaps I should make a topping for it that was just a smidge unhealthy. Something like, oh I don’t know— homemade chocolate sauce! Like I said crazy, but oh so good…

Fresh Strawberry Frozen Yogurt
This recipe doesn’t make a tremendous amount, perhaps a quart or so, which is just enough for your kids to think you’re a total rock star in the kitchen. Enjoy the accolades!

ice cream3

2 1/2 cups diced fresh strawberries
2/3-3/4 cup sugar
1 tbsp. lemon juice
1 cup plain nonfat greek yogurt
1/2 cup light sour cream
2/3 cup chocolate chips (optional)

  1. Hull and chop the berries. Toss them with the sugar and lemon juice in a large bowl, cover and let steep about an hour.
  2. Remove 3/4 cup of the macerated berries and set aside. Combine the remainder of the berries, sour cream and the greek yogurt in a blender and blend until smooth. Gently stir in the reserved strawberries and chill the mixture for at least one hour.
  3. Pour the chilled mixture into your ice cream maker and process according to the manufacturer’s directions. (Half way through the processing we added our chocolate chips.)
  4. Enjoy your homemade frozen yogurt with a healthy drizzle of chocolate sauce and revel in how multifaceted you’ve become in the kitchen.

*adapted from kitchen trial and error

Homemade Chocolate Sauce
This sauce is fantastic drizzled on ice cream, makes terrific hot chocolate or chocolate milk and is the perfect chocolate fix right off the spoon.

1/2 cup dark cocoa powder
1 cup water
1 1/4 cups sugar
1 pinch salt
1 tsp. real vanilla extract

  1. In a medium high sided saucepan mix together the cocoa powder and water. Place over a medium flame, add the sugar and stir to dissolve.
  2. Bring mixture to a boil and allow to cook and thicken for 5 minutes, stirring frequently. (Be prepared for it to bubble up while cooking.)
  3. Remove the pot from the heat, and stir in the salt and vanilla. Allow to cool slightly before pouring into glass jars. Allow to fully cool on the counter then store jars in the fridge.

*adapted from small notebook

Criss-Cross Applesauce

I love Fall, it’s absolutely my favorite season. I love the beautiful blanket of falling leaves (it drives me crazy that here in Northern NJ everyone sweeps up their leaves the minute they hit the ground); I love the chill in the air; I love the contrast between the bright blue sky and Mother Nature’s muted colors; I even love the cool, earthy and slightly damp way the season smells. And there is no food that says Fall to me more perfectly than apples.

It seems like this time of year everyone you talk to has either just gone apple picking or has plans to. (Although truth be told, the Greco family prefers to apple pick mid-August in Vermont. Sorry N.J., but you really can’t compete.) Anyway, back to those apples. If you in fact do go apple picking then you’re probably like me and end up bringing home way more than you and your family can possibly eat out of hand. And seriously how many pies does any one person feel compelled to make? So to use up all those lovely fresh picked apples I make applesauce. In the past I would make it on the stove top and just let it cook until it was mushy and “done”. Then I discovered a Martha Stewart recipe for roasted applesauce. Hello delicious!

This is honestly some of the best applesauce I’ve ever tasted. It’s loaded with wonderful spices, takes less than an hour to make and freezes beautifully. My family likes to eat it in the morning with toast, at dinner alongside chicken or pork chops and warmed up with a bit of vanilla ice cream for dessert. I promise that after making this roasted version you’ll never bother with the stove top kind again.

Roasted Applesauce
Roasting the apples rather than cooking them on the stove really gives this applesauce a much more complex flavor.

1/4 cup water
4 tbsp. packed brown sugar
3 tsp. fresh lemon juice
a big pinch of salt
3 tbsp. unsalted butter, melted
3 lbs. apples (about 10-12)
1 tsp. ground cinnamon
1/8 tsp. nutmeg
1/8 tsp. ground cloves

  1. Preheat oven to 400°F. Peel, core and cut apples into medium size chunks. Place in a large bowl and set aside.
  2. Combine water, sugar, lemon juice, melted butter and salt in a small bowl. Stir until blended and sugar has dissolved.
  3. Pour sugar mixture over the apples and toss to coat well. Place apples in a large baking dish, cover tightly with foil and roast 40 minutes.
  4. Let cool slightly then mash apples with a fork. Adjust spices (if needed) and serve warm over vanilla ice cream, at room temperature, or freeze for a later date.

*adapted from martha stewart

All Dressed Up

I am always looking for ways to take the everyday and make it special. Sometimes I do this purely out of necessity (I’m a busy girl after all!) and sometimes it’s just because making a dish entirely from scratch isn’t dramatically better than tweaked up store-bought. I’ll make fancy from scratch frosting to go with boxed cake mix and homemade butter for store baked bread. Even something as simple as a pre-made fruit platter looks fancy when served in a pretty bowl with a few snips of fresh mint on top. I’m all for minimal effort, maximum impact.

As you know by now I love salad. I eat it nearly everyday, especially since I’ve begun harvesting it from my own garden, and I serve it anytime we have a sizable gathering. And what could be easier than a homemade dressing to fancy-up any otherwise ordinary tossed salad. Sure it’s easy to buy a bottle of dressing at the store (actually I usually serve something store-bought alongside my homemade for those “afraid of the unknown” guests) but homemade salad dressing is crazy easy to throw together and much tastier than pre-made.

In the past I’ve made a simple mustard vinaigrette and a garlicky pesto dressing, but having recently made hummus I really wanted to find another use of that container of tahini I had sitting in my refrigerator. Voilà… Lemon, Tahini & Garlic Dressing was born.

Lemon, Tahini & Garlic Salad Dressing
This was delicious drizzled on salad but I imagine it would work as well on a hummus and falafel pita or even steamed greens. And feel free to decrease the garlic and up the honey if a sweeter, milder dressing is what you prefer.

4 tbsp. tahini
3 tbsp. lemon juice
2 tbsp. water
1 tbsp. apple cider vinegar
2 1/2 tsp. honey
3 cloves of garlic, finely minced
1/2 tsp. smoked paprika
1/4 tsp. salt
1/8 tsp. pepper
2 tbsp. toasted sesame oil

  1. Whisk together the tahini, lemon juice, water, vinegar and honey. Add to this the garlic, smoked paprika, salt and pepper. Drizzle in the sesame oil and whisk everything together until it is thoroughly blended.
  2. Adjust the salt and sweetness to your taste, adding a splash more water if you prefer a thinner dressing, and chill for at least 30 minutes to let the flavors meld. Allow it to come to room temperature before serving.

*adapted from eating well