jackalope + the bees knees

Well hello there. Long time so see. Yes I know it’s my fault that we don’t connect more. Yes I know that I promised to keep in touch. Yes I know that fourteen weeks ago I apologized for being so elusive and swore that changes were afoot. Yes I know. But here’s the thing…

I’ve been busy.

To give you an idea of what I’ve been up to I’ve decided to offer you a visual journey through the past fourteen weeks of my life. It begins with tiny little seedlings that I started in ice cube trays in the house, and ends with a shot of the garden in full growing glory. In between there’s a whole bunch of fabulous, frivolous and food-centric fun going on. Okay ready? Here ya go…

grid2

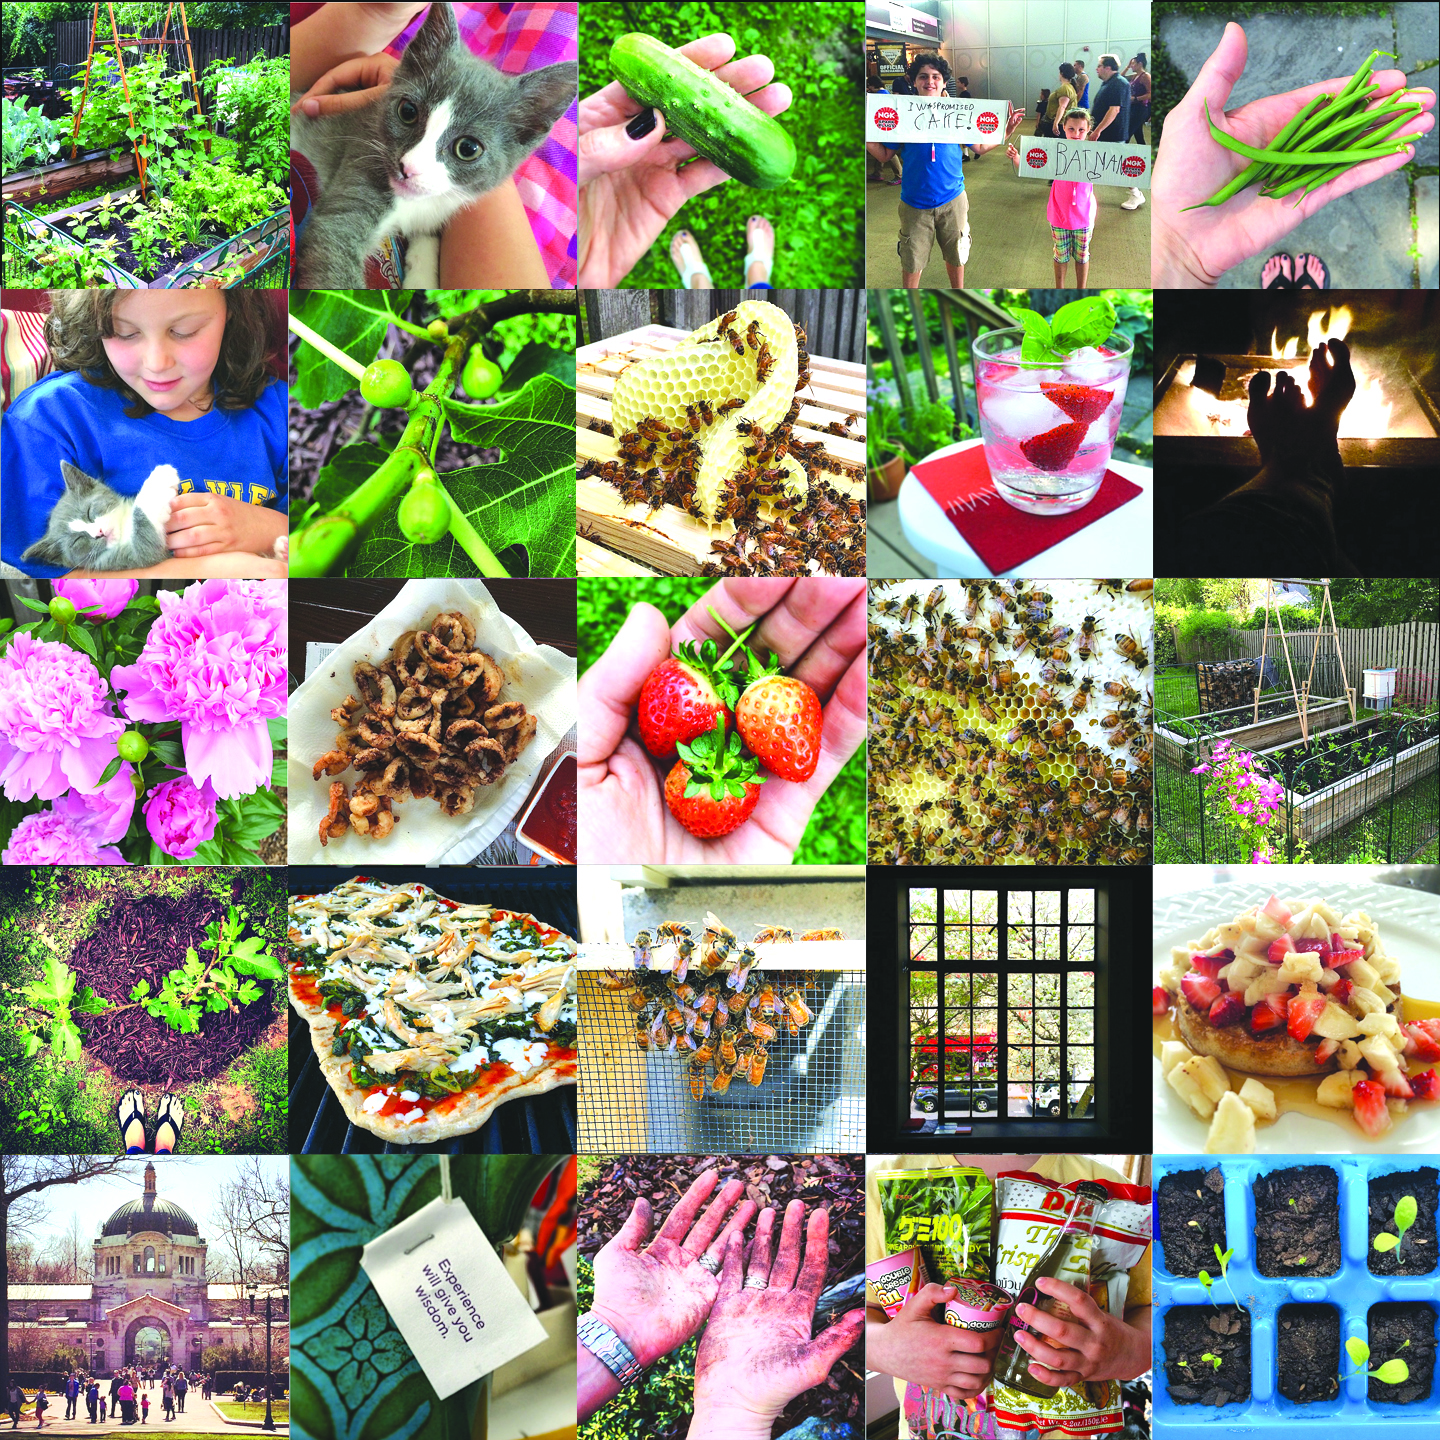
So, besides the obvious gardening and harvesting, cooking and cocktail enjoying (really the key to managing the madness) we’ve also spent some time NYC, we’ve done some shopping at my favorite Asian market (the kids are now Yan-Yan aficionados!), we’ve roasted marshmallows on our new fire-pit and celebrated my littlest loves birthday at Monster Jam (she’s a total tough-chic). You may have noticed all the bee images, that’s because in May we became the host yard to a hive of Italian honey bees. They’re fabulous for my garden, a fantastic learning opportunity for my children and since pollinators are responsible for one out of every three bites of food you eat, they’re my opportunity to give back to Mother Nature. Just after the bees arrived we also became the forever family to a full of spit n’ vinegar kitten. Jack was a tiny ball of fur that was initially considered just another sad story. A few weeks and a whole bunch of TLC and Jackalope (it’s how he gallops) is a happy, healthy, 2 lb 14 oz  mischief-maker and a “I can’t remember what life was like before him” part of our family.

Over the past fourteen weeks we’ve also been busy cooking up a storm on my husband’s new swanky smoker. He’s smoked everything from turkey to pit beef, ribs to red potatoes. I on the other hand have discovered that the GIANT cast iron pan a certain someone gifted me is ideal for outdoor frying– hello chicken and calamari!. Since my last post we also wrapped up baseball and soccer season (and not a minute too soon) and said so long to kindergarten and fifth grade and hello to Summer break (big sigh). Oh and then there’s work, which is crazy and exploding in the best possible way.

So you see, I wasn’t kidding. I’ve been a busy girl!

Since the arrival of the bees I’ve been thinking long and hard about honey. It’s my understanding that with a new hive I may not get honey in the first year. Okay, no biggie. This hasn’t stopped me from perfecting a honey recipe for when that real deal honey from my own hive shows up. You may be thinking honey cake or baklava, used as a glaze or drizzled on homemade yogurt; but you’d be wrong. Nope the recipe I’ve been perfecting is one with such a long and illustrious history that it was once considered illegal. A recipe in fact so perfect that it’s quite honestly “the bees knees.”

“The Bee’s Knees cocktail is a gin, lemon and honey classic that dates back to prohibition. The phrase ‘bee’s knees’ was prohibition-era slang for ‘the best’. In that time, the addition of ingredients such as citrus and honey were often used to cover the less than ideal smell and taste of bathtub gin. Improving the taste of an inferior gin may have been the goal, but the result was a fantastic concoction that can hold its own today.”

At heart I’m a wine girl. However since gin happens to be my favorite summertime spirit, I stumbled across a “Bee Knees” recipe calling for fresh basil (of which I have tons), and I find it impossible to say no to a cocktail with a fun backstory I decided to mix myself up one.

I have but one comment: I would have survived nicely during prohibition.

The Bees Knees with Fresh Basil
Daisy Buchanan may not have added basil to her “Bees Knees,” but that certainly doesn’t mean that you can’t!

bees knees

3 oz. gin
3 large fresh basil leaves, plus a sprig for garnish
1/2 oz. fresh lemon juice
3/4 oz. honey syrup*
lemon seltzer, to taste
lemon rind, to garnish

  1. Add the basil leaves to a cocktail shaker and using a muddler (or handle of a wooden spoon) bruise the basil. Add the gin and lemon juice, fill with ice & shake vigorously.
  2. Strain into a glass filled with ice, add the honey syrup and top with seltzer to taste. Garnish with a fresh sprig of basil, a twist of lemon rind if desired and enjoy!

*To make honey syrup; combine equal parts honey to heated water and stir until honey is dissolved, let cool.

**adapted from aviation gin

Advertisement

the almond milk rescue

I was still on a high from last weeks pretzel success and feeling rather invincible when I decided that this week I would make another attempt at baking “the perfect crusty loaf”. Going back to work has seriously affected the amount of time I have to cook, so when I found a recipe that actually read “1. Mix together all the ingredients in the morning before you go to work. 2. Leave it in the warmest spot in your kitchen and allow to rise for 6-8 hours. 3. When you come home from work…” Are you kidding?!? I had joked that 2014 might be the year I finally achieved baking success, but I didn’t actually believe it. So before I left for work one morning I followed the recipe directions (seriously, I did!); mixed together the ingredients, left the covered bowl in a warm spot, said a quick prayer to the baking gods and hustled myself and the kids out the door. Flash forward eight hours to the biggest epic fail of my baking career. BIGGEST. EPIC. FAIL. After an eight-hour rise the dough was still fairly flat, I gave it a quick knead and attempted a second proofing only to be left with a big sticky mess to clean up and to top the disastrous attempt off nicely—the loaf stuck like glue to the bottom of my brand new dutch oven. Sigh… Calgon take me away.

It seemed a little early for a glass of wine and while I love coffee; freshly ground, freshly brewed, strong coffee, if you know me then you know that the only time of day I actually drink it (or anything caffeinated for that matter) is in the morning. If I need something warm and soothing later in the day then its usually a cup of decaf chai tea with a splash of milk—I love the creamy, spicy warmth that comes with chai. I’ve recently started making green smoothies again which means that I have always have almond milk in the house. I started tinkering around with other ways to use almond milk and discovered that when you heat it up and add lots of spices to it you wind up with the perfect warm, smoothing chai-type drink. Sure it won’t make you the queen of all bakers, but it will warm you from the inside out and offer you a few moments to regroup before the next “perfect crusty loaf” recipe comes along.

Warm Spiced Almond Milk
This recipe also works with regular milk, however I actually prefer it with the almond milk.

almond milk5

2 cups almond-coconut milk
1 tsp. ground cinnamon
1/2 tsp. ground nutmeg
1/4 tsp. ground ginger
1/4 tsp. ground cloves
1/4 tsp. ground black pepper
1/4 tsp. Chinese Five Spice
1/2 tsp. real vanilla extract
2 tsp. honey

  1. Place all the ingredients in a small saucepan. Heat over a medium flame, stirring frequently, until the milk is hot but has not yet begun to simmer.
  2. Stain milk mixture through a fine mesh strainer and into a large mug and enjoy!

lovin’ the herb

I love to grow fresh herbs. I love the smell of fresh herbs. I love to cook with fresh herbs. There’s nothing that says summertime to me more than overflowing pots of lush herbs on my back steps; it makes me happy just to look at them. Sometimes I run my hand along the rosemary or sage stems just to let them give off their lovely aroma. And who doesn’t love the way fresh basil smells. I’ve been thinking I just may start rubbing the leaves behind my ears as my summer scent. Anyway with all these wonderful herbs around I try to use them at every opportunity and since the more you clip herbs the more abundant they become, it’s really a win-win situation.

Finding uses for fresh basil is really a no brainer— as soon as Jersey tomatoes start hitting the farmers market I make a simple caprese salad or a Sweet Summer Sauce with my homegrown cherry tomatoes. Abundant amounts of oregano go into my Smokey Baked Beans, I use fresh rosemary on roasted potatoes and to marinade pork, cilantro has a starring role in my Spicy Corn & Black Bean Salad and what would Herbed Drop Biscuits be without fresh thyme. However as tasty as these few dishes are, they don’t really put a significant dent in my herb supply. I’m always looking for new ways to work fresh herbs into my cooking and my latest creations are a brush on grill sauce for chicken and a creamy buttermilk salad dressing.

The grill sauce is a super simple way to give some fresh summery flavor to chicken or vegetables without much advance prep. Sure it makes a mess of the grill, but the you’ll enjoy dinner so much it will totally be worth a few extra minutes with the grill brush. And the salad dressing is something like a healthy hybrid of caesar and ranch, it turns nothing fancy greens into a salad worth serving guests.

Here’s wishing you a Summer filled with lovely sights, sounds and smells.

Buttermilk & Fresh Herb Salad Dressing
Say so long to that bottle of store bought dressing and hello to yum! I usually sprinkle a bit more shredded parmesan on top of the salad and sometimes a few slivered almonds.

herb salad5

2 tbsp. fresh basil
2 tbsp. fresh dill
2 tbsp. fresh parsley
1 tbsp. fresh tarragon
3 tbsp. sweet onion, diced
2 cloves garlic, chopped
2 tsp. lemon juice
4 tbsp. light mayo
3 tbsp. plain low-fat yogurt
2 tbsp. light sour cream
1 cup reduced fat buttermilk
2 tbsp. shredded parmesan cheese
1 tsp. granulated sugar
1/2 tsp. salt
1/4 tsp. smoked paprika
1/8 tsp. black pepper

  1. Place all ingredients in the bowl of a food processor and pulse until the herbs are finely minced and the ingredients are fully blended.
  2. Pour into a glass jar and chill overnight, allowing flavors to blend, before drizzling over salad greens and serving.

Grilled Chicken with Fresh Herb Sauce
You can brush this on the chicken or vegetables as you grill them. It will make a mess of the grill, but it’s totally worth it!

herb grilled chicken

6 cloves garlic, smashed
1/4 cup apple cider vinegar
1 tbsp. fresh oregano leaves
1 tbsp. fresh parsley leaves
1 tbsp. fresh rosemary
1 tbsp. fresh thyme leaves
1 tbsp. honey
1/2 teaspoon salt
1/2 cup olive oil
1/8 tsp. cayenne pepper
1 package of chicken, thighs or breasts

  1. Place all the ingredients in the bowl of a food processor. Allow to run until herbs are minced and a thick sauce has formed.
  2. Heat grill to medium-high. Brush the chicken with the sauce and begin to grill. Flip and continue to baste with the remaining sauce until chicken is completely cooked.
*adapted from serious eats

“we’re starving!” snack bars

I don’t know about your kids but when mine come home from school they usually ask for a snack. Snacks before dinner are tricky; too much and they don’t eat dinner, too little and they complain that they’re STARVING until dinners ready. I always try to offer them something healthy (which they usually accept without complaint) but sometimes even I know that baby carrots just won’t cut it. Sometimes a snack needs to be healthy, but seem like a treat. Hello homemade snack bars.

I’ve been on a mission to make a granola/snack bar for sometime, but something always went wrong. Too crumbly. Too sticky. Too blech… But being the tenacious type and all, I kept on trying. The recipe I finally achieved success with is super easy; it really only requires melting and mixing; is pretty healthy; almond butter, puffed brown rice, dried cranberries (yeah there’s mini chocolate chips, but just a few) and most importantly my kids love them.

Here’s hoping that yours do as well and that these tasty snack bars buy you a few pre-dinner hours free from starving people underfoot.

Crispy Almond Snack Bars
These bars can easily be adapted to fit your kids’ likes; soy nut butter instead of almond, raisins instead of cranberries and mini m&m’s instead of chips. Go crazy, you have my permission!

new bars2

2 tbsp. butter
1/3 cup chunky almond butter
1/3 cup honey
2 cups puffed brown rice cereal
1/3 cup dried cranberries
1/2 cup slivered almonds, toasted and chopped
1/4 cup mini chocolate chips

  1. Line an 8×8 pan with parchment or wax paper and set aside. In a small sauté pan toast the almonds. Allow to cool slightly and roughly chop.
  2. Place the cereal, almonds and dried cranberries in a large bowl, being sure that cranberries are not all clumped together. Set aside.
  3. In the pan you used to toast the almonds melt together the butter and almond butter, stirring frequently. Remove from heat, add the honey and stir until fully incorporated. Pour the mixture over the cereal and stir to evenly coat.
  4. Press the cereal mixture into the parchment lined pan. Scatter the top with chocolate chips and lightly press them into the sticky cereal mixture. Place the pan in the freezer for 20 minutes to set.
  5. Remove from the freezer, use the parchment paper to lift the contents out and slice into individual bars. Store in the refrigerator in an air tight container between sheets of waxed paper.

All Dressed Up

I am always looking for ways to take the everyday and make it special. Sometimes I do this purely out of necessity (I’m a busy girl after all!) and sometimes it’s just because making a dish entirely from scratch isn’t dramatically better than tweaked up store-bought. I’ll make fancy from scratch frosting to go with boxed cake mix and homemade butter for store baked bread. Even something as simple as a pre-made fruit platter looks fancy when served in a pretty bowl with a few snips of fresh mint on top. I’m all for minimal effort, maximum impact.

As you know by now I love salad. I eat it nearly everyday, especially since I’ve begun harvesting it from my own garden, and I serve it anytime we have a sizable gathering. And what could be easier than a homemade dressing to fancy-up any otherwise ordinary tossed salad. Sure it’s easy to buy a bottle of dressing at the store (actually I usually serve something store-bought alongside my homemade for those “afraid of the unknown” guests) but homemade salad dressing is crazy easy to throw together and much tastier than pre-made.

In the past I’ve made a simple mustard vinaigrette and a garlicky pesto dressing, but having recently made hummus I really wanted to find another use of that container of tahini I had sitting in my refrigerator. Voilà… Lemon, Tahini & Garlic Dressing was born.

Lemon, Tahini & Garlic Salad Dressing
This was delicious drizzled on salad but I imagine it would work as well on a hummus and falafel pita or even steamed greens. And feel free to decrease the garlic and up the honey if a sweeter, milder dressing is what you prefer.

4 tbsp. tahini
3 tbsp. lemon juice
2 tbsp. water
1 tbsp. apple cider vinegar
2 1/2 tsp. honey
3 cloves of garlic, finely minced
1/2 tsp. smoked paprika
1/4 tsp. salt
1/8 tsp. pepper
2 tbsp. toasted sesame oil

  1. Whisk together the tahini, lemon juice, water, vinegar and honey. Add to this the garlic, smoked paprika, salt and pepper. Drizzle in the sesame oil and whisk everything together until it is thoroughly blended.
  2. Adjust the salt and sweetness to your taste, adding a splash more water if you prefer a thinner dressing, and chill for at least 30 minutes to let the flavors meld. Allow it to come to room temperature before serving.

*adapted from eating well

Baking with my Cookie

“Let’s make cookies!” my daughter says on the way home from nursery school one afternoon. “Oh baby, I don’t have the ingredients for cookies, next time I go to the store I’ll get some.” “Yes you do” she replies, “sugar, flour, milk and eggs…” Hmmm, my two-and-a-half year old budding chef might be right, we in fact could make sugar cookies with the ingredients she just rattled off. So, since she specifically requested a little kitchen time with mom (and I would hate to deny my sweet girl), it looked like we’d be baking after lunch.

Here’s something you may not know about me, I don’t like to do anything if it seems too easy. I guess I equate a certain degree of effort with a successful final product. I’m sure plain sugar cookies would of been fine and certainly would of satisfied my daughter’s desire to bake, but in my little head that would of been too simple. I had to make sugar cookies that were a bit fancier. Cookies with some added cinnamon and nutmeg in the dough and then a quick roll in more cinnamon and sugar before baking. Yeah, those are my kinda sugar cookies!

So how did our little mother-daughter baking session go? Well, as is often the case with a two-and-a-half year old her enthusiasm for the project didn’t last long. Once the ingredients were measured and the stand mixer switched on, she was more interested in pillaging the fruit bowl and helping herself to cheese sticks from the fridge. Oh well, there’s always next time.

But the final results, seriously delicious.

Cinnamon-Sugar Cookies
These cookies are fantastic as is or with a glass of cold milk. They’re even better along side of a scoop of vanilla ice cream.


12 tbsp. Smart Balance spread
3/4 cup granulated sugar
1/2 cup brown sugar
1/4 cup honey
1 1/2 tsp. baking powder
1/2 tsp. baking soda
1 tsp. creme of tarter
1 tsp. ground cinnamon
1/2 tsp. ground nutmeg
1/2 tsp. salt
1 tsp. vanilla extract
2 tbsp. milk
1 egg
3 cups flour

For the cinnamon sugar topping:
3 tbsp. granulated sugar
1/2 tsp. ground cinnamon

  1. Preheat the oven to 350°F and line two baking sheets with parchment paper. In a small bowl mix together the cinnamon and sugar for topping, set aside.
  2. To make the dough cream together the softened butter, sugar, brown sugar, honey, baking powder, baking soda, creme of tarter, cinnamon, nutmeg, vanilla and salt. Add the egg and milk and blend into the butter mixture, then slowly stir in the flour.
  3. Scoop out rounded tablespoons of the dough (it will be very soft), shape them into balls, and roll each ball in the cinnamon sugar mixture. Place each ball on the prepared cookie sheet, about 2 inches apart. Bake for 12-16 minutes, until the cookie is golden brown and the tops have begun to crack.
  4. Allow to cool on a wire rack and then try to eat just one. Store remainder in an air tight container.

* I realize you may think I’m crazy to use anything other than butter to make these cookies. I agree it’s unorthodox but here’s the thing, I tested this cookie recipe three times and on the last try I ran out of butter and substituted Smart Balance. While the butter cookies were good, they got hard very quickly sitting in my cookie jar, but the Smart Balance cookies stayed soft and yummy for days. Like the saying goes, “necessity is the mother of invention”…